3. Create the Application Elements for a SharePoint Library
In this step, you generate K2 application elements for the Document Review and Approval application. You will generate data objects based on the Documents to Review and Approve library. For the forms element, you will generate SmartForms that replace the standard SharePoint forms. The workflow element has a single "approval" workflow that you start manually when you need to. In a later step, you will create a second workflow for reviewing documents. Finally, you will create a reports page that displays information about current workflow instances.
For the most part, K2
- For the Documents to Review and Approve library, create a new K2 application with Data, Forms, Workflow and Reports selected. Use the tables below to configure the application elements.
Data SettingsSetting Value Notes Create SmartObject Keep defaults. This is the primary data source for the application. Form Settings
Setting Value Notes Use K2 smartforms as the New, Edit and Display forms for this list/library CHECKED You will use K2-generated forms for adding, editing, or displaying items from this library. Workflow Settings
Setting Value Notes Name Document Approval Workflow This is the name of the workflow as it appears in the K2 Worklist web part and the reports. If you are working in a shared environment where there are multiple builds of the same workflow, consider adding your initials to the workflow name that it is unique. For example, Document Approval Workflow YourInitials.Start Option When the following events occur > Workflow is manually started You will manually start the workflow. Reports Settings
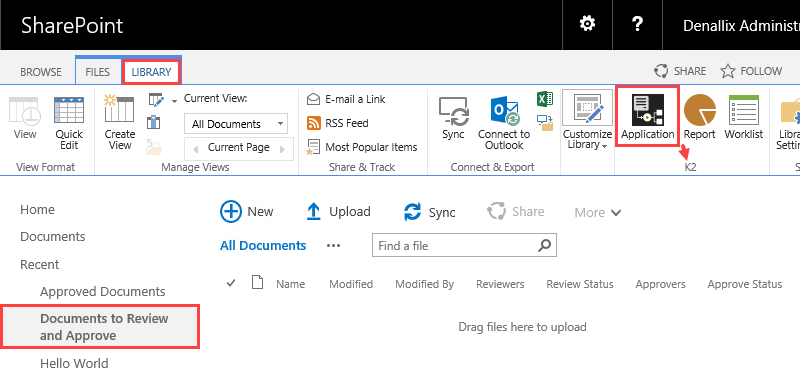
Setting Value Notes CHECKED You will use K2-generated reports for this application. - From the Documents to Review and Approve library, click the LIBRARY tab in the ribbon, then click the Application button found in the K2 group.
- On the Create K2 Application page, configure the Data settings for the new application as follows.
Setting Value Notes Create SmartObject Keep defaults. This is the primary data source for this application. (You do not need to check the option for the legacy designer.) 
- Configure the Form settings for the new application as follows:
Setting Value Notes Use K2 smartforms as the New, Edit and Display forms for this list/library. CHECKED You will use K2-generated forms for adding, editing, or displaying items from this library. 
- Configure the workflow settings for the new application as follows:If you are working in a shared environment where there are multiple builds of the same workflow, consider adding your initials to the workflow name that it is unique. For example, Document Approval Workflow YourInitials.
Setting Value Notes Name Document Approval Workflow This is the name of the workflow as it appears in the K2 Worklist web part and the reports. Start Option When the following events occur > Workflow is manually started You will start the workflow manually when you are ready to submit the document for approval. 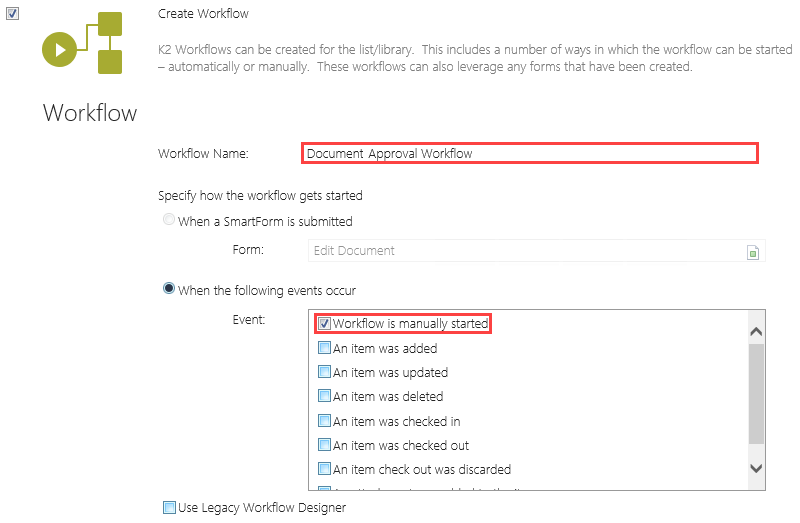
- Select the Reports option, then click OK to create the new application elements.

The K2 Workflow Designer launches.
- From the Documents to Review and Approve library, click the LIBRARY tab in the ribbon, then click the Application button found in the K2 group.
Review
In this step, you generated the application elements for the Documents to Review and Approve library. You selected the data, forms, workflow, and reports application elements. You configured the forms element to use K2-generated SmartForms in place of the standard SharePoint forms. You configured the workflow element to start manually. This creates an on-demand scenario, where you start the workflow only if you need to. In the next step, you begin building out the Document Approval Workflow by adding an Update Document Properties step.