6. Add the Rework Outcome and Requester Rework Task
In this step, you will add a third action, Rework, to the Manager Approval step. The approving manager can now select either Approved, Denied or Rework. The rework outcome connects to a new task, Requester Rework. The leave requester is the task recipient, who must decide to either resubmit the request or cancel the request. To complete this step, you will add a Decision step and a SmartObject Method step. The Decision step generates the outcomes for the Requester Rework task step, while the SmartObject Method step updates the status property.
-
Begin by adding a third action option for the approving manager so that they can send the request back to the requester for rework.
Add a third ACTION to the Manager Approval task and name it Rework. Update the instructions to the manager so that they include the Rework option.- In this step, you will add a third action that allows the approving manager to send the request back for rework. The request routes back to the leave requester, who can either rework and resubmit the request, or cancel the request.
Select the Manager Approval step. Expand the Configuration Panel. Click the Task Detail tab (if it is not already active). Add a third action called
Rework
then update the INSTRUCTIONS so that it includes the Rework action as a decision option. For example,
A leave request has been submitted. Select Approved, Denied or Rework, then click Submit to send your decision.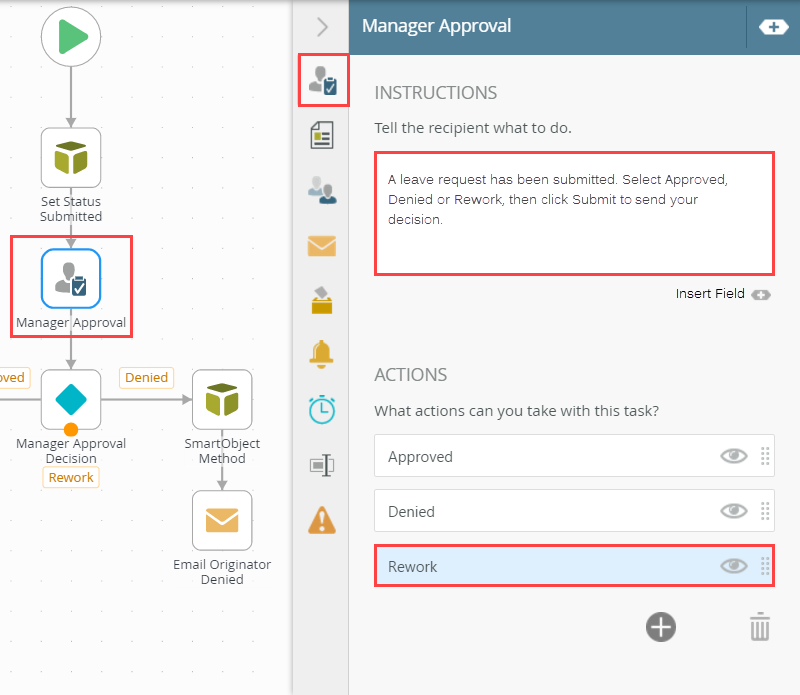
- In this step, you will add a third action that allows the approving manager to send the request back for rework. The request routes back to the leave requester, who can either rework and resubmit the request, or cancel the request.
-
Customize the task notification email using variables from the Context Browser. At runtime, K2 replaces the variables with live data, which personalized the email message. From the Notification tab, add additional content to the SUBJECT line and message BODY using the image below as a guide.
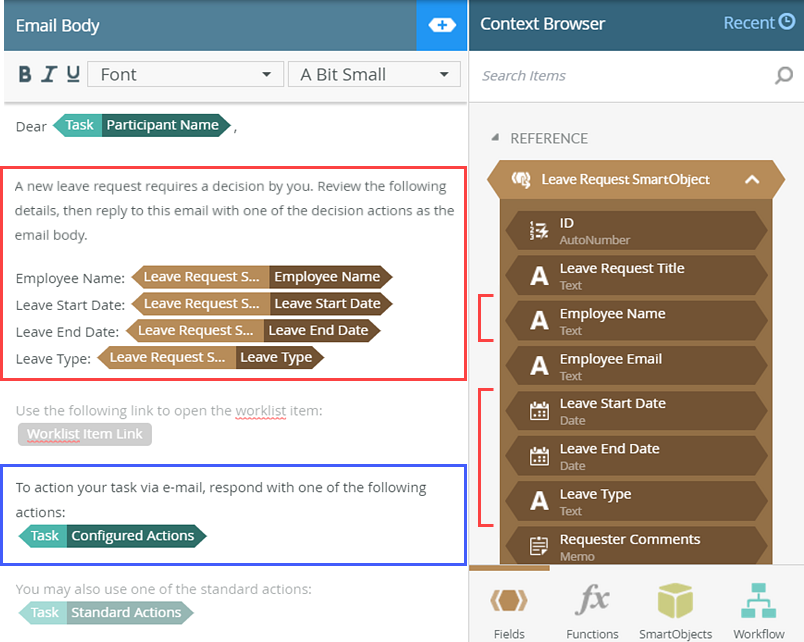
- In the next section, you will customize the task notification email. You will update the subject line and edit the message body so that they include variables from the Context Browser. This personalizes the message and provides more in-depth content so that the manager can make a decision directly from the email itself without opening the form.
Click the Notification tab. CHECK the box to Customize Notification. Expand the Context Browser. Click the link: Open Text Editor (located near the bottom of the screen).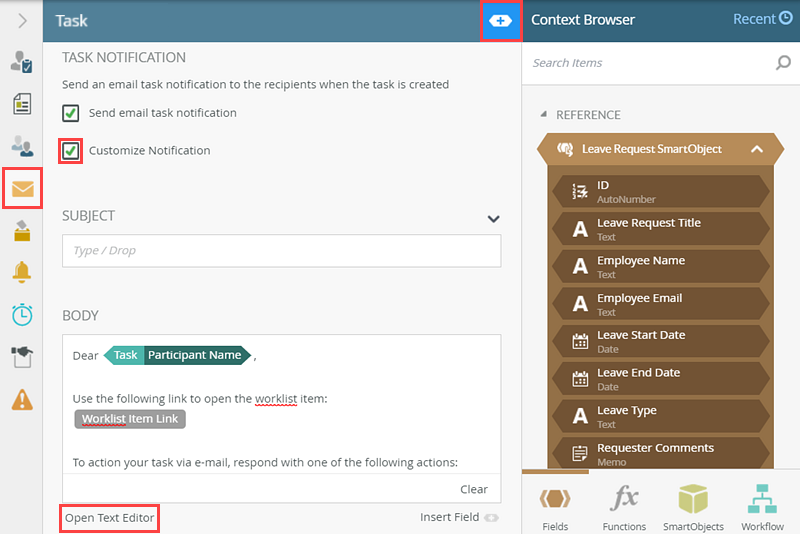
The text editor opens in a new pane. The text editor gives you a better view of the email content, making it easier to edit. K2 loads the default task notification content. You are going to add additional text to the email so that the manager can approve, reject or rework the request using SmartActions. Notice the paragraph in the email that contains the properties called Configured Actions. (Refer to the image in Step (c), blue outline.) At runtime, the email will display the Manager Approval actions you configured (Approved, Denied, Rework) for this task . Using SmartActions, you can reply to the email with one of the actions as the message body. - For the Subject line, enter
Leave Request Submitted: [Leave Request Title]
then append the Leave Request Title to the end of the subject line, replacing the bracketed text. The title property is located in the Leave Request SmartObject under REFERENCE. At runtime, K2 replaces the variables with "live" content. For this application, the subject line includes the Leave Request Title text box entered by the leave requester.
- In the email body, just below the Dear Participant line, enter the following text, then drag variables from the Leave Request SmartObject reference in place of the bracketed text.
A new leave request requires a decision by you. Review the following details, then reply to this email with one of the decision actions as the email body.
Employee Name: [Employee Name]
Leave Start Date: [Leave Start Date]
Leave End Date: [Leave End Date]
Leave Type: [Leave Type]
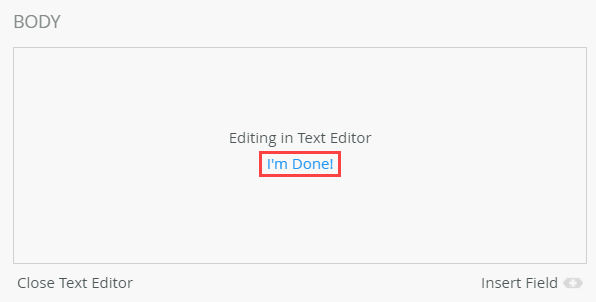
- There are no other configurations, so close the email text editor. Collapse the Context Browser, then collapse the Configuration Panel. To close the email text editor, click the I'm Done link in the message BODY pane. Collapse the Configuration Panel.
- In the next section, you will customize the task notification email. You will update the subject line and edit the message body so that they include variables from the Context Browser. This personalizes the message and provides more in-depth content so that the manager can make a decision directly from the email itself without opening the form.
- Next, you will add and configure the rework Task step and assign it to the leave requester.
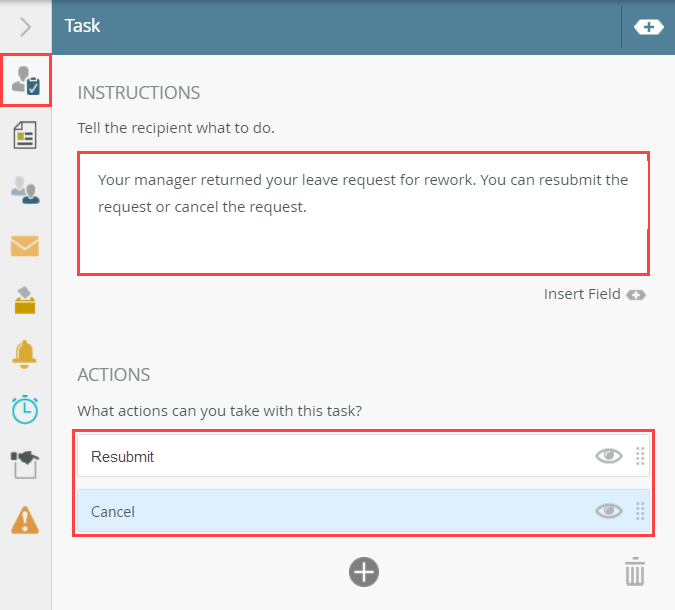
Add a Task step to the design canvas and connect it to the Rework outcome. Configure the Task step as follows:- For the INSTRUCTIONS, enter Your manager returned your leave request for rework. You can resubmit the request or cancel the request.
- For the ACTIONS, enter two actions: Resubmit and Cancel.
- For the FORM TYPE, select SmartForm. For the FORM, select the Leave Request Form. The form configuration wizard launches.
- For the REFERENCES, keep the default settings.
- For the OPEN TASK, select Help me configure it.
- For the FORM STATE, create a new state called Workflow Task (the default state name).
- Keep the remaining default values for the form wizard.
- For the task RECIPIENT, keep the default Originator.
- For the TASK NOTIFICATION, you will not customize this email. Keep the default settings as is.
- For the GENERAL PROPERTIES, rename the step Requester Rework.
- Now that you have a third action, you need to configure the steps for the workflow if it follows that outcome. In this case, you will add a new Task step and assign it to the leave requester. The requester must either rework and resubmit the request, or cancel it entirely.
From the Toolbox > Basic node, drag a Task step just below the Decision step. Connect the Rework outcome to the Task step.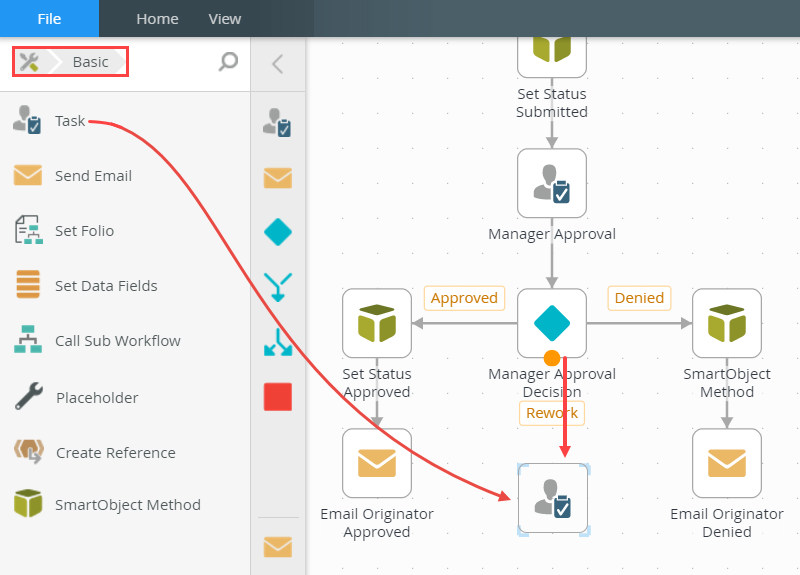
- Next, you will configure the task step for the leave requester. Select the Task step, then expand the Configuration Panel. Click the Task Detail tab (if is not already active). For the INSTRUCTIONS, enter
Your manager returned your leave request for rework. You can resubmit the request or cancel the request.
then add the two ACTIONS for the rework task:
Resubmit
Cancel
- Now you need to add the form for the task. Even though the requester may not actually use the form to respond to the task (more on that later), K2 still needs the form to apply rules for the step and outcome.
Click the Forms tab. For the FORM TYPE, select SmartForm. For the FORM, navigate to, then select the Leave Request Form.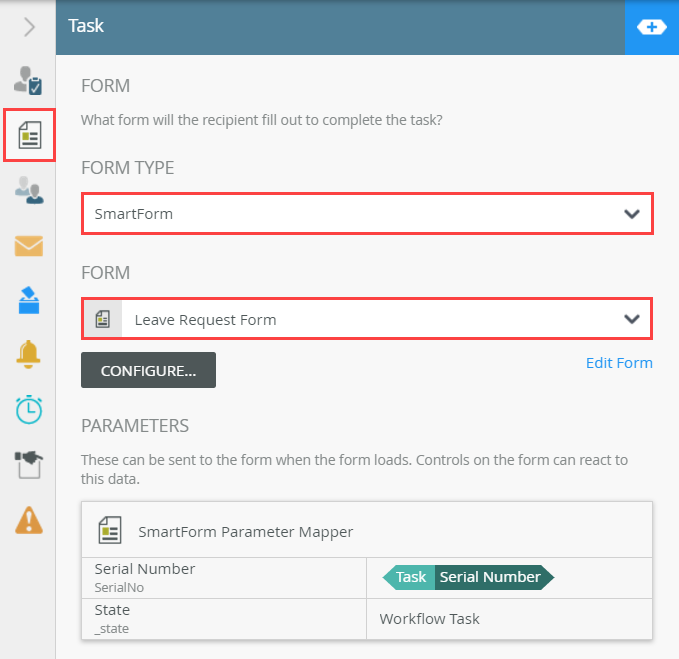
- On the REFERENCES screen, K2 should have found at least one SmartObject, possibly two (Leave Request SmartObject and Leave Types). This lets you know the K2 connection between SmartObject > Form > Workflow is working! Click NEXT.
- On the OPEN TASK screen, select Help me configure it, then click NEXT.
- On the FORM STATE screen, you can keep the default, Create a new State, with Workflow Task the default state name. Click NEXT.
- There are no changes on the OPEN TASK RULE ACTION screen, so click NEXT.
- There are no changes on the AFTER SUBMIT ACTION screen, so click NEXT.
- On the summary screen, review the changes that K2 will make, then click SAVE AND FINISH. When you see the success check, click OK.
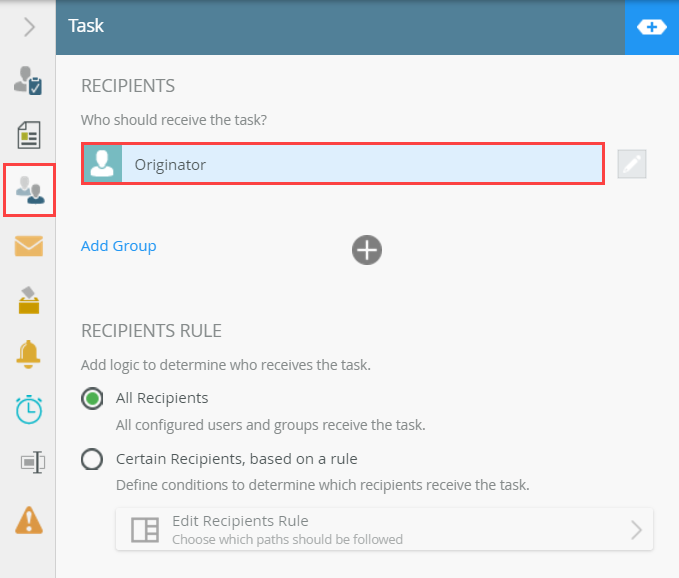
- Next, you will assign the recipient. Click the Recipients tab. Since this is the rework task, the recipient should be the leave requester, or workflow originator. Confirm the RECIPIENTS value is Originator. You won't make any changes to the recipient rules, so you'll move on to the task notification email settings.
- You won't customize this task notification email, so continue to renaming the task step. Click the General Properties tab. Rename the step
Requester Rework
then collapse the Configuration Panel.
The Open Task on a Form wizard launches.
-
Next, you will add a Decision step that generates the outcomes for the Requester Rework task step.
Add a Decision step and connect the Requester Rework step to the Decision step.- From the Toolbox > Logic node, add a Decision step below the Request Rework step. Connect the two steps.
The Decision step generates the outcomes for the rework step (Resubmit and Cancel). You do not need to edit the Decision step properties, so you can continue to the next step. If you need more canvas space, click anywhere on the design canvas, then drag your mouse to move the workflow around the canvas. For example, you can move the workflow up so that you have more room to add to the bottom steps.
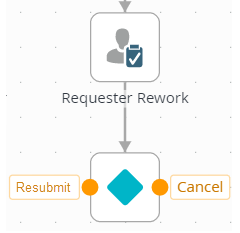
- From the Toolbox > Logic node, add a Decision step below the Request Rework step. Connect the two steps.
The Decision step generates the outcomes for the rework step (Resubmit and Cancel). You do not need to edit the Decision step properties, so you can continue to the next step.
- Connect the Resubmit outcome to the Set Status Submitted step.
- Next , you will configure the steps for the two rework outcomes (Resubmit and Cancel). First, you will route the resubmit outcome back to the Set Status Submitted step so that the workflow returns to a previous step. For the canceled outcome, you will add a SmartObject Method step and set the Request Status property to Canceled.
Connect the Resubmit outcome to the Set Status Submitted step.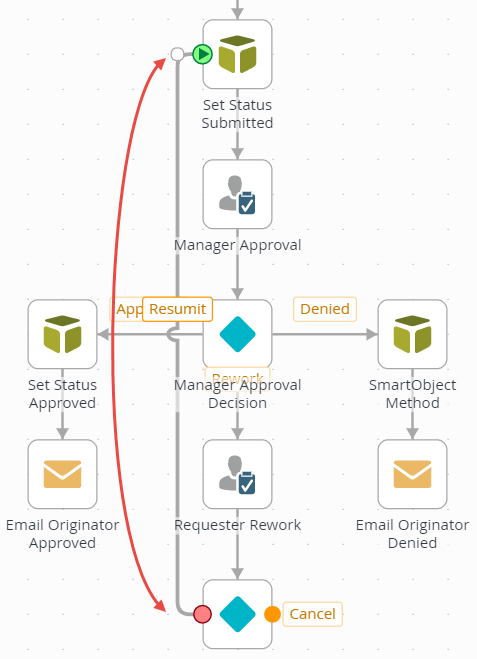
- Next , you will configure the steps for the two rework outcomes (Resubmit and Cancel). First, you will route the resubmit outcome back to the Set Status Submitted step so that the workflow returns to a previous step. For the canceled outcome, you will add a SmartObject Method step and set the Request Status property to Canceled.
-
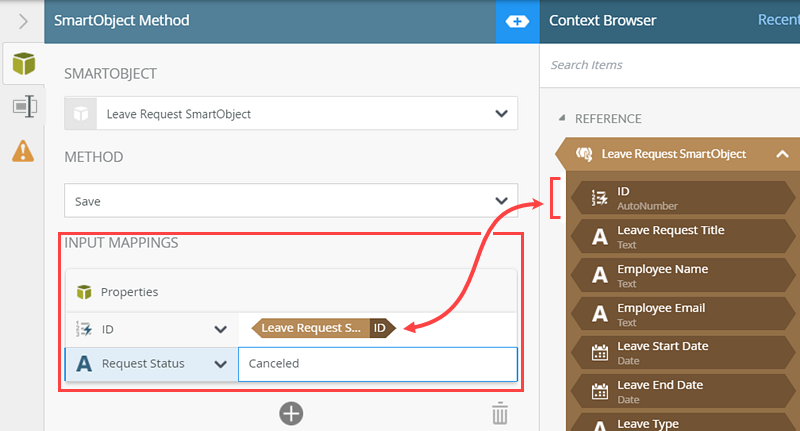
Now, you need to update the request status property if the leave requester cancels their request. This update appears on the Previous Leave Requests list that both the requester and manager sees when they open the Leave Request Form. Add a new SmartObject Method step for the Cancel outcome. For the INPUT MAPPINGS, select both the ID and Request Status properties. Bind the reference Leave Request SmartObject > ID to the INPUT MAPPINGS ID. For the Request Status value, enter Canceled. Rename the SmartObject Method step to Set Status Canceled.
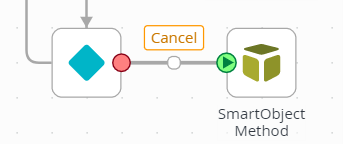
- From the Toolbox > Basic node, drag a SmartObject Method step so that it aligns with the Cancel outcome. Connect the Cancel outcome to the SmartObject Method step.
- Select the SmartObject Method step. Expand the Configuration Panel and click the SmartObject Detail tab. Select the Leave Request SmartObject. Select the Save method. Remember that "save" is the equivalent of "update" in K2 terms.
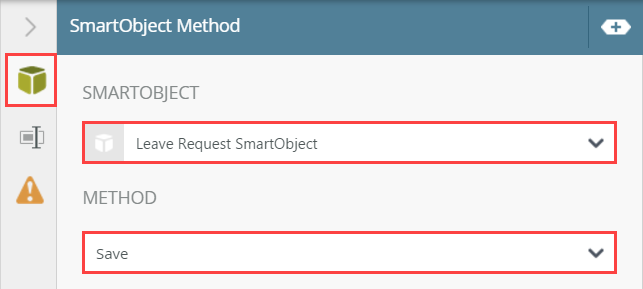
- Expand the Context Browser, then expand the Leave Request SmartObject under the REFERENCE heading. In the center pane, click the Add (+) icon under INPUT MAPPINGS. Select the ID and Request Status properties. (You can select both at the same time, then click outside the list menu to close it.) Drag the reference ID property next to the ID input mapping. For the Request Status input mapping, enter
Canceled.
K2 needs to know which record to update. So you map the ID of the current record back to the SmartObject > ID. Then, you can update any other properties for this same record as you need to.
- Once again, you will give the step a friendly name. Click the General Properties tab. Change the step Name to
Set Status Canceled
then collapse the Configuration Panel.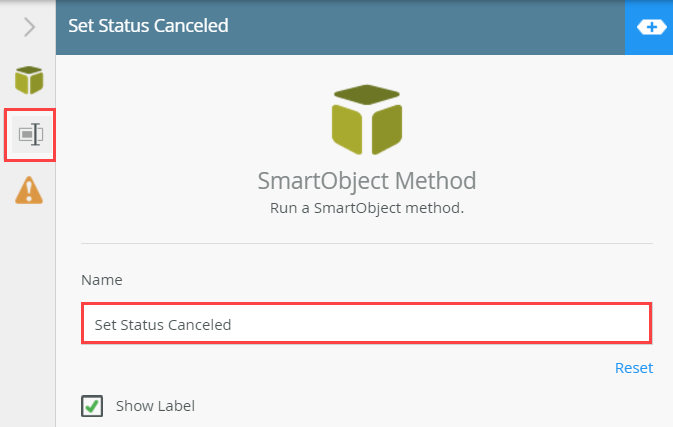
- From the Toolbox > Basic node, drag a SmartObject Method step so that it aligns with the Cancel outcome. Connect the Cancel outcome to the SmartObject Method step.
-
To complete the extended workflow, add End steps and connect them to the Email Originator Approved, Email Originator Denied and Set Status Canceled steps.
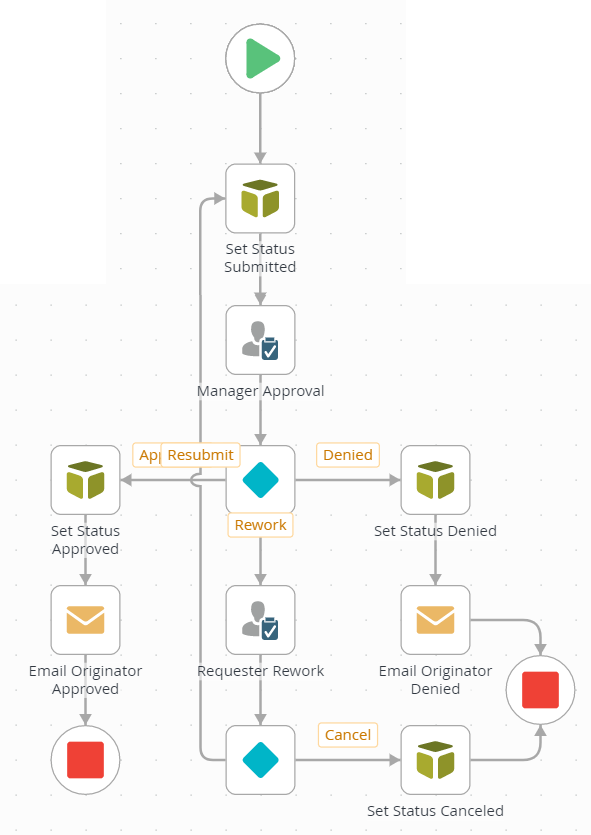
- Next, you will add End steps for the three Manager Approval outcomes (Approved, Denied and Rework). While not required, End steps provide a clear sign that the workflow has come to an end. Other than a visual indicator, the End step has no other function.
From the Toolbox > Logic node, add an End step just below the Email Originator Approved step. Connect the two steps. Add another End step and align it near the Email Originator Denied and Set Status Canceled steps. Connect the email step to the End step. Connect the set status step to the same End step. Use the image below as a guide if necessary.
Your completed workflow should look like the image below.

- Next, you will add End steps for the three Manager Approval outcomes (Approved, Denied and Rework). While not required, End steps provide a clear sign that the workflow has come to an end. Other than a visual indicator, the End step has no other function.
Review
In this step, you added a third action, Rework, for the Manager Approval task. You customized the task notification email to include leave request details. You added a new Task step, Requester Rework, for the Rework outcome. The leave requester is the task recipient and they must decide to either resubmit or cancel the request. You connected the Resubmit outcome to the first status request step and this creates a looping effect. The loop will repeat itself until the manager or the requester chooses a different outcome. Finally, you added End steps. While they are not required, End steps are clear indicators of completed outcomes.