Box storage location

|
This feature is not yet supported in the Lightning Experience DocGen Designer. |
Box integration enables you to store output files to Box. To use Box with Nintex DocGen, install and configure the Box for Salesforce app from the AppExchange.
Prerequisites for using Box with Nintex DocGen
To integrate a Box account and use Box as a delivery option you need to have the following set up in Salesforce and Box.
-
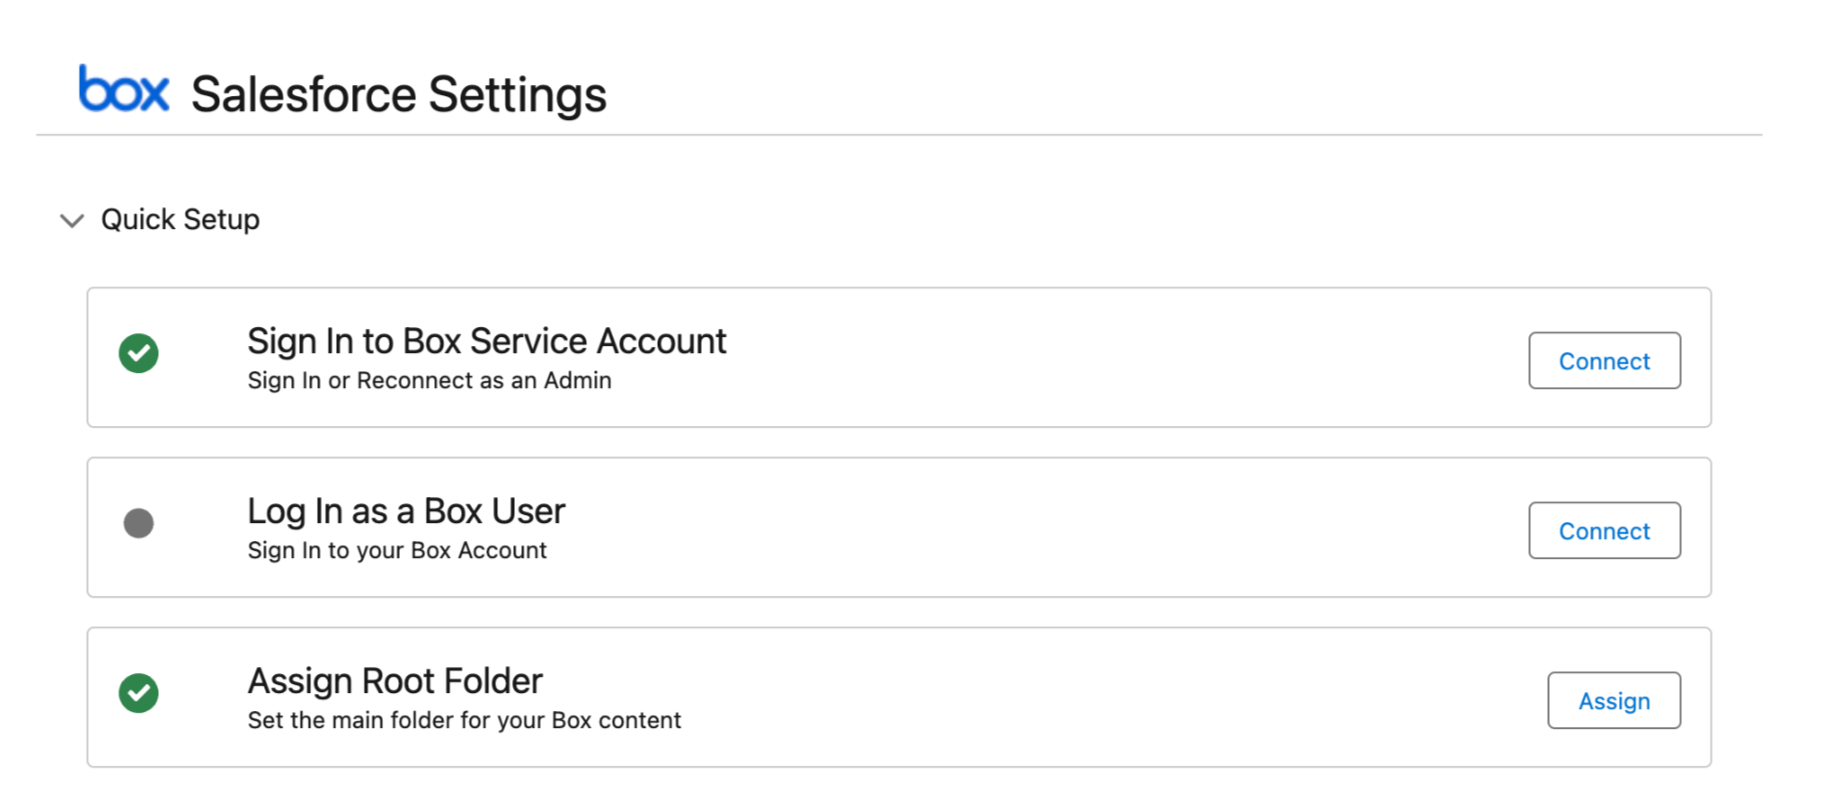
A Box enterprise account with at least one Box user to integrate Box with Nintex DocGen
-
Assign your Salesforce user account "Box Admin" permission set in Salesforce
-
Assign a root folder for the Box content
If your integration has been set up in Salesforce successfully you should see the following in your Salesforce Settings:
For information on setting up the Box integration with Nintex DocGen, refer to the Box section on the Integrations page.
Manage Box
To change authorization for Box or delete the Box integration:
-
In Nintex DocGen, click DocGen Admin.
-
Under Configuration, click Integrations.
-
On the Integrations page, for Box, click Edit to change authorization.
Click Delete to delete the integration.
-
Click Reauthorize.
-
Enter the credentials for the Box admin account and click Authorize. Another prompt appears requesting permissions.
-
Click Grant access to Box.
A success message confirms authorization.
Use Box
Note: Before you can use Box as a storage location ensure that Box has been set up as an integration in Nintex Admin.
Store copies of documents you deliver to Box using Store As on a Delivery Option. If you use Email delivery, you can use Box links. Box links allow you to store your output files to Box and deliver a link to the same document on Box. Instead of sending the actual file through email, you send a link to the file on Box.
Note: You can't access Box links from the DocGen Package Wizard.
To store files on Box:
-
In Nintex DocGen, click DocGen Packages.
-
Under Delivery Options, click New Delivery Option.
The Select Delivery Option Type screen is displayed. -
From Type of new record, select any of the following Delivery Options and click Continue.
-
Email
-
Attach
-
DocGen Queue
-
Download
-
Email
-
HTTP Service
-
SMTP Service
-
-
Fill out all required fields.
-
Under Attach Options, select Allow Document Storage or Require Document Storage. (Skip this step if you selected the Attach Delivery Option.)
-
From Store as, select Box.
-
Click Save.
The Delivery Option Detail page is displayed.
-
(Optional) In Storage Location, click [Change] to store the file in location different than the default location.
The Delivery Option Edit page is displayed.
-
In Storage Folder, enter a folder name.
Note: You can use a tag to have the DocGen Package dynamically generate a folder name. For example, you could enter <<Account_Name>> and the output file will be stored in a folder with the same name as the account.
To send a link to Box using Email delivery:
-
In Nintex DocGen, click DocGen Packages.
-
Under Delivery Options, click New Delivery Option.
The Select Delivery Option Type screen is displayed.
-
From Type of new record, select Email Delivery Options and click Continue.
Fill all the required fields. Do not select Auto send as you can't use Box links with the Auto Send option.
-
Under Attach Options, select Allow Document Storage or Require Document Storage.
-
From Store as, select Box.
-
Select Use Box links.
-
Click Save.
The Delivery Option Detail page is displayed.
-
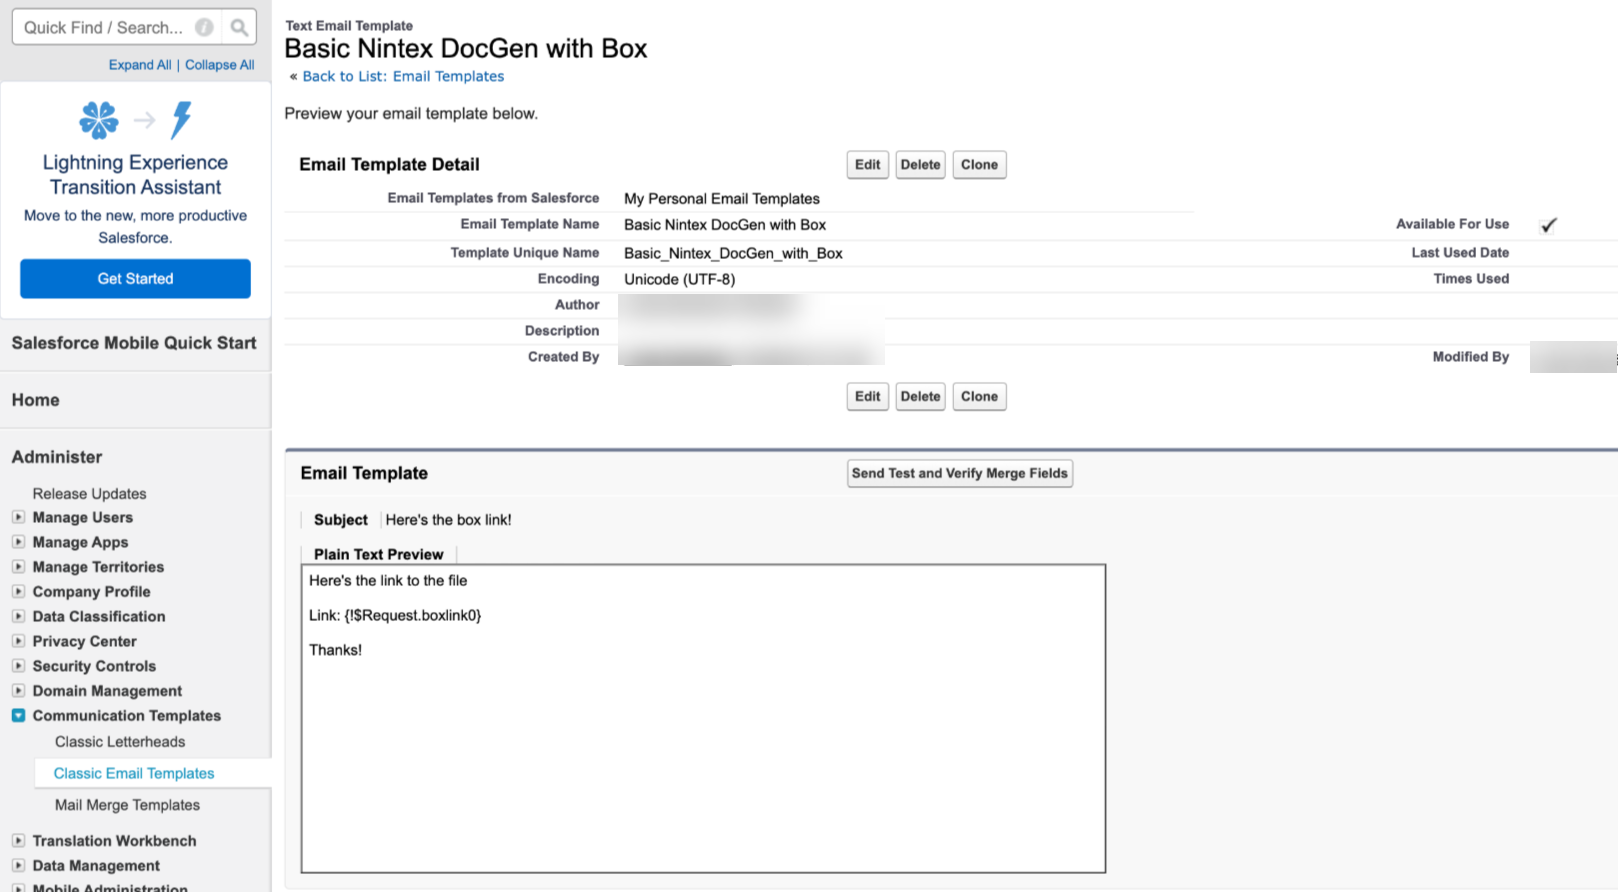
In Email template, the email template you use must include a tag for the merge field using the Box link.
-
Box link: "{!$Request.boxlink0}"
-
-
(Optional) In Storage Location, click [Change] to store the file in location different than the default location.
The Delivery Option Edit page is displayed.
-
In the Delivery Option Detail screen, set the Email Template field to use the template created in Nintex DocGen Classic.
-
In Storage Folder, enter a folder name.
Note: You can use a tag to have the DocGen Package dynamically generate a folder name. For example, you could enter <<Account_Name>> and the output file will be stored in a folder with the same name as the account.