Create Mass button in Lightning
If the Generate Document button has not been added to any of the Salesforce views, or was not previously set up in Classic, then the button needs to be added to Lightning Designer. This section covers how to add the Generate Document button using the Lightning Designer.
Add Generate Document Button
There are multiple stages to adding a Generate Document button in Lighting Designer:
-
Copy the Visaulforce page sample provided below
-
Create a Visualforce Page
-
Create a new Generate Document button
-
Add the button to the page layout
There is also some additional information you can configure once the button has been set up and added.
This is a sample for the ability to specify a contact to meet the Salesforce Contact Email validation requirement and run mass from Custom Objects in Lightning.
The following is a Visualforce page sample referencing the Opportunity object in the ‘standardController’. Replace the Opportunity object with the desired object's API name.
<apex:page standardController="Opportunity" recordSetVar="units">
<script src="/soap/ajax/26.0/connection.js"> </script>
<script src="/support/console/26.0/integration.js"> </script>
<apex:dataTable value="{!selected}" var="un">
<apex:column >
<apex:outputLabel styleClass="ids">{!un.Id}</apex:outputLabel>
</apex:column>
</apex:dataTable>
<style>
.ids{visibility : hidden}
</style>
<script type="text/javascript">
document.addEventListener("DOMContentLoaded", function(event) {
var elems = document.body.getElementsByClassName("ids");
var ids = new Array();
for (var i = elems.length - 1; i >= 0; i--) {
ids[i] = elems[i].innerHTML;
}
console.log(ids);
if (!ids || ids.length < 1)
alert('Please select at least one record.');
else
{
var instanceName = window.location.hostname;
var newLocation = '/apex/loop__jobqueuestatus';
console.log(instanceName+newLocation);
var redirectUrl = '/apex/loop__masslooplus?';
redirectUrl += '&recordIds='+ids.join(',');
redirectUrl += '&sessionId={!$Api.Session_ID}';
redirectUrl += '&retURL='+newLocation;
if (sforce && sforce.one && sforce.one.navigateToURL) {
sforce.one.navigateToURL(redirectUrl);
} else {
window.location.href = redirectUrl;
}
}
});
</script>
</apex:page>
Create a new Visualforce page:
-
Navigate to Salesforce setup.
-
Use the Quick Find box to search for Visualforce Pages .
-
Click New.
-
Create a unique name in the format “MassLightning{object}”, for example 'MassLightningOpp'.
-
Select Available for Lightning Experience.
-
Paste the sample above into the Visualforce Markup section.
-
Add the desired object API name for the ‘standardController’. For example, <apex:page standardController="Opportunity" recordSetVar="units">
-
Click Save.
Create a New Generate Document button:
-
Navigate to Salesforce Setup.
-
Select Object from Object Manager menu.
-
Select Button, Links, and Actions.
-
Click New Button or Link.
-
Create a name for the label in the Label Name field.
-
Under Display Type, select List Button with Display Checkboxes.
-
In Behavior, pick the desired behavior.
-
In Content Source, select Visualforce Page
-
Select the created Visualforce Page from the list.
-
Click Save.
Add Button to Layout
-
Navigate to Salesforce Setup.
-
Select Object from Object Manager menu.
-
Select Search Layouts or Search Layouts for Salesforce Classic section.
-
Click Edit on the List View Layout.
Or
-
Select the newly created button from the Available Buttons list.
-
Add it to the Selected Buttons list.
-
Click Save.
Add additional parameters below the {'redirectUrl += '&sessionId={!$Api.Session_ID}';} line:
-
Email with Mass
-
If the Delivery Option is set to Email, a contact field needs to be configured in the Visualforce Page.
-
redirectUrl += “&contactfield=APINAME_OF_FIELD”;
-
Replace the APINAME_OF_FIELD with the desired contact field API.
-
-
-
Specify Document Packages and Delivery Options
-
To specify Document Packages and Delivery Option, add the following line and parameters.
-
redirectUrl += "&ddpIds=PACKAGE_ID&deploy=DELIVERY_ID";
-
Replace the PACKAGE_ID & DELIVERY_ID with the desired record ids.
-
-
-
Run Automatically
-
To bypass the user selection page, add the &autorun=true parameter.
-
redirectUrl += "&autorun=true";
-
-
-
Redirect after generation
-
By default, the Job Queue Status has been chosen to be the redirect location.
-
A Salesforce Lightning List View can be chosen as an alternative. This can not be dynamic unless you wish to develop the code and button independently.
-
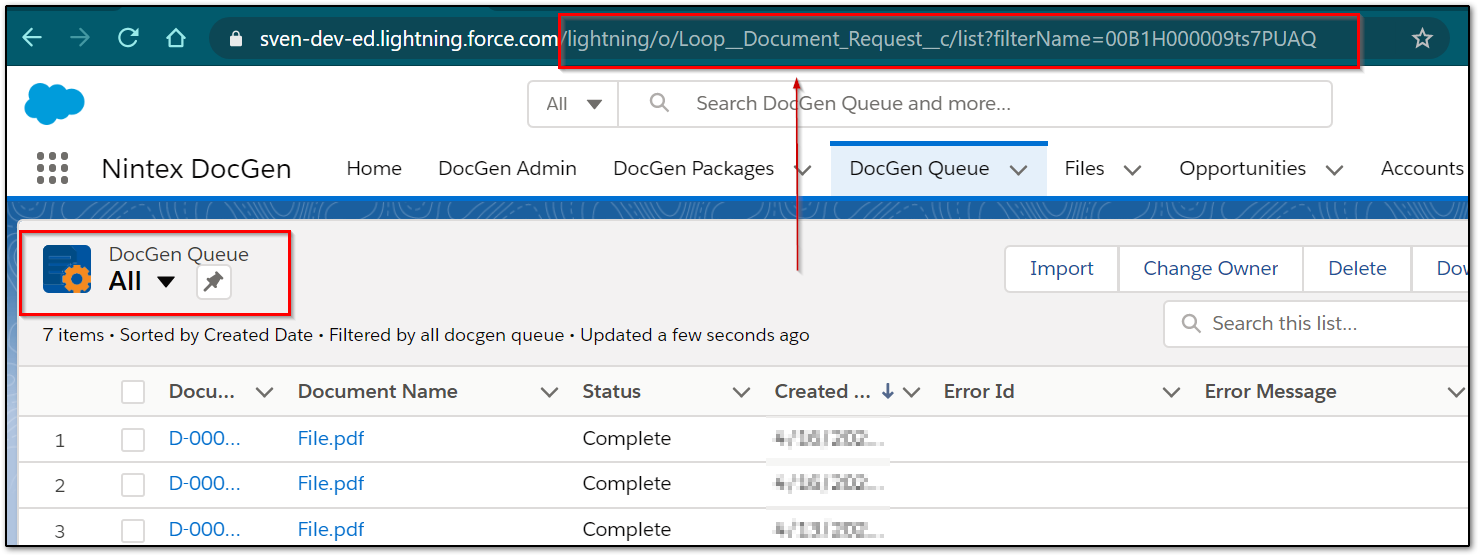
Navigate to the desired List View in Lightning and copy the information after the ".com".
-
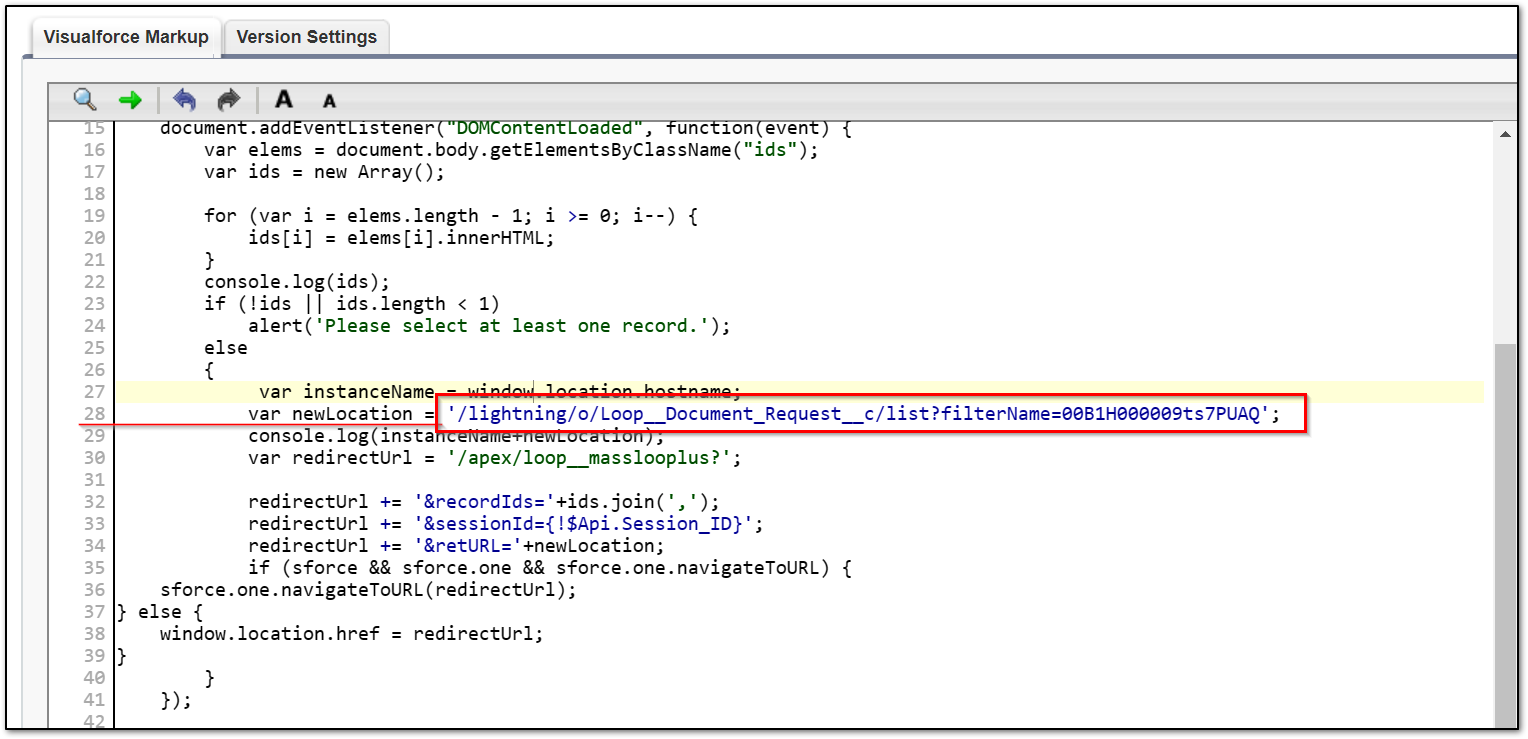
Replace /apex/loop__jobqueuestatus in line 28 of the Visualforce page with the desired URL.
-
See example below:
-
-
Get the URL

-
Add URL to the Visualforce page.

-