You can integrate Sertifi with Nintex Drawloop DocGen® for Salesforce to deliver documents for an electronic signature.
Integrate Sertifi with Nintex Drawloop DocGen® for Salesforce
First you install Sertifi, then you configure it. Once you configure Sertifi in your organization, Nintex Drawloop DocGen® for Salesforce automatically adds Sertifi to the list of available delivery options.
Install the Sertifi for Salesforce app
Install the Sertifi app from the AppExchange. You don't need a Sertifi account to install the app. You can get a Sertifi account by installing and configuring the Sertifi app.
To install Sertifi for Salesforce app
-
From the AppExchange, install the Sertifi for Salesforce app.
For more information, see Sertifi for Salesforce.com Installation Guide on the Sertifi Support Center (scroll to the bottom of the page).
Configure the Sertifi for Salesforce app
You set up your Sertifi account and get your API Code by using the Sertifi app from within Salesforce. After you get your Sertifi account, you configure custom settings for the Sertifi app, then configure network access. You can optionally add the Sertifi related list to page layouts, so that you can track signing information from your Sertifi deliveries.
To configure your Sertifi account
-
From Setup, click Installed Packages to display a list of the packages installed in your organization.
-
In Installed Packages, click Configure for the Sertifi package.
Note: Ensure the configured user for Sertifi is an active user in Salesforce. This will allow the user to see the status of documents in DocuSign.

The New Sertifi E-Sign Account windows appears.
-
Type account information for the following fields:
Field
Description
Account Title Type your company name. Account URL Type a value. The value you use here appears in the administration URL for managing your account and the documents you send with Sertifi. Salesforce Login* Your Salesforce user name for the organization that hosts the Sertifi app. Salesforce Password* Your Salesforce password for the user name listed above. * You must add Salesforce credentials to get data back from Sertifi.
-
Click Save.
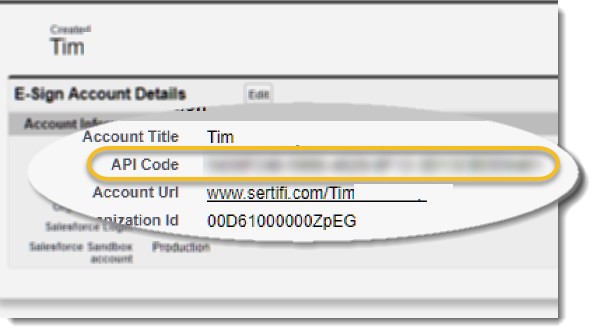
Your API code appears along with your Sertifi account information.

-
Note your API Code. You will need this for the next step.
-
From Setup, enter Custom Settings in the Quick Find box, then click Custom Settings to display a list of the apps with custom settings in your organization.
-
In Custom Settings, click Manage for Sertifi Application Settings.

-
Click New.
-
Type information in the following fields:
Field
Description
Name You must type Settings. APICode Type the API Code here. LinkObjectType Type the name of the Salesforce object from which you will generate documents in Nintex Drawloop DocGen® for Salesforce. SFDataIntegration Select this checkbox. This enables Sertifi to send data to your organization. -
Click Save.
To configure network access for Sertifi
-
From Setup, enter Network Access in the Quick Find box, then click Network Access to display a list of trusted IP ranges in your organization.
-
Click New.
-
In Start IP Address, type: 204.93.207.36
-
In End IP Address, type: 204.93.207.46
-
Click Save.

