Worklist Control
The Worklist control is available in the K2 smartforms View Designer and is a predefined list containing all the work items for the current user that has been generated and assigned by the workflow. You can use the Worklist to action the items assigned to you. The functionality of the Worklist control is similar to the current worklist found in K2 blackpearl. For more information on the features of the K2 blackpearl Worklist, see the following sections in the K2 blackpearl User Guide:
- Existing workflow instances
- Create a View or a Form
- Drag the Worklist control onto the canvas. The control can be found in the Worklist section of the Controls found in the View Designer, see the Properties section below
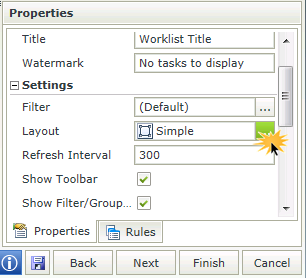
- Configure the properties of the Worklist control as required, see the Properties section below
- The Worklist control can be used on a View or a Form
- Work items displayed in the Worklist are those assigned to the current signed in user
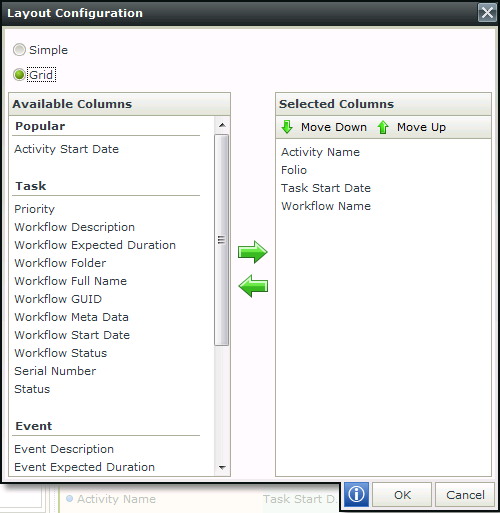
- A list of columns to be displayed in runtime is available and can be accessed by selecting Grid from the Layout property of the control. The user can select or deselect columns to customize the display of the Worklist control in runtime
- When applying a filter to the Worklist in runtime, the filter is only valid for the duration of the browser session. If a new browser session is opened, the filter created in design time will apply
- When using custom themes, ensure to specify the CSS classes for the elements
- Work items assigned to the user and started from any workflow designer such as K2 Studio, K2 Designer for Visual Studio, K2 Designer and K2 Designer for SharePoint are available using the Worklist control
- The Worklist control uses the default value for the current environment for the K2 Web Service URL field. The hostname, rather than IP Address is used to check for work items. If the hostname is not mapped to any IP Address, it will not return any work items
The Worklist control is available in the Worklist section of the Controls found in the View Designer.
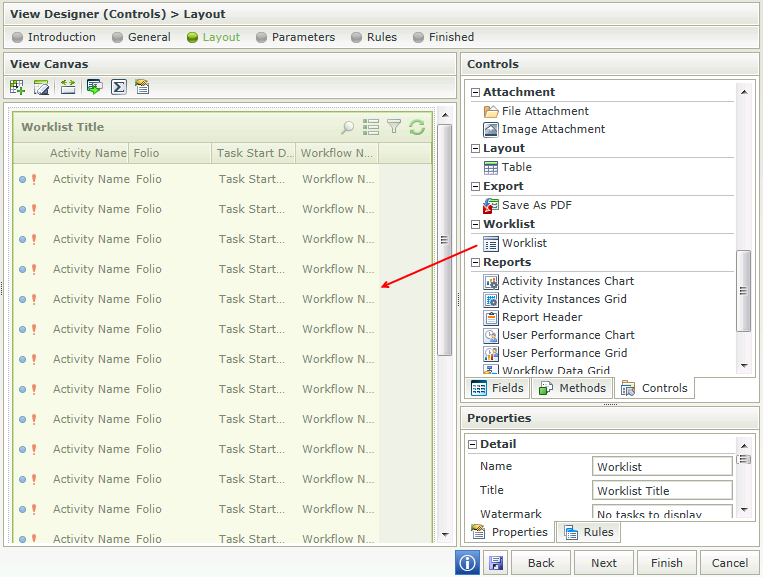
| Property | Description | Can be set in runtime using Rules |
|---|---|---|
| Detail | ||
| Name | A unique identifier for the selected control. This property is required | No |
| Title | The Title of the Worklist to be shown in runtime | Yes, see Control Properties Actions for more information |
| Watermark | The text to display when the control is not populated | No |
| Settings | ||
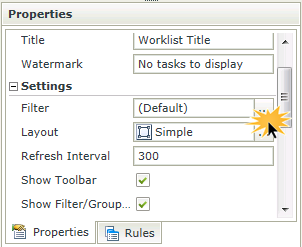
| Filter | Enables filtering and sorting of the data returned in runtime | Yes, see Control Properties Actions for more information |
| Layout | Enables the layout to be configured. Columns can be selected, deselected and moved as required. The Simple option displays the Activity Name, Folio, Activity Start Date and Process Name. Click on the ellipsis, select Grid and specify the columns to be displayed in runtime. Move columns up and down as required | Yes, see Control Properties Actions for more information |
| Refresh Interval | Indicates the time that will elapse before the worklist is automatically refreshed . Value is noted in seconds. Specify the interval to be used | Yes, see Control Properties Actions for more information |
| Show Toolbar | Shows or hides the Toolbar containing the Search and Multiselect icons | Yes, see Control Properties Actions for more information |
| Show Filter | Shows or hides Filter/Grouping in runtime | Yes, see Control Properties Actions for more information |
| Show Search | Shows or hides the Search at runtime | Yes, see Control Properties Actions for more information |
| Enable Search | Enables the search functionality at runtime | Yes, see Control Properties Actions for more information |
| Show OOF items | Shows the work items assigned to the user along with those whose original destination is not the current user. These have been assigned to the current user since the original destination user setting is set to Out Of Office. More information on the Out of Office feature can be found in the K2 blackpearl User Guide>Out of Office | Yes, see Control Properties Actions for more information |
| Rows | Indicates the number of work items to be displayed on the page. If the number is reached in runtime, the option is available at the bottom of the page to load the same number of items in addition to the current items. Specify the number of items to be displayed when the worklist is opened | Yes, see Control Properties Actions for more information |
| Action Menu Items |
Shows the menu items selected on the worklist item at runtime. The following items are available:
|
Yes, see Control Properties Actions for more information |
| General | ||
| Height | Adjusts the height of the control. Any whole number or pixel value to a maximum of 32767px can be entered. Type the dimension to be used | Yes, see Control Properties Actions for more information |
| Width | Adjusts the width of the control. Any whole percentage up to 100%, whole number or pixel value to a maximum of 32767px can be entered. Type the dimension to be used | Yes, see Control Properties Actions for more information |
| Visible | Shows or hides the control in runtime | Yes, see Control Properties Actions for more information |
| Styles | Opens the Style Builder enabling the user to specify style features like Format, Font, Borders, Padding and Margins. See the Style Builder topic for more information on styling options | No |
| Conditional Styles | Opens the Conditional Formatting Designer. This is used to design styles that will apply only when certain conditions are met. See the Conditional Styles section for more information | No |
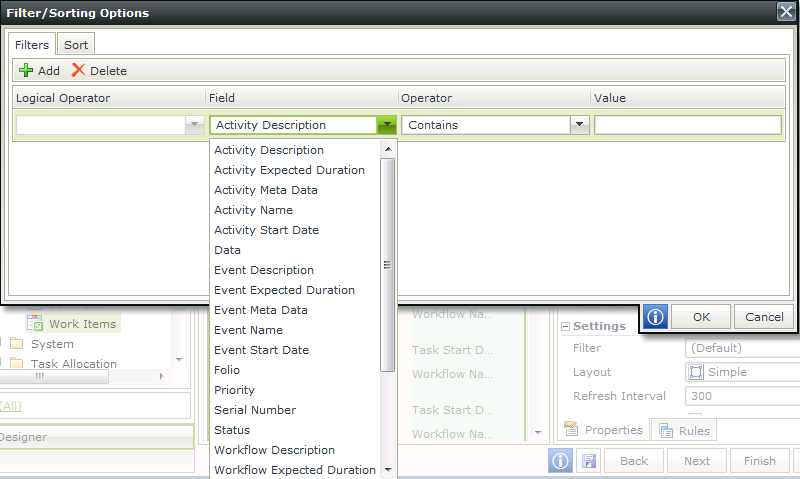
Clicking on the ellipsis next to the Filter property, opens the Filter/Sorting Options dialog. Filters can be configured in design time to be applied in runtime. Multiple filters can be configured by using the Add button. When changing the filter in runtime, the filter is only valid for the duration of the browser session. If a new browser session is opened, the filter created in design time will apply
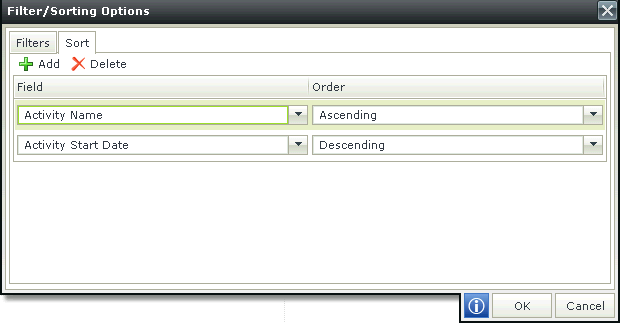
Selecting the Sort tab on the Filter/Sorting Options dialog enables the user to configure the sorting options to be applied in runtime. Multiple items can be added by using the Add button and will be sorted in the order they are listed.
Clicking on the ellipsis next to the Layout property opens the Layout Configuration dialog. Columns can be added or removed and ordered using the Move Up and Move Down buttons to fit the user's requirements. This will affect the display of the columns at runtime. This configuration is applied at runtime and cannot be changed by the user at runtime.
Certain actions are available using the Worklist control at runtime. These actions will enable you to manage the worklist item.
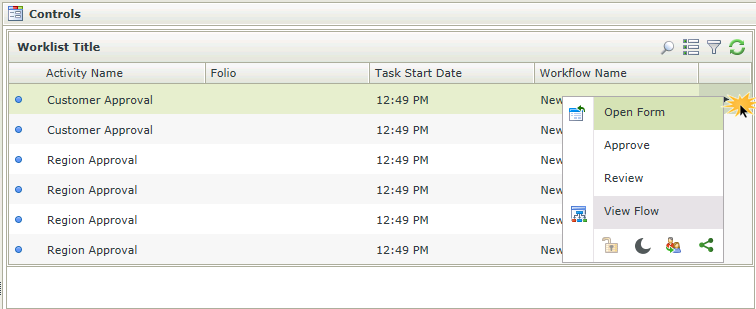
Select one of the following Worklist actions by clicking the drop-down arrow next to the work item:
| Feature | Icon | Description |
|---|---|---|
| Open Form | Selecting Open Form will open the work item in the selected forms technology such as InfoPath, an ADO.NET form or SmartForms | |
| Action(s) | Displays the actions available on the task such as Approved or Review | |
| View Flow | This feature provides a detailed view of the actions taken during the process, see the View Flow topic in the K2 blackpearl User Guide for more information | |
| Release |
|
This feature provides the ability to release an item that has been opened enabling other destination users to action the item |
| Sleep |
|
Pauses or suspends a work item for a period of time. The work item is visible but cannot be actioned |
| Redirect |
|
This feature allows a user to send the selected work item to a specific workflow participant to process. The work item will be removed from the current users Worklist and will appear in the selected user's Worklist. |
| Share |
|
Allows a work item to be allocated to a different user for processing. The work item will appear in both the users' Worklist. The first user to select the work item will process the item |
To learn about dynamic roles and advanced destination planning, including specific examples of activity planning based on common business scenarios, visit the following link http://old.k2underground.com/files/folders/technical_product_documents/entry20948.aspx
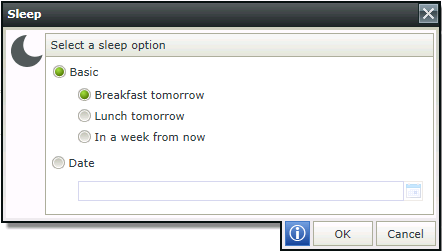
The "Sleep" action allows you to pause or suspend a work item for a period of time. The work item is visible but cannot be actioned.
To pause or suspend a work item click the drop-down arrow next to the work item and select Sleep. Select a Sleep option.
| Feature | Description |
|---|---|
| Basic | |
| Breakfast tomorrow | The item is paused until 8 AM the following day |
| Lunch tomorrow | The item is paused until 1 PM the following day |
| In a week from now | The item is paused until 8 AM the following week |
| Date | |
| Date | Select the calendar icon to specify a date until which the task item must Sleep until. |
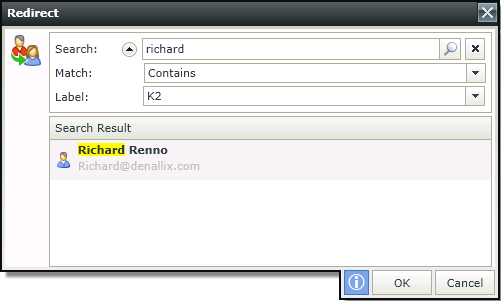
The “Redirect” action allows you to move a work item to another user. Once you Redirect a work item, that item will not be available on your own worklist but it will appear on the other user’s worklist, and he/she may open and complete the item.
To Redirect a work item to a different user click the drop-down arrow next to the work item and select Redirect. The Redirect window will open. Search for Users, Groups or Roles.
| Feature | Description |
|---|---|
| Search | Type part or the full name of the user, group or role the task is to be redirected to and click the Search icon |
| Match | Click on the drop-down and select the match option such as Contains, Equals etc to use in the search |
| Label | Click on the drop-down and select the security label to use in the search |
| Search Result | Displays the names returned from the search. Select the user the task will be redirected to |
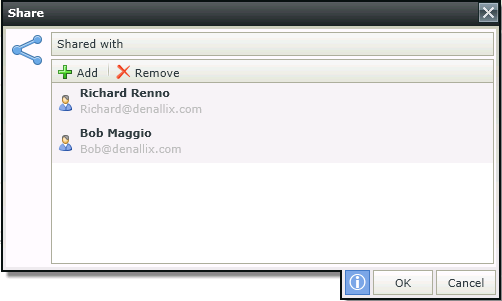
The “Share” action allows you to share the selected work item with another user. Once you Share a work item, that item will still be available on your own worklist but it will also appear on the other user’s worklist, and either one of you may open and complete the item.
To share a work item with a different user or users click the drop-down arrow next to the work item and select Share. The Share window will open.
| Feature | Description |
|---|---|
| Add | Click Add to add a user or users to share with |
| Remove | Click Remove to remove the selected user from the list |
| Shared with | Displays a list of users the work item will be shared with |
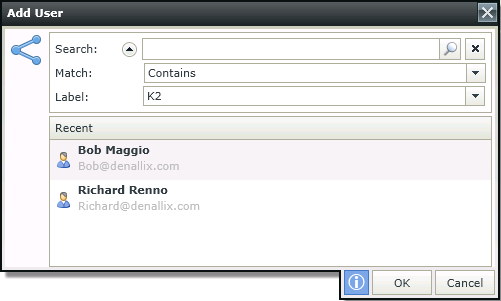
Click the Add button to share the item with a user, group or role. More than one user can be added.
| Feature | Description |
|---|---|
| Search | Type a user's name in the Search box. |
| Match | Click on the drop-down and select the match option such as Contains, Equals etc to use in the search |
| Label | Click on the drop-down and select the security label to use in the search |
| Recent | Displays the name of the user or users returned from the search |
The "View Flow" action provides you with a detailed view of the actions taken during the workflow of the selected work item. See the View Flow topic in the K2 blackpearl User Guide for more information
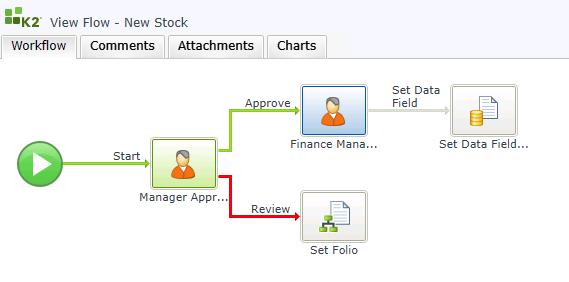
To view the flow of a work item click the drop-down arrow next to the work item and select View Flow. The View Flow of that specific work item will open. The Workflow tab of the View Flow represents the steps of the workflow and which route has been taken. In the example below we can see that the “Manager Approval” task was completed with an outcome of “Approved”, and the workflow is currently waiting for the “Finance Manager Approval” task to complete
To interpret a View Flow diagram remember:
- Line Rules that evaluated to true, and were successful are colored green
- Lines Rules that evaluated to false, and were not successful are colored red
- Skipped lines or not yet evaluated lines remain clear
Process Summary
When clicking on the Start activity, the Process Summary dialog opens which contains the Overview and Process Data tabs.
The Overview tab contains the details of the Workflow.
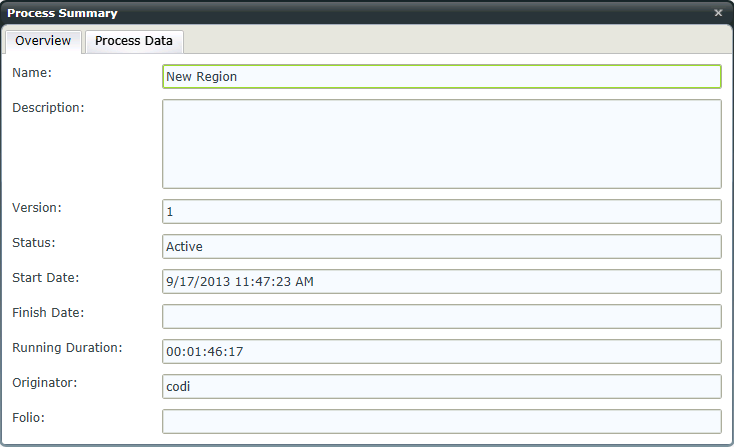
| Feature | Description |
|---|---|
| Name | This is the Name of the Workflow as configured in any of the K2 designers |
| Description | This is the Description as configured in any of the K2 designers |
| Version | This is the version of the Workflow for which a Workflow instance was started |
| Status | This is the status of the Workflow instance e.g. completed, active, error etc |
| Start Date | This is the date that a Workflow instance was started |
| Finish Date | This is the date that the Workflow instance was finished |
| Running Duration | This is the actual duration of the Workflow instance from the start until the present or until completed. |
| Originator | This is the person where the Workflow instance originated from, i.e. the person who started the Workflow instance |
| Folio | This is the Folio used when the Workflow instance was started |
The Process Data tab contains the details of the Workflow Data Fields. Columns can be re-sized by dragging the column lines as required. If the value of a Data Field or XML Field has changed in the process, a View link will be displayed. Click on the link to view the changes or hover over the item.
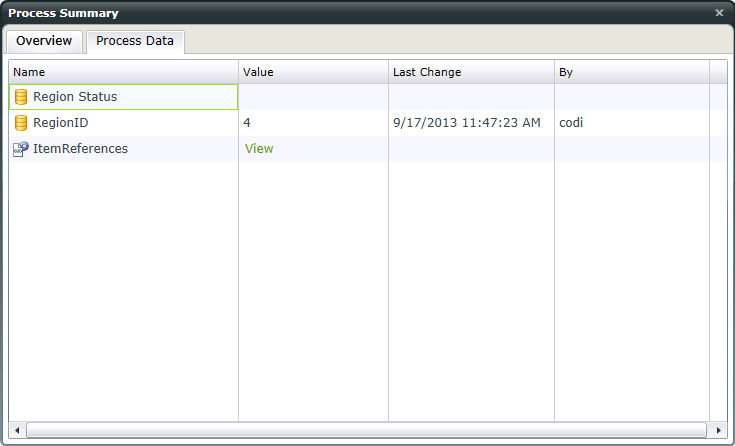
| Feature | Description |
|---|---|
| Name | The name of the data field |
| Value | The value of the data field |
| Last Change | If the current value is different from the initial (default) value, this field will be populated with the date it was changed. |
| By | If the current value is different from the initial (default) value, this field will be populated with the person who last changed the data field |
Activity Summary
When clicking on an Activity, the Activity Summary dialog opens which contains the Overview, Participants, Process Data tabs.
The Overview tab contains the details of the specific Activity.
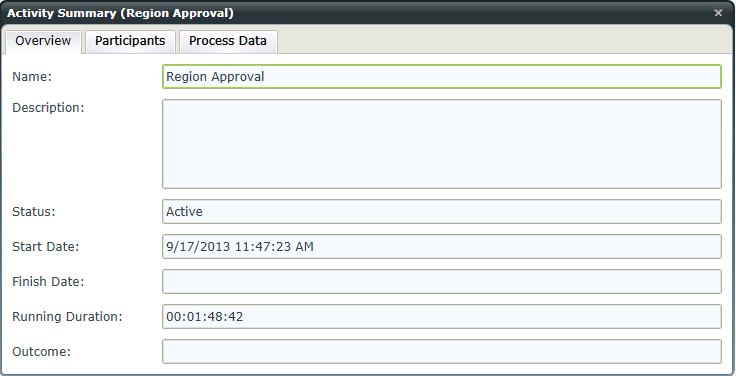
| Feature | Description |
|---|---|
| Name | This is the Name of the Activity as configured in any of the K2 designers |
| Description | This is the Description as configured in any of the K2 designers |
| Status | This is the status of the Activity instance e.g. completed, active, error etc |
| Start Date | This is the date that an Activity instance of the workflow was started |
| Finish Date | This is the date that an Activity instance of the workflow was finished |
| Running Duration | This is the actual duration of the activity from the start until the present or until completed |
| Outcome | This is the Outcome as configured in the User Task |
The Participants tab contains the details of the participants of the activity. Columns can be re-sized by dragging the column lines as required.
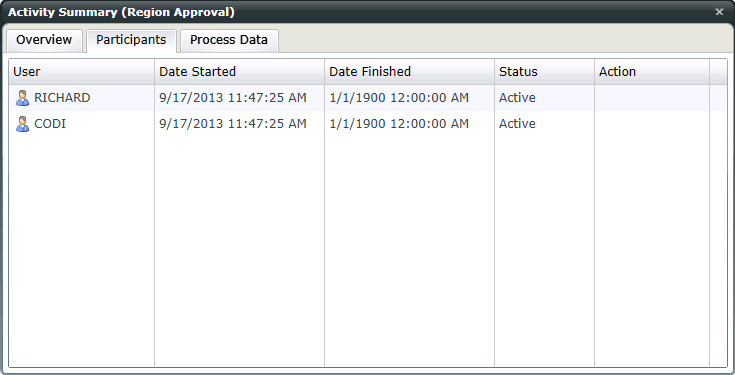
| Feature | Description |
|---|---|
| User | The user who participated in the Activity instance of the workflow |
| Date Started | This is the date that an Activity instance of the workflow was started |
| Date Finished | This is the date that an Activity instance of the workflow was finished |
| Status | This is the status of the Activity instance e.g. completed, active, error etc |
| Action | This is the Action performed by the participant. The available actions are related to the Outcomes as configured by the workflow designer |
The Process Data tab contains the details of the Workflow Data Fields. Columns can be re-sized by dragging the column lines as required.
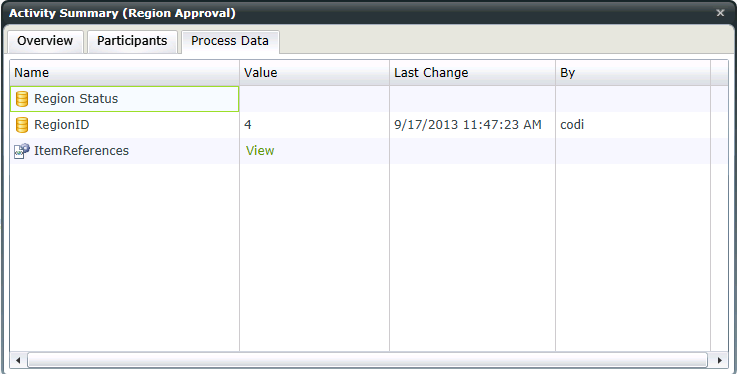
| Feature | Description |
|---|---|
| Name | The name of the Data Field |
| Value | The value of the Data Field |
| Last Change | If the current value is different from the initial (default) value, this field will be populated with the date it was changed. |
| By | If the current value is different from the initial (default) value, this field will be populated with the person who last changed the value |
-
The Refresh interval can be changed in the web.config file by editing the value in the following node:
<add key="ViewFlowRefreshTime" value="30" />
The web.config file can be found in the following location:
Program Files\K2 blackpearl\WebServices\ViewFlow
The value is recorded in seconds and the minimum value that can be applied is 15 seconds.
-
The Task Start Date displays in days for the last week with the exception of current date which is displayed only as the time. When hovering over the task, the specific date is shown. Tasks started prior to a week before are displayed in date format. Following is an example if the current date is a Thursday:
Monday
Tuesday
Yesterday
11:28 PM
The Out of Office feature is available on the K2 Worklist and enables a user to share specific or all their K2 Worklist items with other users. The Out of Office setting is enabled by default, and can be disabled on the Worklist control. See the Worklist Out of Office topic for more detail.
