Building the Leave Request Application (V1 or "Basic" Version)
This document contains the step-by-step instructions to build Version 1 (or the "basic" version) of the Leave Request Approval Application. If required, please refer to the Application Design topic for an overview of the Application.
For clarity, we will divide this tutorial into four parts: in Part 1, we introduce you to the Data component by creating a SmartBox SmartObject to store our submitted form content. In Part 2, we concentrate on the Forms component by creating the views and form necessary for our Application. In Part 3, we focus on the Workflow component by building a simple approval workflow and then editing the Forms for the additional workflow integration tweaks. In Part 4, we will test our Application.
Part 1: Data
Most applications require some kind of Data storage. In K2, this data storage usually refers to K2 SmartObjects. Part 1 of this tutorial will introduce you to K2 SmartObjects by creating a SmartBox SmartObject. SmartBox is K2-provided storage where K2 creates a dedicated table in the K2 database on SQL Server. For this scenario we will create a Leave Request SmartObject which will store the leave request information entered by the user.
This part should take around 15-20 minutes to complete.
The first step for creating our Leave Request Application is to add categories in K2 Designer that will house our forms, views and workflow. Categories can be thought of as folders. While this step is not required, it is a good practice to keep your K2 artifacts organized, especially as you begin to build larger applications.
Step 1 Tasks
- In K2 Designer, create a new category under All Items and name it
K2 Learning - Create a new category under K2 Learning and name it
Leave Request - Create three new categories under Leave Request and name them
Forms
SmartObjects
Views
- Launch K2 Designer (Start > All Programs > K2 blackpearl > K2 smartforms > K2 Designer).
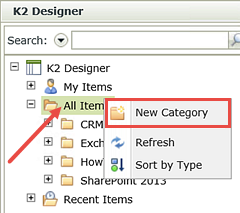
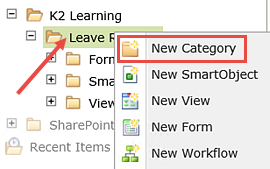
(If the shortcut is not on your desktop or if you are not using a K2-provided virtual machine for this tutorial, check with your K2 administrator what the web address (URL) is for your K2 Designer environment and then open the site using a browser like Internet Explorer, Chrome or Firefox. We recommend using Firefox or Chrome since these fast web browsers tend to be a little more responsive) - Right-click All Items and select New Category.
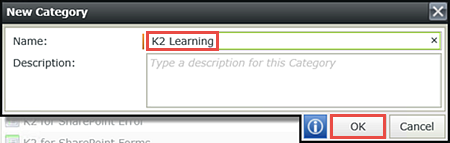
- Name the new category
K2 Learning
then click OK. - Right-click the K2 Learning category and select New Category. Name the new category
Leave Request
then click OK. - Right-click the Leave Request category and select New Category. Name the new category
Forms
then click OK. This category will house the forms for our application. - Repeat the step above for two more categories and name them
SmartObjects
Views
These categories will house our views and SmartObject.
On the left side of the screen is the Category Browser. This is where your K2 artifacts (forms, views, workflows, etc.) will be stored. The All Items category is the primary category for storing applications that you will build. First we are going to create a main category for our applications called K2 Learning. As you work through K2 tutorials, you can create categories under the K2 Learning category to keep your files organized.
If you are using an environment that is shared with other users, you may want to add your name to the folder name, so that your application does not conflict with other user's applications
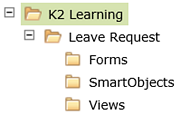
Now we will create the categories specific to our Leave Request Application. Using the same steps as above, we'll add folders that will store the Forms, Views and SmartObjects of our application.
Your Category Browser should look like the image below.
STEP 1 REVIEW
In this step, we prepared the K2 Designer environment by creating categories (or folders) for our application (Leave Request) and application artifacts (Forms, SmartObjects, Views). We created a main category (K2 Learning) that we can use for future tutorials and for practice applications.
In this step we will create the single SmartObject required for the basic version of our application. This will be a SmartBox SmartObject and we will manually define the properties ("columns" or "fields") to store the Leave Request details. K2 provides default methods (Create, Get List, Save) for creating the new record when a Leave Request is submitted, listing previous Leave Requests and updating the record's status property. We will use these methods in later steps when configuring the Forms for the application.
Step 2 Tasks
- Create a New SmartBox SmartObject under the SmartObjects category and name it
Leave Request SmartObject
and allow it to be used in workflows. - Add the following properties with their corresponding data types to the SmartObject.
- Finish the wizard to publish the SmartObject.
| Name | Type | Notes |
|---|---|---|
| ID | Autonumber | This field should be added already by default |
| Leave Request Title | Text | |
| Employee Name | Text | |
| Employee Email | Text | |
| Leave Start Date | Date | |
| Leave End Date | Date | |
| Leave Type | Text | |
| Requester Comments | Memo | |
| Request Status | Text | This field will be updated by the workflow as the leave request is submitted and then approved or rejected |
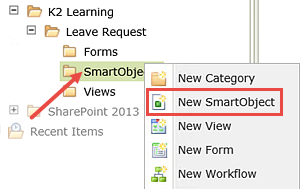
- Right-click the SmartObjects category and select New SmartObject.
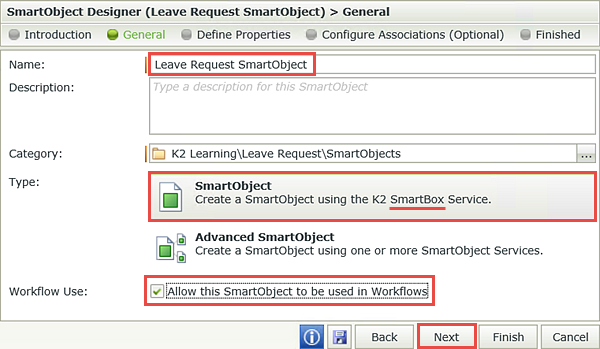
- The SmartObjects General settings screen opens. Name the SmartObject
Leave Request SmartObject
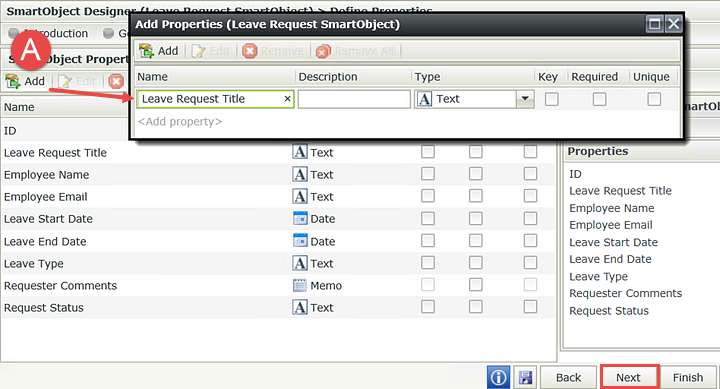
and confirm the SmartObject Type is set to the default SmartBox. CHECK the option to Allow this SmartObject to be used in Workflows. The Category setting is fine as it is. Click Next when ready. - Begin by clicking Add. (Refer to A in the image below the table.) Enter the property Name and data Type using the table entries as a guide. Click the <Add property> link to continue adding properties until you have entered all eight. Click OK, then Next to continue.
- On the Configure Associations screen, click Finish to publish the new SmartObject to the K2 server.
We don't need to adjust the category because the we started from the SmartObjects category to create this SmartObject. You can create SmartObjects a number of ways, then move them into a different category. The option to use this SmartObject in a Workflow will simply expose the SmartObject and its properties in the K2 Workflow Designer, which we will observe in Part 3.
On the Define Properties screen, notice that K2 has automatically created the ID property, which is the key identifier for each SmartObject record. In the next few steps, we will be adding the properties for our Leave Request SmartObject.
| Name | Type | Notes |
|---|---|---|
| Leave Request Title | Text | |
| Employee Name | Text | |
| Employee Email | Text | |
| Leave Start Date | Date | |
| Leave End Date | Date | |
| Leave Type | Text | |
| Requester Comments | Memo | |
| Request Status | Text | This field will be updated by the workflow as the leave request is submitted and then approved or rejected |
STEP 2 REVIEW
You have just created your first K2 SmartBox SmartObject. Taking a closer look at the SmartObject properties, you might recognize them as the future form fields we will use for our Leave Request Form (with the exception of the ID property, which is hidden). When a user submits a Leave Request, the form content will be saved to this SmartObject. As the workflow progresses, the Request Status property will be updated with the appropriate status value.
Part 2: Forms
For this sample application we will be using K2 smartforms as the user interfaces to capture the Leave Request details and to approve the Leave Request. With our Data objects created in Part 1, we are ready to start on the Forms component of our application. The first step is to create an Item View.
Now that we have our SmartObject created, we can tell K2 to design a view based off of that SmartObject. K2 will create the view and assign the SmartObject properties as controls in the view, which you can then move around and edit as needed. The first view we will create is an Item View, or a view that contains the content for a single record. This view will become our Leave Request entry form and when submitted, will create one record back into the Leave Request SmartObject.
Step 3 Tasks
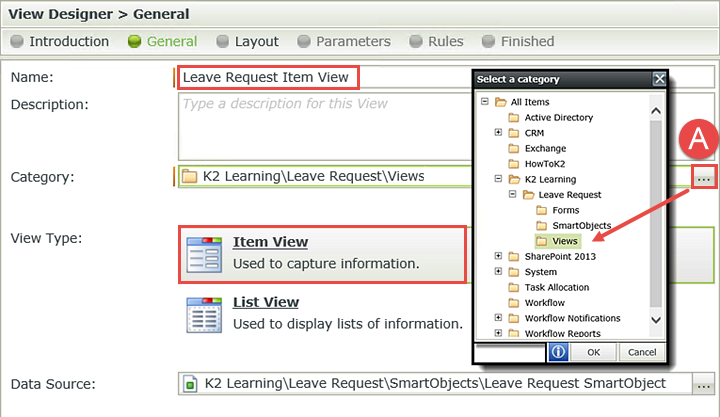
- Design a new View based on the Leave Request SmartObject and name it
Leave Request Item View
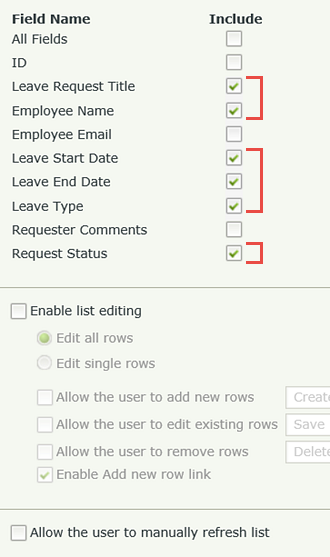
then move it to the Views category. - Create Labels and Controls and include all of the fields except the ID. Make the Employee Email field Display Only. Confirm/set 2 columns for the layout table. Change the Label position to Left and add the Colon suffix. CHECK the option for the Create button (only).
- Change the width of the first column so that it is in closer alignment to the view labels.
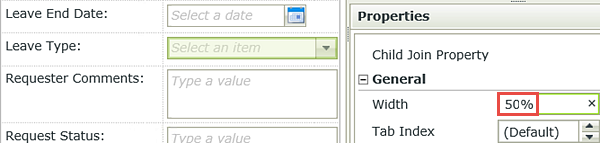
- Change the Width of the Leave Start Date and Leave End Date fields to
50% - Change the Leave Type Text Box control to a Drop-Down List and manually add the following entries (for both Value and Display):
Paid Time Off
Study Leave
Family Responsibility
then change the Width of the Leave Type Drop-Down List to
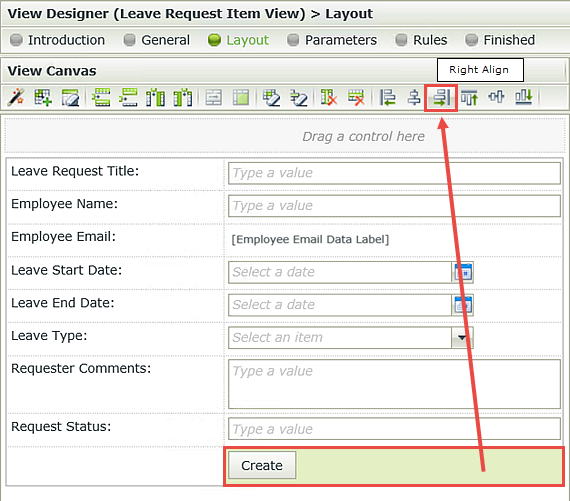
50% - Move the Create button to the second cell and align it to the right.
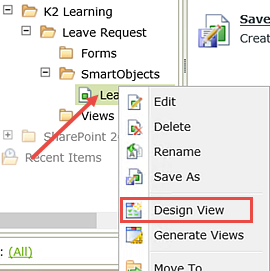
- Right-click the Leave Request SmartObject (located in the SmartObjects category) and select Design View.
- On the Views Introduction screen, click Next.
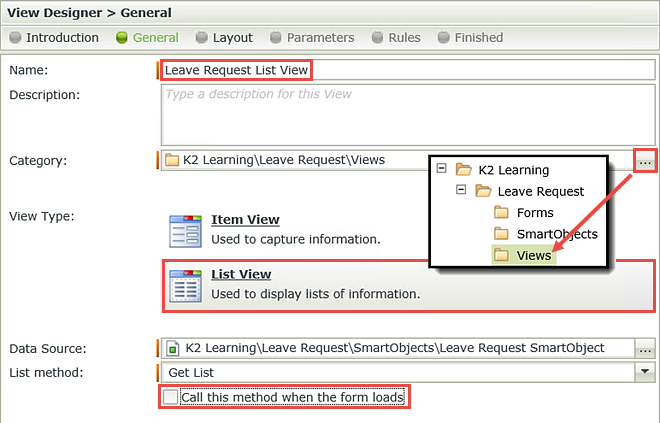
- On the General settings screen, name the new view
Leave Request Item View
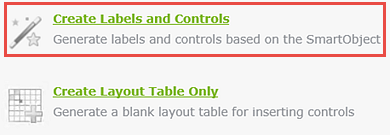
then change the category to the Views category. (A below) Confirm Item View is selected and click Next. - On the Layout design screen, click Create Labels and Controls.
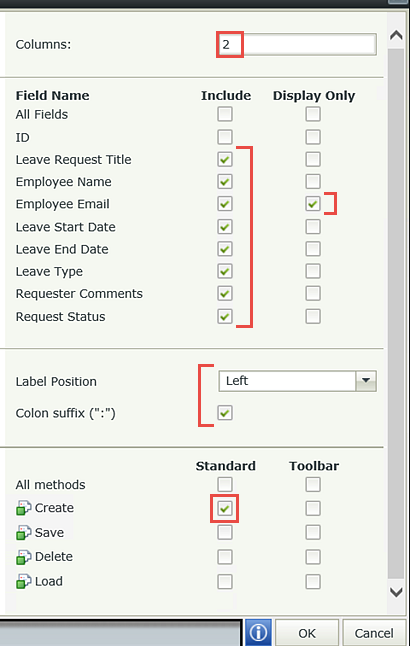
- On the Labels and Controls settings screen, make the following configurations:
- Keep the number of columns set to 2
- Include all of the fields, except the ID
- Select the Display Only option for the Employee Email
- Change the Label Position to Left
- CHECK the box to add the Colon suffix
- CHECK the box to add the Standard Create Button
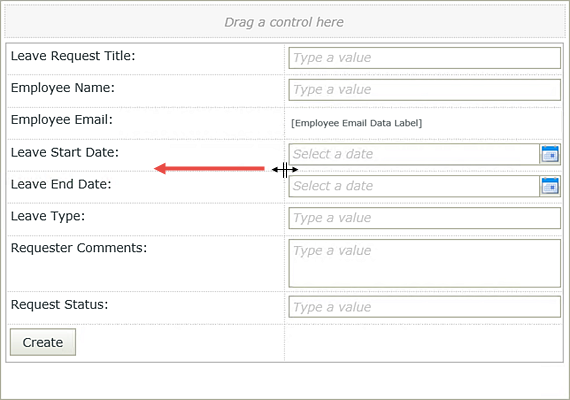
- Hover over the center column line until you see the double lines/arrows. Click+drag the column line so that it is closer to your labels. In other words, reduce the width of the Labels column.
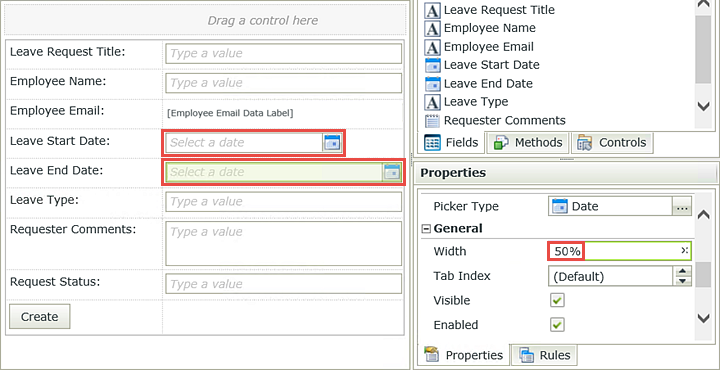
- Highlight the Leave Start Date Calendar box by clicking it. In the Properties Pane, change the Width to
50%
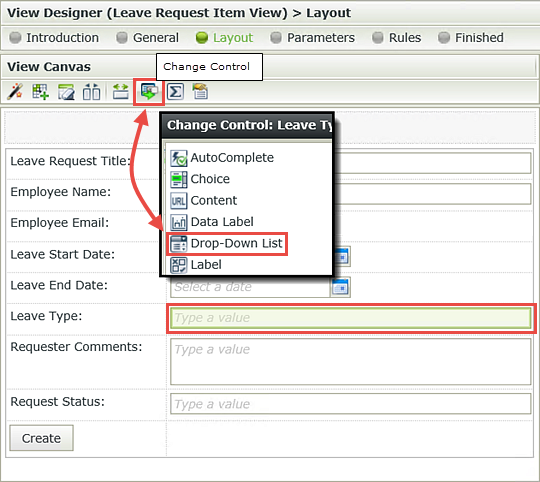
then repeat this same step for the Leave End Date Calendar box. - Highlight the Leave Type Text box. Select the Change Control icon found in the View Menu. Change the control to a Drop-Down List.
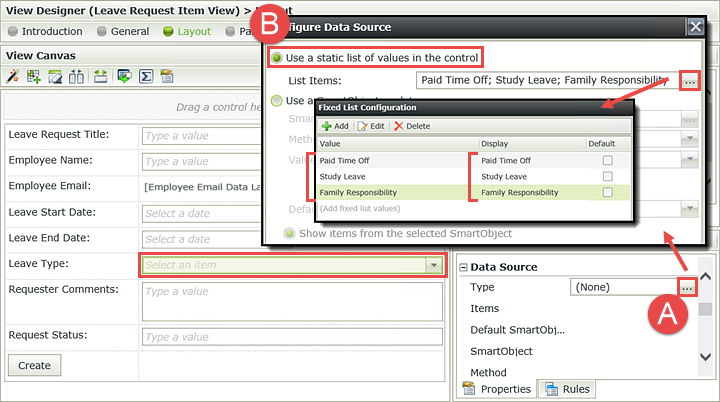
- With the Leave Type control still highlighted, open the Data Source Type editor (A below) found in the Properties Pane. Select the option to Use a static list of values in the control. (B below) Open the list editor and Add the following options for both the Value and the Display, and then click OK when you are done.
- Paid Time Off
- Study Leave
- Family Responsibility
- Change the Width property of the Leave Type drop-down control to
50% - Click and drag the Create button into the second cell. Click within the cell itself to highlight it, then click the Right-Align icon found in the View Menu.
- Click Finish in the Navigation Wizard (lower right corner of the screen) to save and exit from this view.
We do not need to make any edits to the Data Source, because we designed this view directly from the Leave Request SmartObject (the data source) itself.
When you select Create Labels and Controls, K2 will give us an option to select which fields we want on our view, plus a few other settings for the layout table. (The Create Layout Table Only option creates a blank table and you will need to drag and drop controls yourself. For this exercise we will use the Create Labels and Controls option).
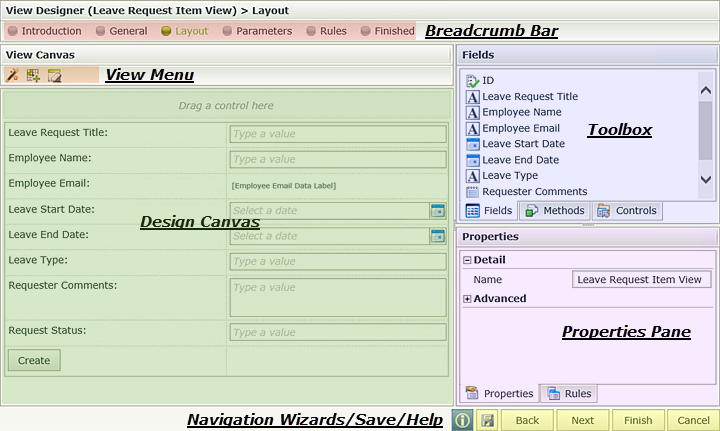
Your new View should look similar to the image below. We've highlighted the sections you will use the most (Breadcrumb Bar, View Menu, Design Canvas, Toolbox, Properties Pane and Navigation Wizards/Save/Help) to help you with terminology if you are new to K2 Designer. As we move forward with the steps and exercises, you will become more familiar with the Designer layout and terms.
Now that we have the basic view designed, we'll add a few customizations that will make the view a little more user friendly. 99% of view and form design are preference and you will learn what works for your users and what doesn't as you build more applications. First, we'll adjust the width of the label column and second we'll adjust the width of the two date fields.
Notice the Employee Email Data Label. Where a label is a static control (it never changes), a data label is a control that cannot be changed by the user, but is dynamic in nature. The Employee Email value will change to reflect the user currently logged in. (This is actually a rule we will set in a later step.) Data labels can also be hidden to perform some type of function within the form or view.
Next, we'll change the Leave Type text box to a drop-down list and add some choices for our users to select. This will keep the Leave Types consistent as they are saved to the SmartBox.
We have one last adjustment to make to our view layout. We'll move the Create button to the right side of the view, which will make the view flow smoother for our users.
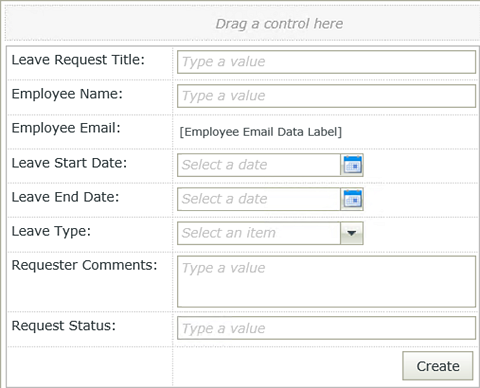
Your view should now look like the image below.
STEP 3 REVIEW
In this step, we created an Item View based on the Leave Request SmartObject. By designing the view directly from the SmartObject, K2 automatically created the view fields which we were able to include and /or display. We selected the Create button for our View. K2 creates all of the necessary rules and actions so that when the button is clicked, a new SmartBox SmartObject record is created in the associated Leave Request SmartObject. We also applied some minor formatting and we manually entered the values for our Leave Type drop-down list.
The next view we are going to create will be a List View. List views contain the content from multiple records. The purpose of this view is to output all of the previous leave requests from the current user. This will be especially helpful to the approving manager, to assess how much leave this employee has requested, or for the requesting user to see the status of their prior leave requests.
Step 4 Tasks
- Design a new List View based on the Leave Request SmartObject and name it
Leave Request List View
then move it to the Views category. Change the View Type to List View and disable the Call this method when the form loads option. - Add the following fields:
- Leave Request Title
- Employee Name
- Leave Start Date
- Leave End Date
- Leave Type
- Request Status
- Right-click the Leave Request SmartObject and select Design View. On the View home screen, click Next.
- Name the new view
Leave Request List View
then move it to the Views category. - Change the View Type to List View. UNCHECK the option to Call this method when the form loads. Click Next when ready.
- Select the Create Labels and Controls option. On the layout screen, include the following fields:
- Leave Request Title
- Employee Name
- Leave Start Date
- Leave End Date
- Leave Type
- Request Status
Call this method when the form loads. Because we have designed this list view based off of a SmartObject, K2 by default will retrieve all content from the SmartObject when the view is loaded. This is not what we want. We want only the records that pertain to the current user, not all of the records. That is why we turn off this option. In a later step, we will configure an Action to retrieve any records for the current user only.
There are no other changes to the layout editor, so click OK when ready. Click Finish (Navigation Wizard - lower right corner) to save and exit from this view.
STEP 4 REVIEW
In this step we created a basic List View based off of the Leave Request SmartObject. We will use this view to retrieve previous leave request records for the current user.
Recall that a form is the main container for views and additional controls. In this next step, we will create a Form and add the two Views created in the previous steps. We will then apply a new theme to change the Form's look and feel.
Step 5 Tasks
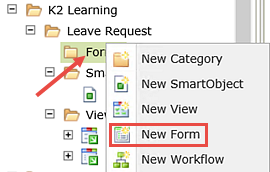
- Create a New Form from the Forms category.
- Add the Leave Request Item View and change the view title to
Leave Request - Add the Leave Request List View to just below the Item View and change the view title to
Previous Leave Requests - Change the default form Theme to the Lithium theme.
- Right-click the Forms category and select New Form. On the Forms home screen, click Next.
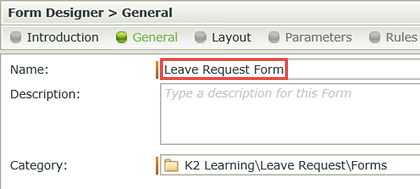
- Name the new form
Leave Request Form
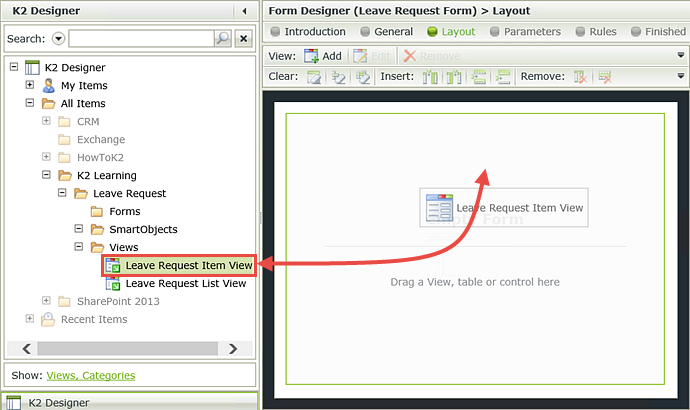
then click Next. - Drag the Leave Request Item View onto the form design canvas.
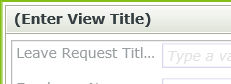
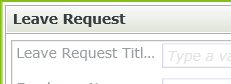
- Double-click the (Enter View Title) view title and change it to
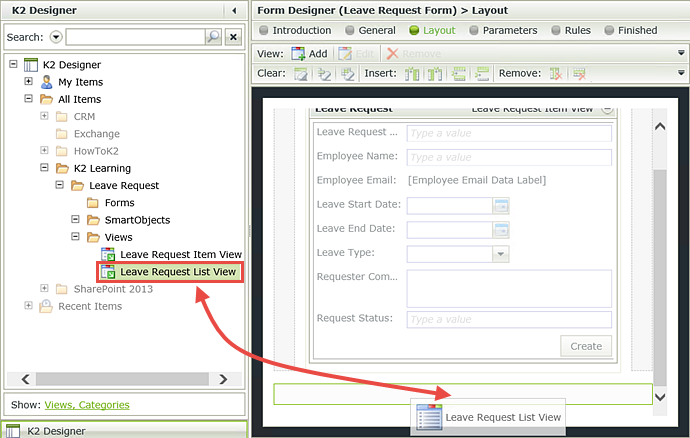
Leave Request - Now we'll add the List View to just below the Item View. Drag the Leave Request List View to just under the Item View. You will notice that K2 automatically adds a new placeholder as you drag the view onto the canvas. Drop the view into the placeholder.
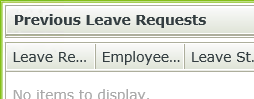
- Double-click the (Enter View Title) view title and change it to
Previous Leave Requests - First, we want to access the Properties Pane for the form. We need to make sure that neither of the views is already highlighted. Click anywhere outside of the views. In the Properties Pane, navigate to the Theme property found under the Appearance heading. Select Lithium.
- Click Finish to save and exit the Form Designer. In the Category Browser, right-click the Leave Request Form and select Check In. If you get a message about associated views, click OK to check in the Views associated with this Form.
You should now be on the Form Designer screen. The Form Designer has a design canvas and many of the same toolbars and panes as the View Designer.
The last step in creating our form will be to customize the look and feel by changing the default theme to the Lithium theme. K2 has a number of predefined themes that you can apply to your forms, or you can create your own as you advance in your K2 knowledge. Lithium is K2's latest theme and is compatible with mobile devices, so it is a good option if your users will be using devices like tablets and phones to access SmartForms. It is possible to extend the standard list of themes with custom themes, for example if your organization has a particular color scheme.
(If you have trouble seeing the Theme property, it's quite possible that a view is currently selected.)
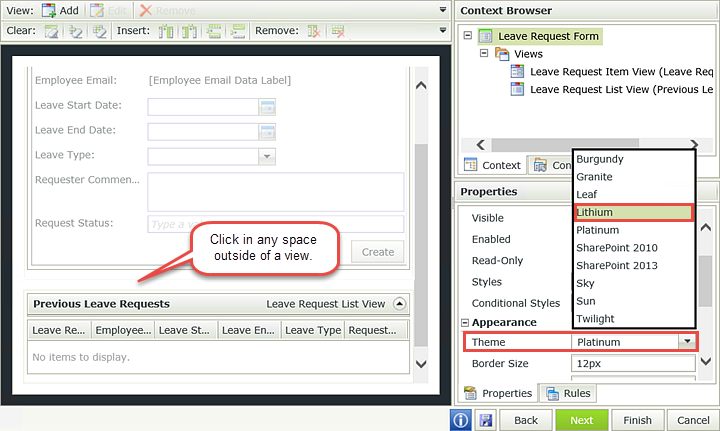
Once the Lithium theme is applied, the form style should change to something like the below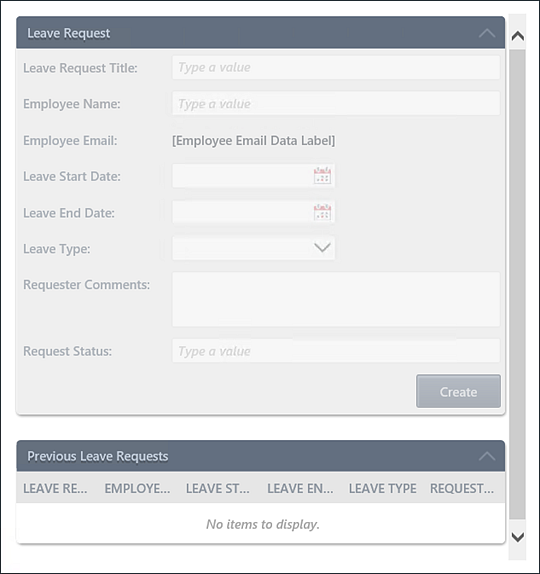
Views and forms are not available to your users until you have checked them in. This essentially "publishes" the artifacts to the K2 server. If you make a change to a view or form, you must check it in before those changes are evident to your users.
STEP 5 REVIEW
In this step, we created a new form and then added our Item View and List View to the Form canvas. We gave our form a complete make-over by simply changing the theme.
Part 3: Workflow
In Part 3 we will create the Leave Request Workflow, which will incorporate the Data and Forms components created in Parts 1 and 2. The workflow will contain a User Task (the manager making a decision on the request) and System Tasks (updating the status property in the Leave Request SmartObject).
In this step, we will create a new workflow in K2 Workflow Designer. We will associate the workflow with the Leave Request Form and assign workflow rights to all domain users.
Step 6 Tasks
- Create a New Category under Leave Request and name it
Workflows - From the Workflows category, create a New Workflow. On the Workflow setting screen, make the following adjustments:
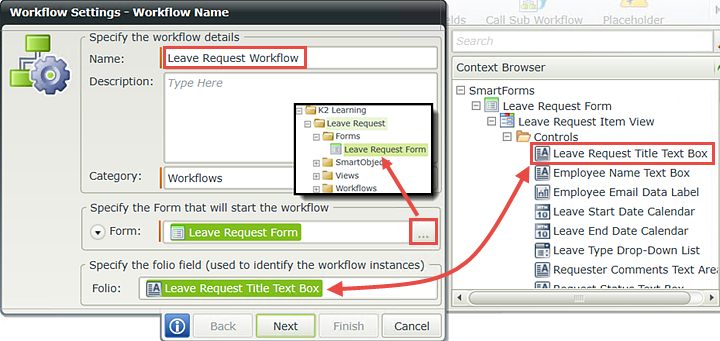
- Name: Leave Request Workflow
- Form: Leave Request Form
- Folio: Use the Leave Request Title Text Box control found in the Context Browser (Leave Request Item View > Controls).
- Confirm the start rule is called when the Create Button is clicked.
- Assign Start and View Workflow Rights to all domain users.
- Add a Save Leave Request SmartObject event to the first event box. For the Request Status field, enter
Submitted
then use the Leave Request SmartObject ID as the input properties' ID value. - Change the Save step title to
Set Status Submitted
- Create a New Category under Leave Request and name it
Workflows - Right-click the new Workflows category and select New Workflow. The Workflow Settings screen opens.
- Name the workflow
Leave Request Workflow - Click the ellipses to the right of the Form field. Navigate to and select the Leave Request Form.
- For the Folio, expand the SmartForms tree in the Context Browser and drag the Leave Request Title Text Box control into the Folio field. Use the image below as a guide.
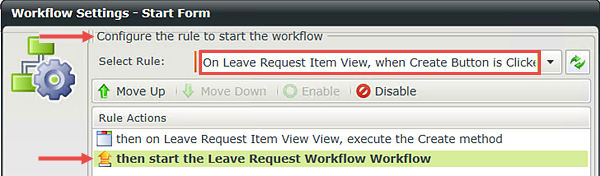
- You should now be on the Configure the rule to start the workflow screen. Here, we want to tell K2 to start the workflow when the Create button has been clicked. Confirm that the Select Rule drop-down contains the value On Leave Request Item View, when the Create Button is Clicked. Click Next.
- We do not have any data field settings, so click Finish.
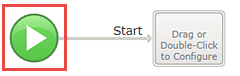
- Double-click the Start button to open the advanced workflow settings wizard.
- This is the same wizard we just worked through, however the advanced version contains the permissions settings. Click Next until you reach the Workflow Rights screen (five times).
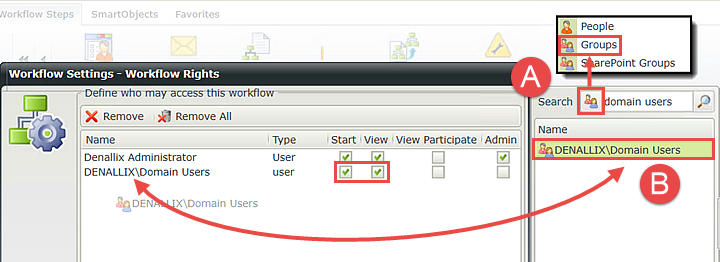
- Begin by changing the search scope to Groups. (A below) Enter
domain users
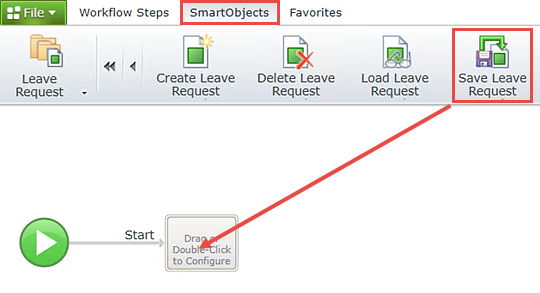
into the search box and click the search icon or hit enter. You should now see the Domain Users group in the search results pane. (B below) Click and drag Domain Users into the permissions pane. CHECK the Start and View boxes. - Select the SmartObjects tab in the workflow ribbon. Drag the Save Leave Request event into the event box. ("Save" is the equivalent of "Update".)
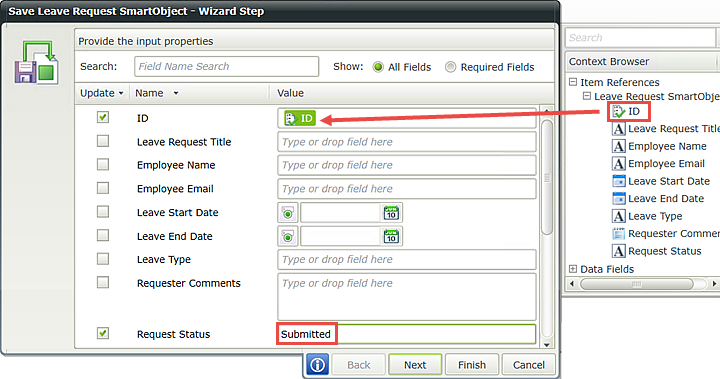
- The Save wizard opens. The first configuration we need to make is to tell K2 which record we want to update. We do this by assigning the SmartObject ID for the current record into the Save event. In the Context Browser, expand the Item References node, then Leave Request SmartObject. Drag the SmartObject ID into the ID input property.
- Now we'll set the status property. Scroll down until you see Request Status. Enter
Submitted
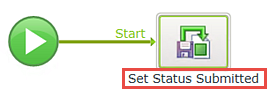
into the value field. Click Next, then Finish to complete the Save event configuration. - To keep our workspace organized, we'll rename the Save event so that we know exactly what that event does. Double-click the Save Leave Request title and change it to
Set Status Submitted
Click Next when you are ready.
What is the Folio? The Folio is a free-text field that is commonly used so that it is easier to distinguish between instances of the same workflow. Think of it as a human-readable “unique reference” for a workflow. The Folio does not have to be unique and does not have to have a value, but assigning some unique value to the process Folio will make things easier for people who may need to report on or work with the workflow. You can assign a value to the process Folio when the workflow is started and update the Folio at any time during the workflow.
Often, Folios are made up of a combination of fields such as the customer name and the order number and the start date. You can also use the Folio as a variable throughout your workflow. For example, you might append the Folio to the first line in an email such as: RE: [Folio], where [Folio] is replaced at runtime with the value assigned to the Folio field.
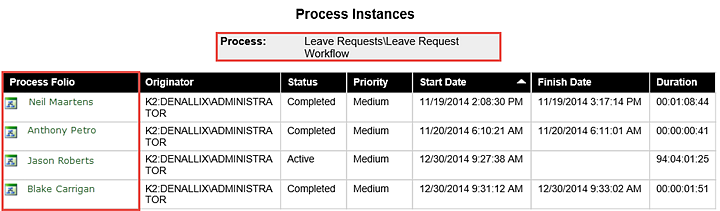
As an example, you might assign the form originator’s name as the Folio to distinguish one instance of that workflow from another. The image below represents a Process Instance report for the Leave Request Workflow based on the requester’s name. Notice how the Folio column has a unique value for each record (or workflow instance) listed.
At this point, we have configured the basic settings for our Leave Request Workflow. We still need to assign permissions however, and to do that, we need to access the advanced workflow settings.
If you do not assign permissions, your users will see an error when they submit the form. The Start setting allows users to start the workflow and the View setting allows users to view the workflow reporting information.
Click Finish
Now that we have our workflow settings complete, we can move on to adding steps to the workflow. The first event we are going to add will be a System Event using the SmartObject Event wizard. Here, we will set the Request Status property to indicate the Leave Request has been submitted.
STEP 6 REVIEW
In this step we created the Leave Request Workflow and configured it to use the Leave Request Form. We assigned Workflow Rights, or permissions, to all domain users so that they can start the workflow and view workflow progress. We added a SmartObject Save event, which will update the status property to indicate the form has been submitted.
In this step, we will add a User Task which will be the approval decision assigned to the workflow originator’s manager.
Step 7 Tasks
- Add an outcome to the Set Status Submitted event. Name the outcome
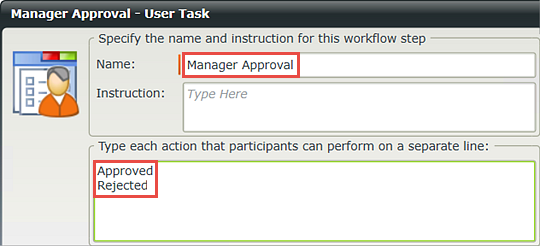
Continue - Add a User Task (SmartForms) to the new event box and name it
Manager Approval
then add two actions and name them
Approved
Rejected - Add the Manager as the task participant, then check the option to notify them when they receive a work item. We will not customize the email notification for this application.
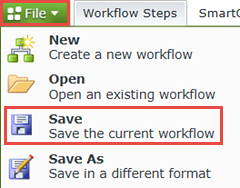
- Save your work.
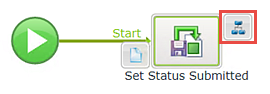
- Hover over the Set Status Submitted event until you can see the Workflow Step Outcome icon. (The icon looks like a blue mini-flowchart. If you don't see the icon when hovering, click once on the workflow canvas to refocus your mouse. Then try hovering again.) Click the Outcome icon to opens its wizard.
- On the configuration screen, click Add. Replace New Outcome with
Continue
then click OK. - Notice that K2 has added a new event box. Switch back to the Workflow Steps tab, then drag a User Task (SmartForms) event into the new event box.
- The User Task wizard opens. Name the task
Manager Approval - On this screen we can will also configure the actions. Actions are the decision options that the user assigned the task can make. You can have many actions, but you need at least one. For our workflow, we will have two. Enter the following actions (on separate lines):
Approved
Rejected
then click Next when ready. - The User Form setting is fine, so click Next. The work item rule is fine, so click Next.
- On the Participants screen, drag the Manager name into the Task Group window. CHECK the box to Notify participants when they receive a work item. Here, we are assigning this task to the form originator's manager. (We also have the option to search for participants in the same manner as we did for the workflow permissions.)
- Save your work. (File > Save)


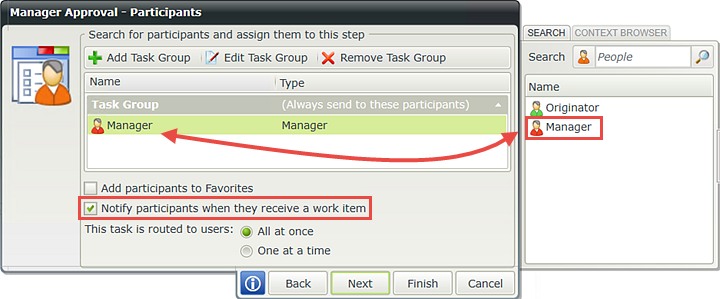
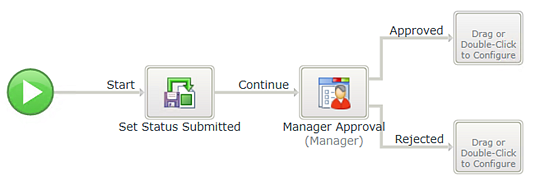
We will not customize the task notification email for this application, so click Finish. Your screen should look like the image below.
STEP 7 REVIEW
In Step 7, we added a User Task and assigned it to the workflow originator's manager. We added two actions (Approved and Rejected). K2 automatically generated outcome lines for each of the actions we added. We can have many actions, but we need to have at least one. By checking the option to notify the participant of a worklist item, the manager will receive an email indicating they have a task, with a link to open the form and action the task.
Step 8 continues with the addition of two System Tasks that will update the Request Status property in the Leave Request SmartObject depending on the decision made by the approving manager. K2 Designer makes reusing events very simple by allowing you to copy and paste existing events. With a few minor adjustments, your new events are ready to go!
Step 8 Tasks
- Copy the Set Status Submitted event and paste it into the event box for the Approved outcome line, then once again for the Rejected outcome line.
- Edit both events and change the Request Status property to the appropriate outcome (Approved or Rejected). Change the event titles to match the outcome.
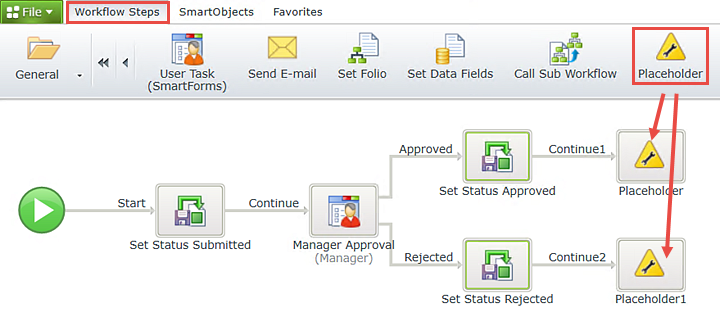
- Add a Placeholder step to the new event boxes that are created.
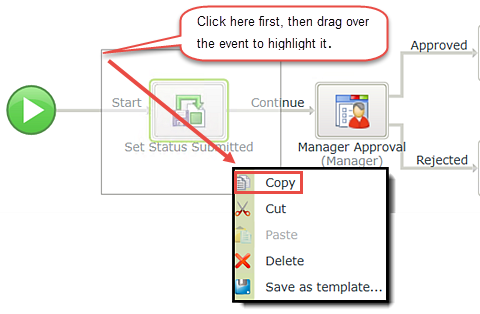
- Copy the Set Status Approved event by click+dragging a box over it to highlight it. Select Copy when the option menu appears.
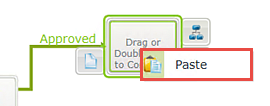
- Hover over the Approved outcome event, right-click and click Paste.
- Hover over the Rejected outcome event, right-click and click Paste once again. Your screen should look like the image below.
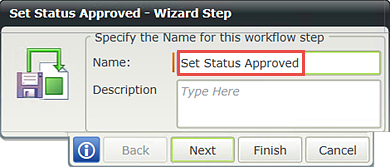
- Double-click inside of the Set Status Submitted1 event (the Approval side) to open its wizard. Change the name to
Set Status Approved
then click Next. - There are no necessary changes to the Workflow Step Outcomes screen, so click Next. (You can change Continue1 to just Continue if you like.)
- On the input properties screen, change the Request Status property from Submitted to
Approved
then click Finish. Be sure to keep the ID property as it is, since we have already configured it to reflect the current record. - Repeat the steps above for the Rejected side. Change the Request Status to
Rejected
then click Finish. - Still on the Workflow Steps screen, drag a Placeholder into each of the empty event boxes (one for the Approved side and one for the Rejected side.)
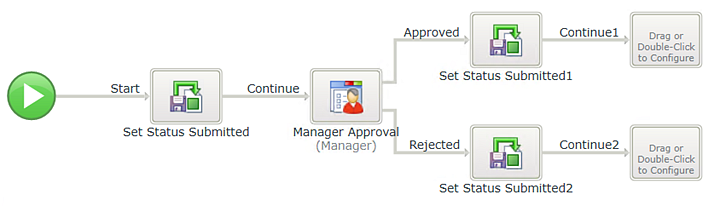
Notice that K2 copied the Save event as well as the Continue outcome line. In the next few steps, we will adjust each new event so that they are consistent with their outcome, then we'll add a Placeholder event to the last two empty event boxes. A Placeholder simply completes an outcome line without adding a formal event. This allows you to deploy and test your workflow without receiving errors of missing events.

Save your work.
STEP 8 REVIEW
In this step, we reused the Save event for the Approved and Rejected outcomes. By copying and pasting the event, we could take advantage of configurations already in place (the ID property already mapped). Copying an event will also copy its associated outcome, so we added Placeholders into each of the new event boxes that were created. We cannot deploy or test our application with empty event boxes, so the Placeholders tell K2 that the event boxes are empty by design.
Next we will deploy our workflow. Deploying a workflow publishes the workflow to the K2 server which then allows it to be exposed to the forms configured for that workflow. If you make changes to your workflow, you must redeploy it before the changes are published to the K2 server.
Step 9 Tasks
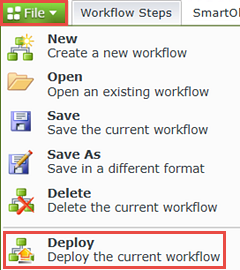
- Deploy the workflow.
- Deploy the workflow by clicking (File > Deploy)
- You will see the Deploying Workflow dialog while the workflow is being compiled and deployed. When you see the Deployment Successful dialog, your workflow is deployed and ready for use! Click Close & Exit.
Now that the workflow has been deployed, we can go back into our Forms and tweak them a little based on where in the workflow the Form is being used (think of this as the "State" of the Form). For example, when the Form is used in the Manager Approval step, we want to load the Previous Leave Requests for the user who requested the leave. Or when the Forms is used to Start the workflow, we want to populate some of the controls on the Form with the current user's information.
In step 10, we will edit the Form for the Start Workflow state. We will add an action that retrieves the current user's previous leave requests found in the Leave Request SmartObject. These records will populate our List View. The second step will be to configure K2 to automatically populate the Employee Name and Employee Email fields on the form with the current user's details.
Step 10 Tasks
- Edit the Leave Request Form, When the Form is Initializing rule on the Leave Request Workflow (Default) state and add an execute a view method action to retrieve the previous leave requests for the current user. Use the system value Email as the input property, then map all of the return properties for the Leave Request List View.
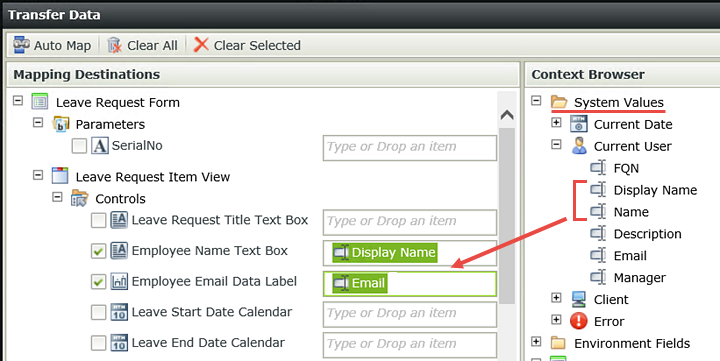
- Add a Transfer Data action and configure it to use the system value Display Name for the Employee Name Text Box control and the Email for the Employee Email Data Label control.
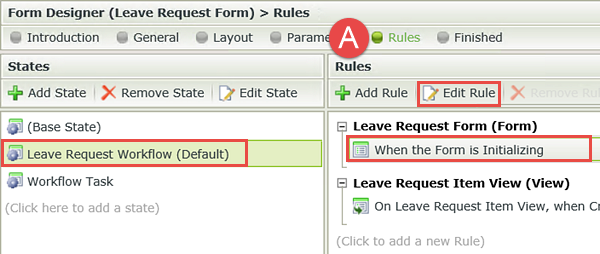
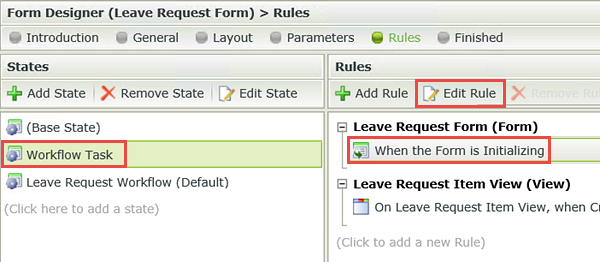
- In K2 Designer, click on the Leave Request Form and select Edit. Click the Rules button in the Breadcrumb Bar (at the top of the screen). (A below) Highlight the Leave Request Workflow (Default) state, then the When the Form is Initializing rule. Click Edit Rule.
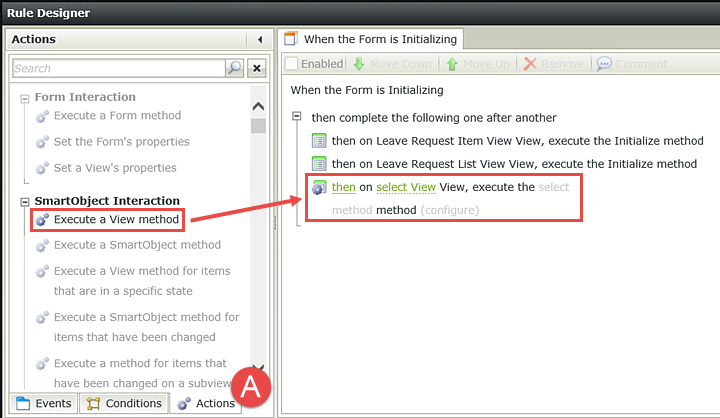
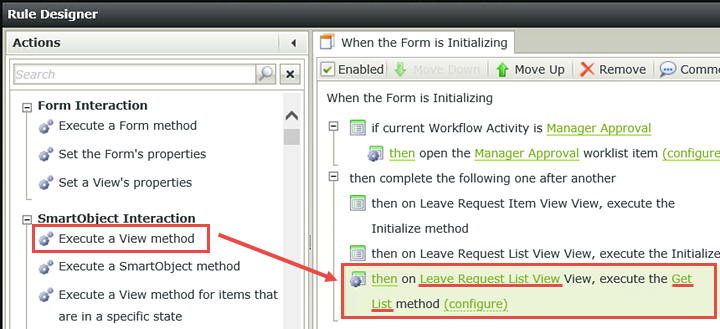
- From the Rule Designer Actions pane (A below), click once on the action Execute a View method to add it to the Rule Definition pane.
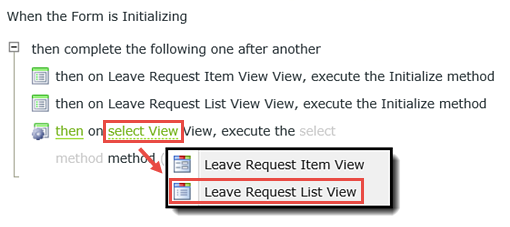
- Click the select View link so that we can tell K2 to which view we want to apply this action. Select Leave Request List View.
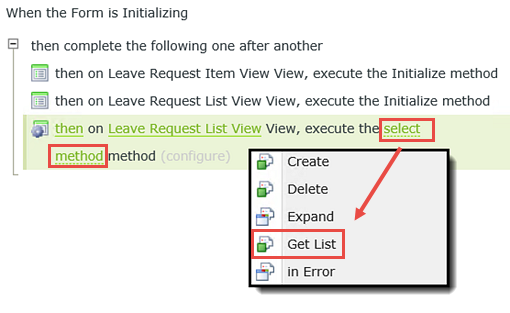
- Click the select method link and choose Get List. The Get List method retrieves content from a data source.
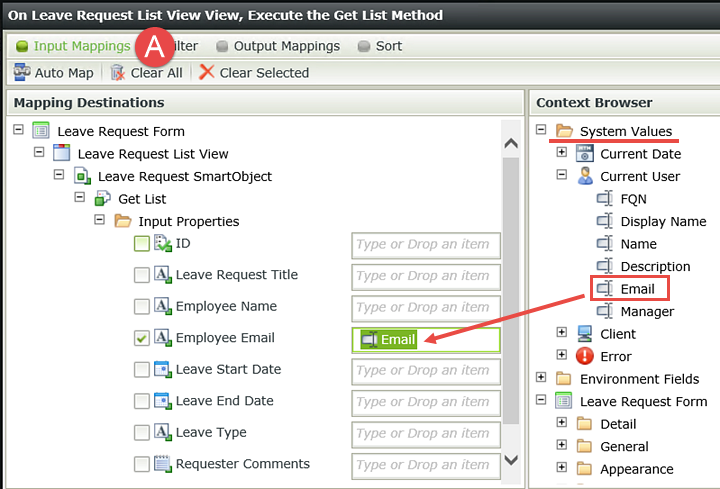
- On the Input Mappings screen (A below) expand the System Values in the Context Browser and drag the Current User > Email property into the Input Properties Employee Email field. Here, we are telling K2 to use the current user's email as the filter to search for previous leave requests.
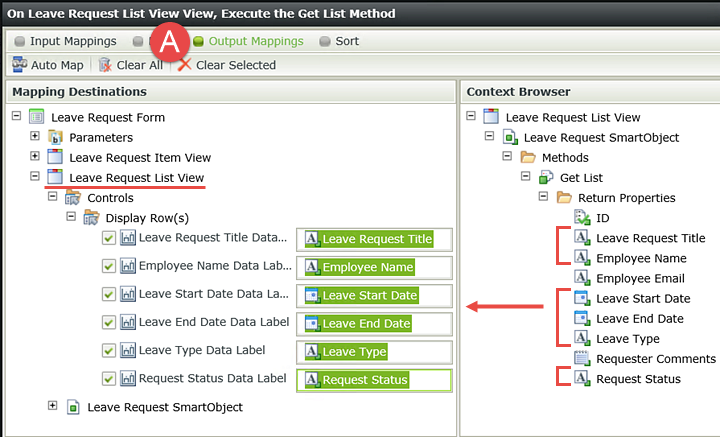
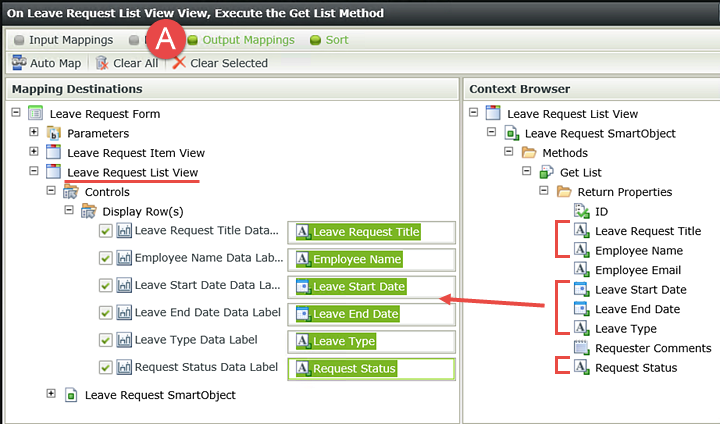
- Now click the Output Mappings button. (A below). On this screen, we want to tell K2 which properties we want returned to our form. Using the image below as a guide, drag the highlighted Return Properties into the Leave Request List View fields. (You may have to collapse the Item View in order to see the List View.)
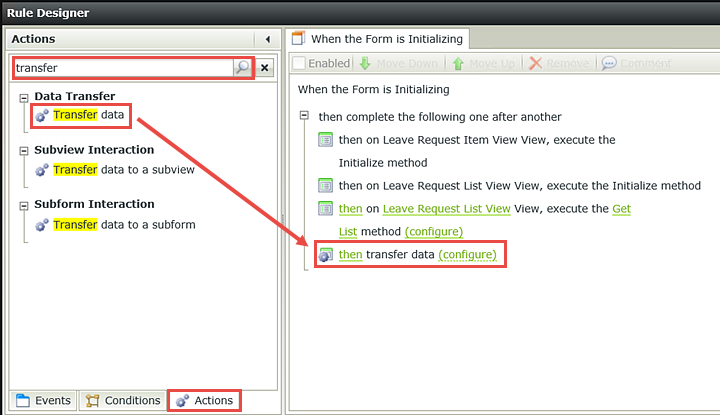
- Still in the Rule Designer (Actions tab), search the keyword
transfer
then click on Transfer data to add it to the Rule Definition pane. - Click the (configure) link. In the Context Browser, expand the System Values node, then Current User. Drag the Display Name into the Employee Name Text Box field. Drag the Email into the Employee Email Data Label field. Click OK.
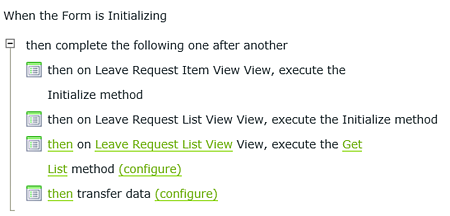
- Your Rule Definition pane should now look like the image below. Click OK to close the Rule Designer.
First, we want to populate the Leave Request List View. Recall that this is the view we created to output a list of all leave requests previously submitted for the requester. To do this, we want to execute (call) a SmartObject method (Get List) for the list view.
Now click the (configure) link. There are two primary sections to the editor that opens. First, we need to tell K2 which user's records we want (this is the input value) and second, we need to tell K2 which SmartObject properties we want to return (these are the output values).
Next, we want to display the current user's name and email on the Leave Request Item View. K2 will automatically populate these fields based on who is logged in. These values will then be saved to the Leave Request SmartObject when the form is submitted, along with the leave request details. This step is simply a matter of transferring system values to the Item View fields.
STEP 10 REVIEW
In this step, we edited the Form Initializing rule on the Leave Request Workflow (Default) state, so that the current user's previous leave requests will populate the Leave Request List View when the form loads when capturing a new Leave Request. We also configured the system values for the Display Name and Email (again, for the current user) to populate their corresponding fields on the Item View.
In this step, we will edit a rule so that the approving manager sees the originator's leave requests. We will hide the Create button, since the approving manager doesn't need to create a record. K2 will automatically add a third view to the form for the approving manager, which will contain our actions (Approved/Rejected) and a submit button.
Step 11 Tasks
- Edit the Form Initializing rule for the Workflow Task state. Execute the Get List method for the Leave Request Item View.
- For the Input Property, use the Leave Request SmartObject Employee Email property for the Employee Email input property.
- Map all of the Return Properties for the Leave Request List View.
- Still on the Workflow Task state, hide the Create button.
- Continuing on with Rules, highlight the Workflow Task state and the When the Form is Initializing rule, then click Edit Rule.
- Click on Execute a View method to add it to the Rule Definition pane. Click the select View link and choose the Leave Request List View. Then click the select method link and choose Get List.
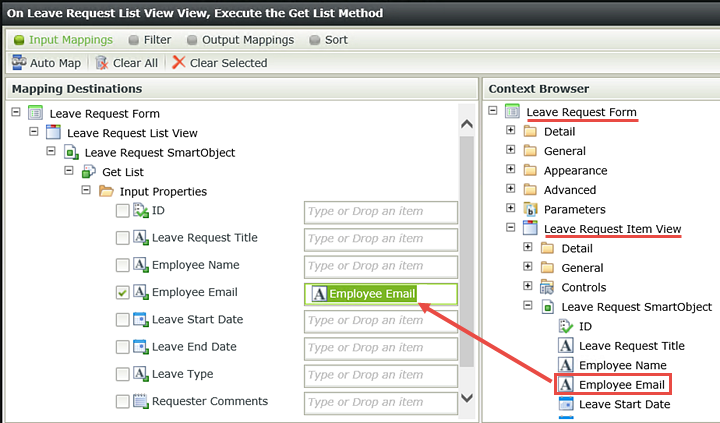
- Click the (configure) link. Using steps very similar to those in Step 10, we will map the Input Properties and the Return Properties. But, instead of using the System Value for the email input, we will use the SmartObject value for the Employee Email input property because we don’t want the email of the current user, we want the email of the user who submitted the Leave Request.
- Now switch to the Output Mappings screen (A below) and map the Return Properties for the Leave Request List View. Click Finish when ready to close the configuration screen, but do not exit the Rule Designer just yet.
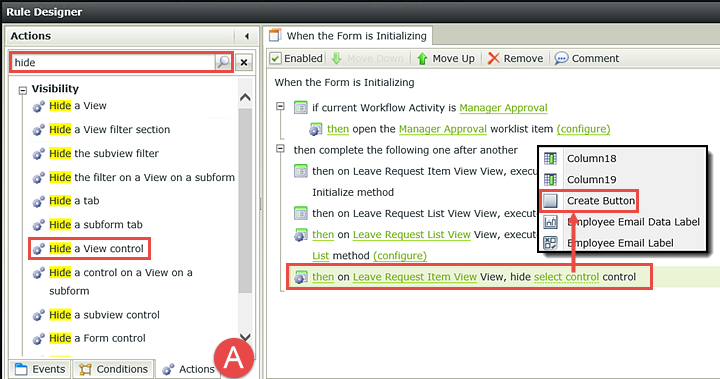
- The last configuration is to hide the Create button for the approving manager. With the Actions tab still highlighted (A below) search for the keyword
hide
then click once on Hide a View control to add it to the Rule Definition pane. Click the select View link and choose Leave Request Item View. Click the select control link and choose Create Button. Click OK to close the Rule Designer, then click Finish to complete the rule configurations. - Right-click the Leave Request Form and select Check In. If you get a message about checking in associated views, click OK to continue.
As a reminder, states are used to control the behavior of a Form based on how it is being used. In the previous step, we edited the Leave Request Workflow (Default) state, which represents the point at the very beginning of the workflow. We edited the Form Initialize rule because we wanted to configure the user interface at the very beginning of the process. Now, we want to configure the user interface for the approving manager. In our application, this is called the Workflow Task state.
First, we want to configure an action so that the originator's previous leave request are loaded. Then, we will hide the Create button for the manager, as it is not needed.
In the Context Browser expand the Leave Request Item View node, then the Leave Request SmartObject. Drag the Employee Email into the Employee Email input property.
STEP 11 REVIEW
In this final step to creating our basic Leave Request Application, we configured two actions for the Workflow Task state. This is the state that represents the approving manager user interface. First, we configured an action that will retrieve the originator's previous leave requests. We also hid the Create Button from the manager, as it is not needed.
Part 4: Test
Now it's time to test our basic Leave Request Application.
We will submit two Leave Request Forms. Using the link found in one of the task notification emails, we will open the worklist item and action it (mark it as "Approved" or "Rejected"). We will then open the Leave Request Forms again to confirm that the previous two leave request records are appearing in the List View with the correct status value. (One record should say "Submitted" and one should say "Approved" or "Rejected".)
Step 12 Tasks
- Use the Runtime URL to open and submit two Leave Request Forms.
- Open the approving manager's Outlook, then confirm there are two task notification emails. Action one of the tasks.
- Open the remaining worklist task and confirm the Request Status reflects the two results: Submitted and Approved/Rejected
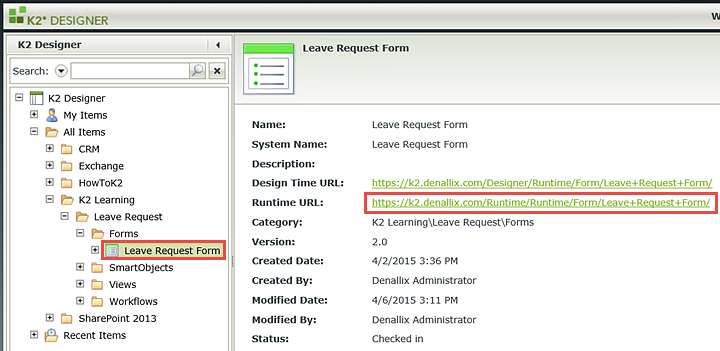
- From K2 Designer, click to highlight the Leave Request Form. In the Properties pane, notice the Runtime URL. This is the link (or URL) to your form. You can provide this link to your end users so that they can submit their own forms. (You may need to click the little down-arrow icon in the top right of the panel to expand the properties for the Form)
- Click the Runtime URL link. Depending on your environment, it may take a few seconds for the form to open.
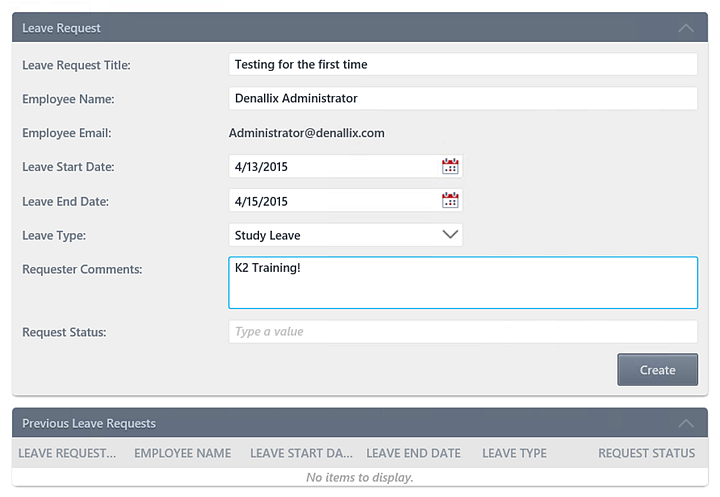
- Complete the form fields with the exception of the Request Status field, then click the Create Button
- You should see an animated processing icon, then you will be returned to the form as you left it. Change the fields (title, dates, etc.) and click the Create Button again. Once again, the form processes very quickly and you are returned to the form as you left it. If you did not receive any errors, close the browser.
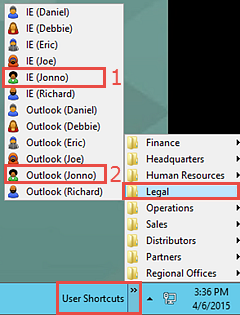
(Usually, you would add some kind of confirmation message to indicate to the user that their request was submitted. We will add this functionality in the extended version of this Leave Request Application) - If using a K2-provided Virtual machine, close all open Internet Explorer windows. Then, click the User Shortcuts arrows found in the lower-right corner of the screen. Expand the Legal folder and click IE (Jonno) as well as Outlook (Jonno) to open IE and Outlook as Administrator's manager, Jonno.
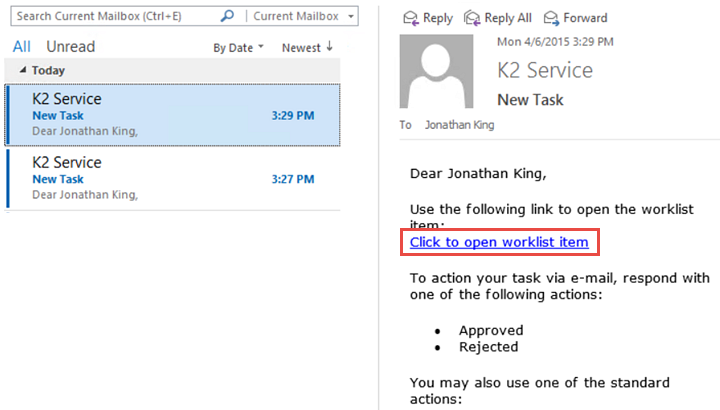
- Confirm there are two task notification emails. In one of the emails, click to open the worklist item link to open the form and action the request.
- Action the request by selecting one of the Action items, then clicking Submit. This time, you will receive K2's generic confirmation message. Click OK to close the dialog and then exit the browser.
- Open the second worklist item. In the Previous Leave Requests list, confirm that the Request Status value has now changed for the request that you approved in the previous step. If you wish, you can Approve or Reject this second leave request.

Now we need to open the approving manager's Outlook and confirm the task notification emails were received. Then we will action one of the tasks. If you are working on a K2-provided virtual environment (VM), you are likely logged in as Denallix Administrator. Administrator's manager is Jonno, so we'll open Jonno's Outlook. (If you are building this application in your own environment, you will need to access the appropriate Outlook account of the Manager for the user that submitted the leave request or whatever user you selected for the Manager Approval task when you designed the workflow)
Jonno's Outlook will begin to open. This can take a minute or two when using a Virtual Machine environment. If you see a message about synchronizing CRM data, continue to wait. If you see a message about licensing, close to continue.
Confirm that the Leave Request details are correct (A below) and then confirm that both form submissions show up in the Previous Leave Requests view with the Request Status as Submitted. (B below)


STEP 12 REVIEW
In this step, we tested our Leave Request Application by submitting two forms using the Runtime URL. The Runtime URL is the "user" link that allows your users to access and submit your forms. (Note: depending on your K2 environment setup, this link would probably only be available to internal users in your organization but there are ways of exposing SmartForms to the outside world) We confirmed the task notification emails were sent and after actioning one of the worklist items, we confirmed the Request Status property was updated appropriately in the Leave Request SmartObject.
Summary
The exercises in the Leave Request (Basic) Application are meant to provide an introduction to building K2 Applications and the K2 components of an Application: Data, Forms and Workflows. By completing the five parts, you should have a basic understanding of how data, forms and workflows integrate with each and how rules can be implemented to provide dynamic functionality to your user interface (for example, auto-populating form fields with the current user details). Key to these exercises are the following:
Data
- SmartObjects are "connectors" to data sources and are the bridge between providers of data (data sources) and consumers of data (forms, workflows, etc.).
- SmartBox is K2-provided storage for creating your own data source from "scratch".
- SmartObject methods can be called from views, forms and workflows (for example, Get List).
Forms
- Forms are containers for views and controls.
- Views are logical sections of form content.
- There are two types of views: Item Views contain the content from one record. List Views contain multiple records.
- Rules are comprised of Events, Conditions and Actions. Events are when something occurs, Conditions are if a specific criteria has been met and Actions do something if the Event and Condition has been met.
- Rules can be applied to different workflow states, essentially creating custom forms for workflow events.
- Forms and views must be checked in before they can be exposed to users.
Workflows
- Workflows created in K2 Designer are comprised of steps and events and are connected with outcome lines.
- There are two types of events: System Tasks are performed by the K2 server such as sending an email or updating a SmartObject. User, or Client Tasks are performed by a human, such as making a decision of some kind.
- Workflows must be deployed before they can be exposed to users.