Leave Request (Extended Version): Application Design
The Leave Request (Extended Version) application begins with editing the existing Leave Request SmartObject, then creating a new SmartObject that leverages data from an external data source. This data will replace the static values in the Leave Type drop-down list. You will edit the Leave Request Workflow and add a rework loop. This loop sends the request back to originator if the approving manager has questions or needs more information. On the Leave Request Form, you will work with rules and states, where you will further customize the user interfaces and for behavior.
Data
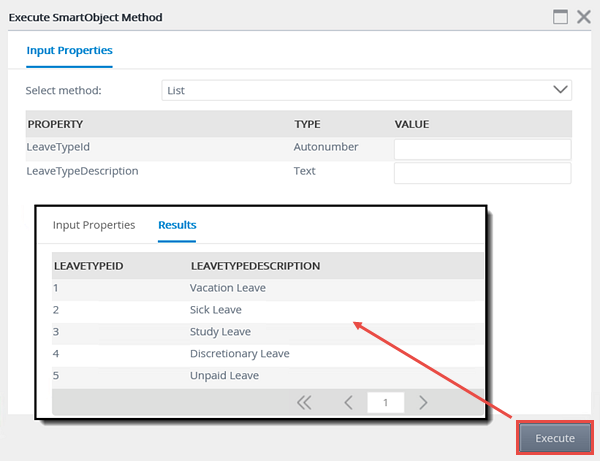
To extend the data component, you will edit the Leave Request SmartObject and add a new property. The property, Approver Comments, will allow the approving manager to add any questions or comments they may have. This step will show you how to edit an existing SmartObject. Next, you will add a new service instance, or connection, to an external data source. The data source, an Azure SQL Server database, contains a table of leave types, which will come into play for extending the forms component. You will generate a new Leave Types SmartObject from the service instance.
The results that are returned from the external data source
Leave Request SmartObject
This tutorial will expand your knowledge of SmartObjects and how you can use SmartObjects to interact with other systems. SmartObjects are the connectors or the "middle layer" between providers of data and consumers of data. Providers of data are where the data lives. Examples include SharePoint lists, SQL Server tables, and Active Directory. Consumers of data are the objects that use data. Examples include form fields and workflows.
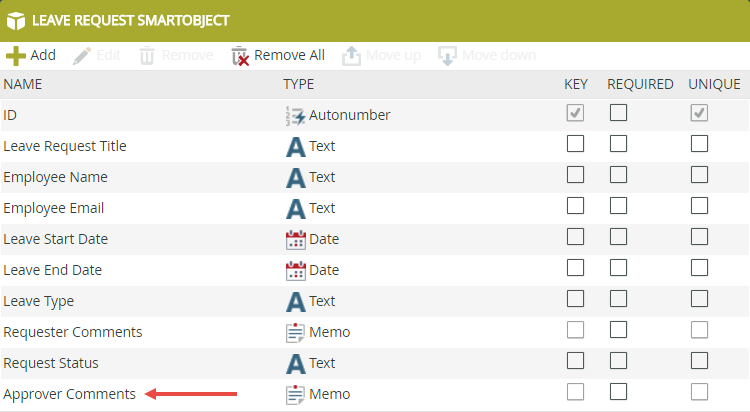
The first task is to add a new property to the Leave Request SmartObject. The new property, Approver Comments, is a memo data type that will capture any comments or questions the approving manager has.
The Leave Request SmartObject with the new Approver Comments property
The second task is to create a new SmartObject, along with the underlying configuration, to connect to an external SQL database. First, you will create a service instance of a SQL Server service type. You will configure the service instance for an Azure SQL database. Finally, you will generate a new SmartObject (Leave Types SmartObject) from the service instance, that will return a list of leave types. In the extended user interfaces tutorial, you will replace the static values for the Leave Type drop-down list with the values returned from the Leave Types SmartObject.
Forms
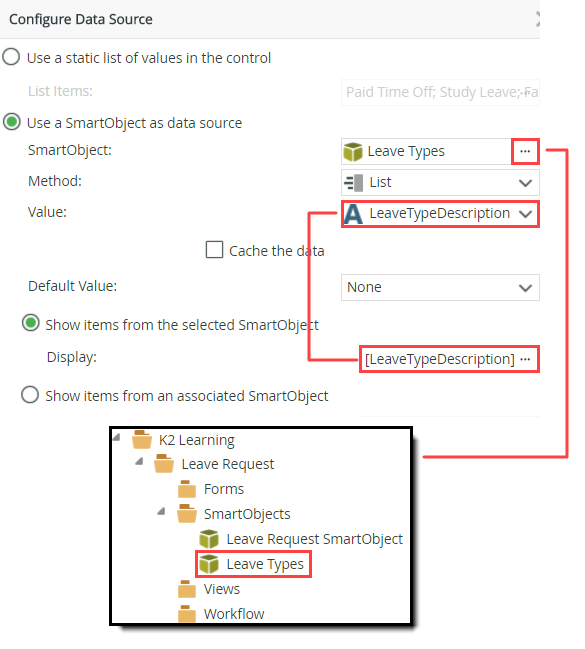
To extend the forms component, you will bind the Leave Type drop-down list to the new Leave Types SmartObject. In the basic version, the drop-down list contains static values. Now, the drop-down list will contain the values from the new SmartObject. There is an advantage to using SmartObject data for form controls. If you need to edit the leave type line items, you can edit the SmartObject itself and any controls that use that data will be immediately updated. This also keeps the leave type values consistent where used.
Binding the Leave Type control to the Leave Types SmartObject
Leave Request Item View
Edit the Leave Request Item View. You will bind the Leave Type drop-down list control to the new Leave Types SmartObject. The drop-down list contains static values for the list items. The Leave Types SmartObject returns a list of leave types found in the Azure SQL database, which will replace the static values. This will create dynamic values for the drop-down list.
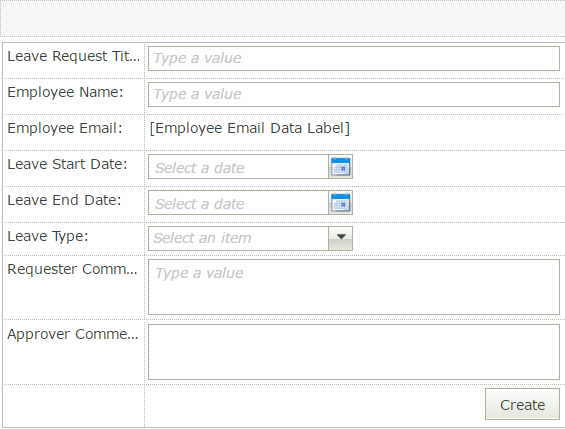
Next, you will add the new Approver Comments property to the Leave Request Item View, then make the property read-only for the requester. In a later step, you will enable the property so that the approving manager can add any questions or comments they have.
Finally, you will delete the Request Status label and control. The workflow updates the status value as it moves along the outcome lines. Since it may be confusing to have the field displayed on the view, you will remove it.
The extended Leave Request Item View
Workflow
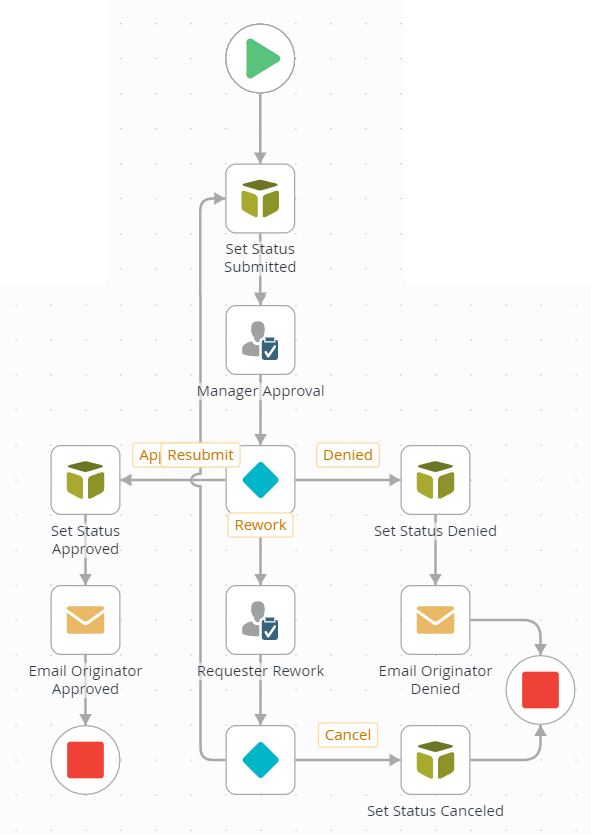
To extend the workflow component, you will add a third action to the Manager Approval task. This action allows the manager to send the request back to the requester for rework. The requester can either resubmit the request or cancel the request. The workflow is further expanded on below. You will also add Send Email steps for the Approved and Denied outcomes.
Leave Request Workflow Design
As you learned in the basic version tutorial, mapping out your workflow is key to organizing the components you need for the application. For the expanded application, you will add email, as well as a new outcome, rework. Once again, the flowchart is in a swim-lane format with the first lane representing the requester's actions and tasks. The second lane represents the approving manager's actions and tasks, while the third lane represents system tasks performed by the K2 server.
The Leave Request Workflow represented as a flowchart.
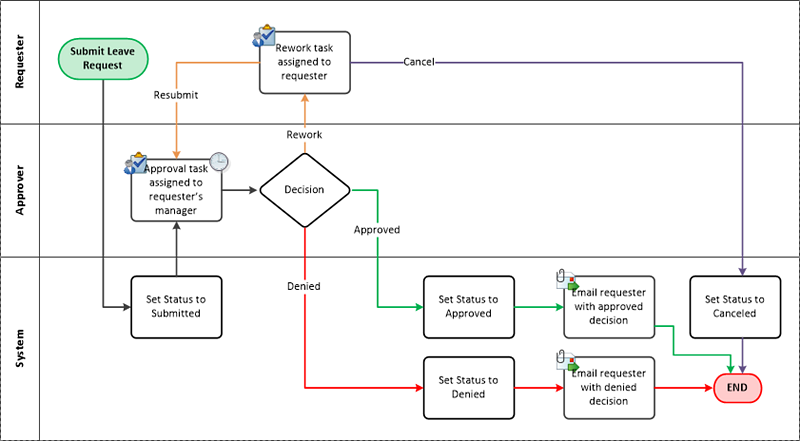
The extended Leave Request Workflow
