9. Edit a Rule to Enable the Approver Comments for the Workflow Task State
Currently, the Approver Comments text area box is a read-only control by default. In this step, you will edit the approving manager's state and enable the control. The manager can then enter any questions or comments they may have.
-
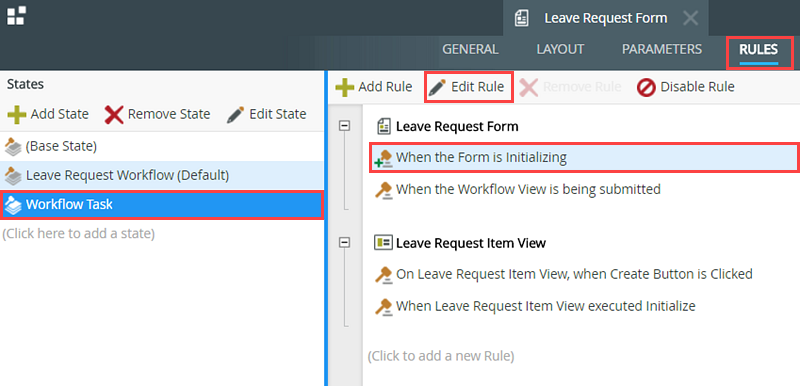
Check out, then edit the Leave Request Form. Edit the form initializing rule for the Workflow Task state. You are editing the rule that fires when the form first loads for the Manager Approval step.You may see a red warning badge next to the RULES tab. This warning appears because you deleted the Request Status control from the item view and it is still bound to a rule or rules. Before continuing, switch to the RULES screen, then locate the state that also has a red warning badge. Click the state to expose its rules. Edit the offending rule.

Click the red (configure) links (there may be more than one).
Most likely, the offending setting is in the OUTPUT MAPPINGS. Click the OUTPUT MAPPINGS tab. UNCHECK the box for the Request Status property.
Click FINISH to save the setting. Click OK to save the rule.
Repeat this step for all states that display a red warning badge.- Recall that states represent the form's behavior and configuration for a particular step, usually a Task step that assigns a task to a recipient. You can configure rules to customize the form's behavior for the recipient. In this case, when added the Approver Comments control to the Leave Request Item View, you made the control read-only so that the leave requester could not change it. Now, you will enable the control for the approving manager, so that they can enter questions and comments if they need to.
In K2 Designer, right-click the Leave Request Form and check it out (if it is not already), then Edit it.Before continuing, check to see if there is a red warning badge next to the RULES tab. If so, go back and follow the instructions in the red caution box above before proceeding. - Click the RULES tab in the breadcrumb bar. Highlight the Workflow Task state, then highlight the When the Form is Initializing rule. Click Edit Rule. The Workflow Task state represents the form configuration and behavior for the Manager Approval step. The form initializing rule fires when the form first loads.

- Recall that states represent the form's behavior and configuration for a particular step, usually a Task step that assigns a task to a recipient. You can configure rules to customize the form's behavior for the recipient. In this case, when added the Approver Comments control to the Leave Request Item View, you made the control read-only so that the leave requester could not change it. Now, you will enable the control for the approving manager, so that they can enter questions and comments if they need to.
-
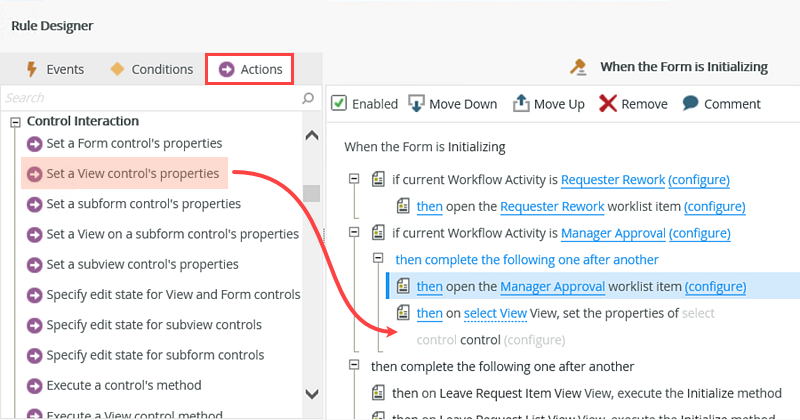
In the if current Workflow Activity is Manager Approval condition, add an action to set a View control's properties on the Leave Request Item View that enables the Approver Comments Text Area control. Here, you are enabling the Approver Comments control for the approving manager.
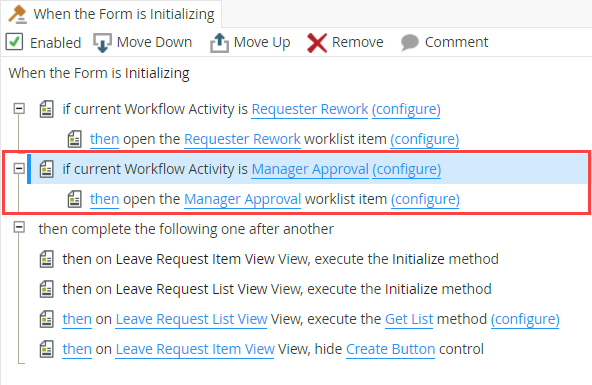
- In the rule definition pane, locate the condition that says if current Workflow Activity is Manager Approval. Notice that this condition already has an action to open the Manager Approval worklist item. K2 added this condition and action when you configured the Manager Approval step. You want to add an action at this point to enable the Approver Comments text area box.

- Confirm the Actions tab is active. Click the then open the Manager Approval worklist item action to highlight it. In the Actions pane, scroll down until you see the Control Interaction heading. Click the Set a View control's properties action to add it to the Workflow Activity condition, just below the open worklist item action.The reason you select the worklist item action first is to tell K2 where to insert the new action. The order of events, conditions, and actions is very important as K2 follows them in a linear fashion. If you did not select the worklist item action, K2 would have placed the new action at the bottom of the rule definition pane. You can always move actions into the correct order by selecting them, then using the control arrows to move them up or down. (After you select an action, simply hover over it to expose the control arrows.)

- Click the select View link and select Leave Request Item View. Click the select control link and select Approver Comments Text Area.

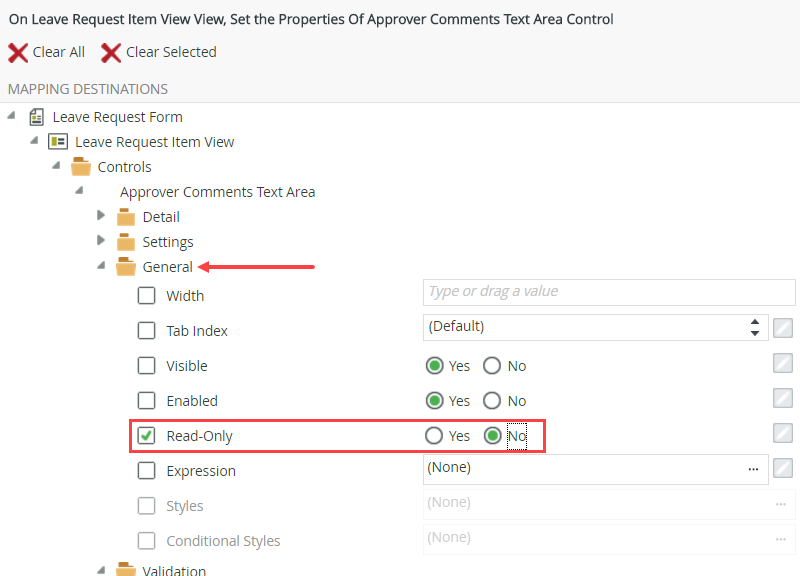
- Click the (configure) link. On the Mapping Destinations screen, scroll down until you can see the General heading. Change the Read-Only setting from Yes to No. By turning off the read-only setting, the manager is able to add comments when they open the form. Click OK, then OK once again to return to the K2 Designer. (Do not close out of the form just yet.)

- In the rule definition pane, locate the condition that says if current Workflow Activity is Manager Approval. Notice that this condition already has an action to open the Manager Approval worklist item. K2 added this condition and action when you configured the Manager Approval step. You want to add an action at this point to enable the Approver Comments text area box.
Review
In this step, you edited the Workflow Task state. This state represents the form behavior for the Manager Approval step. You enabled the Approver Comments text area box so that the manager can enter any questions or comments they may have. In the next step, you will add an action that saves the form fields to the SmartObject after the manager submits their decision.