How To: Attach Images in Emails
This article illustrates one method for attaching an image to an email. For this demonstration, you have a form to enter employee information and upload a photo. After submitting the form, K2 saves the employee information and image to a SmartObject. A workflow starts and sends an email which contains the employee information and image.
An email with photo attachment

Scenario
You work in Human Resources and are responsible for updating employee contact details. One of the goals is to obtain a photo of each employee. You create a form that allows photo attachments. As employees submit forms with their details, a workflow starts and saves the content to a SmartObject. The workflow sends you an email with the photo attached for your convenience.
Steps
For this scenario, you create a SmartObject to store employee details. You create a view from the SmartObject, then add it to a form. The final component is a workflow, which contains a single step to send an email.
Setup Steps
The following steps set up the scenario from start to finish. If you want to skip the setup steps and view the topic step, go to Add a Send Email step and personalize it with a reference.
- Create a SmartBox SmartObject called Employee Details. Add properties using the table below as a guide. (Optional: Add categories first to K2 Designer to keep your work organized.)
Property Type Notes First Name Text Last Name Text Department Text Email Text Phone Text Photo Image The employee uploads their photo. A rule on the view saves the image to the SmartObject after they submit the form. - Launch K2 Designer.If you do not know how to access K2 Designer, see Accessing K2 Sites.
- Click Browse to expose the categories. Categories are folders that keep your environment organized. Add the following categories:
How To
Attach Image.
(To begin, right-click All Items, then select New Category.)
- Now you create the SmartObject. Right-click the Attach Image category and select New SmartObject. Name the SmartObject
Employee Details
then select the SmartBox option. Click Create.SmartObjects are connectors to data sources. Data sources are where data lives, for example, SharePoint lists or SQL tables. SmartBox is K2-provided data storage where K2 creates a table for you in the K2 SQL database.
- Add the properties for the SmartObject. Properties are like the columns in a table. Click Add. Enter
First Name
for the Name value, then select Text for the Type (if it isn't already). Click Add property to add another item.
- Add the remaining properties using the table below as a guide. Click OK when done to save all the properties.
Property Type Notes Last Name Text Department Text Email Text Phone Text Photo Image The employee uploads their photo. A rule on the view saves the image to the SmartObject after they submit the form. - Your properties should look like the image below. Click Finish to save and exit your SmartObject. (The Finish button is near the upper right corner of your screen.)

- Launch K2 Designer.
- Create a view from the Employee Details SmartObject called Employee Details View. Create labels and controls and select all properties except ID. Select the Create (Standard) button.
Next, you create a view from the SmartObject. Creating a view from a SmartObject binds it to the SmartObject and makes the properties available for use in the view. The properties become the view controls for entering data. Because the controls are bound to the SmartObject, K2 knows to save view content to its corresponding data source property.
- Right-click the Employee Details SmartObject and select Design View.
- Name the view
Employee Details View
then confirm Item View is the View Type. Click Create.
- Click Create Label and Controls. This option adds SmartObject properties for you and allows you to select which methods you need.SmartObjects consist of properties and methods. Methods are protocols for interacting with data, such as create, update, and delete.

- On the Create Labels and Controls screen, select all the fields except ID (these are the SmartObject properties you want as view controls). Select the Create (Standard) method. For this demonstration, you only need to create records. Click OK.

- Click Finish to save and exit the view.
Your view should look like the image below. Notice the Create method is a button control. Behind the scenes, K2 adds a rule action that creates field entries in the SmartObject when you click the Create button.

- Create a form called Employee Details Form and add the view.
- Right-click the Attach Image category and select New Form. Name the form
Employee Details Form
then click Create.Views are not accessible on their own and must be contained within a form. Forms are the public facing interface that you open with a browser. You can use a view in more than one form and one form can contain multiple views.
- Next, you add the Employee Details View to the form's design canvas. In the left column, click the Views tab. This is the same category structure you see in the K2 Designer. Navigate to your view location. Drag the Employee Details View onto the canvas.

- Click (Enter View Title) and change it to
Details.
- Your form should look like the image below. Click Finish to save and exit the form.Your form may have a different style applied, depending on your environment. You want to confirm you can see the Employee Details View contained in the form's design canvas.

- Right-click the Attach Image category and select New Form. Name the form
- Create a workflow called Employee Details Workflow.
- Right-click the Attach Image category and select New Workflow.
- The K2 Workflow Designer launches. Name the workflow
Employee Details Workflow
then click Create.
The Workflow Designer launches. The welcome screen includes an interactive panel which you can navigate through by clicking the left and right arrows. You can also click Close to continue to the design canvas.

- Configure the Start step to use the Employee Details Form. Keep all other default settings.
Before you can deploy the workflow, you must configure the Start step. K2 needs to know how and when you want the workflow to start. In this demonstration, you want to workflow to start after you click the Create button on the form.
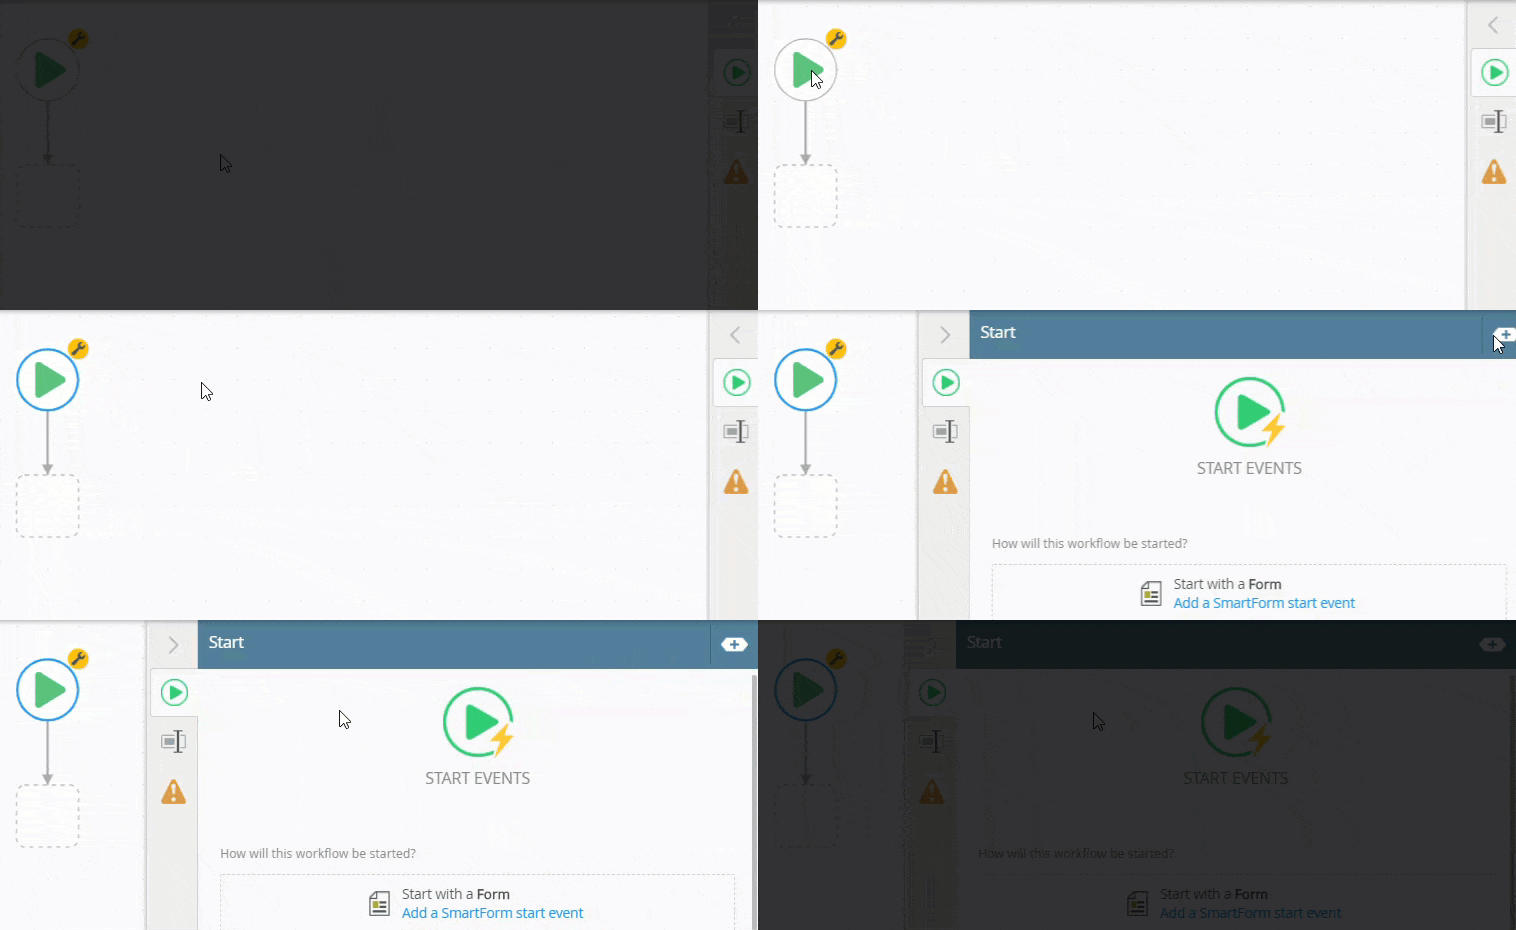
- Select the Start step (with the green triangle). Selected steps have a blue border. Expand the Configuration Panel.The Configuration Panel allows you to configure and customize the steps you add to your workflow.

- Click the Add a SmartForm start event link. This option allows you to bind an existing SmartForm to the workflow.

- Navigate to your Employee Details Form. This folder is similar to the K2 Designer categories. Select the form and click OK.

- On the References screen, notice K2 found the Employee Details SmartObject. K2 discovered the SmartObject when you selected the Employee Details Form (which is bound to the data source). Click Next.

- On the Start Rule screen, keep the default Do it for me! and click Next. K2 configures the form rule to start this workflow when you click the Create button.

- On the summary screen, review the changes K2 makes to the Employee Details Form, then click Save and Finish. When you see the success check, click OK to exit the wizard.

- Notice that the start event indicates the workflow starts when the Create button is clicked. Click the slider to collapse the Configuration Panel.

The Start Workflow from a Form wizard launches.
- Select the Start step (with the green triangle). Selected steps have a blue border. Expand the Configuration Panel.
Add a Send Email step and personalize it with a reference
The following steps illustrate how to add a Send Email step and configure it to use a reference for attaching an image.
- Add a Send Email step. Use the Photo reference as the Attachments default value. Find the Photo reference in the Context Browser > Employee Details references. Use Originator as the recipient.
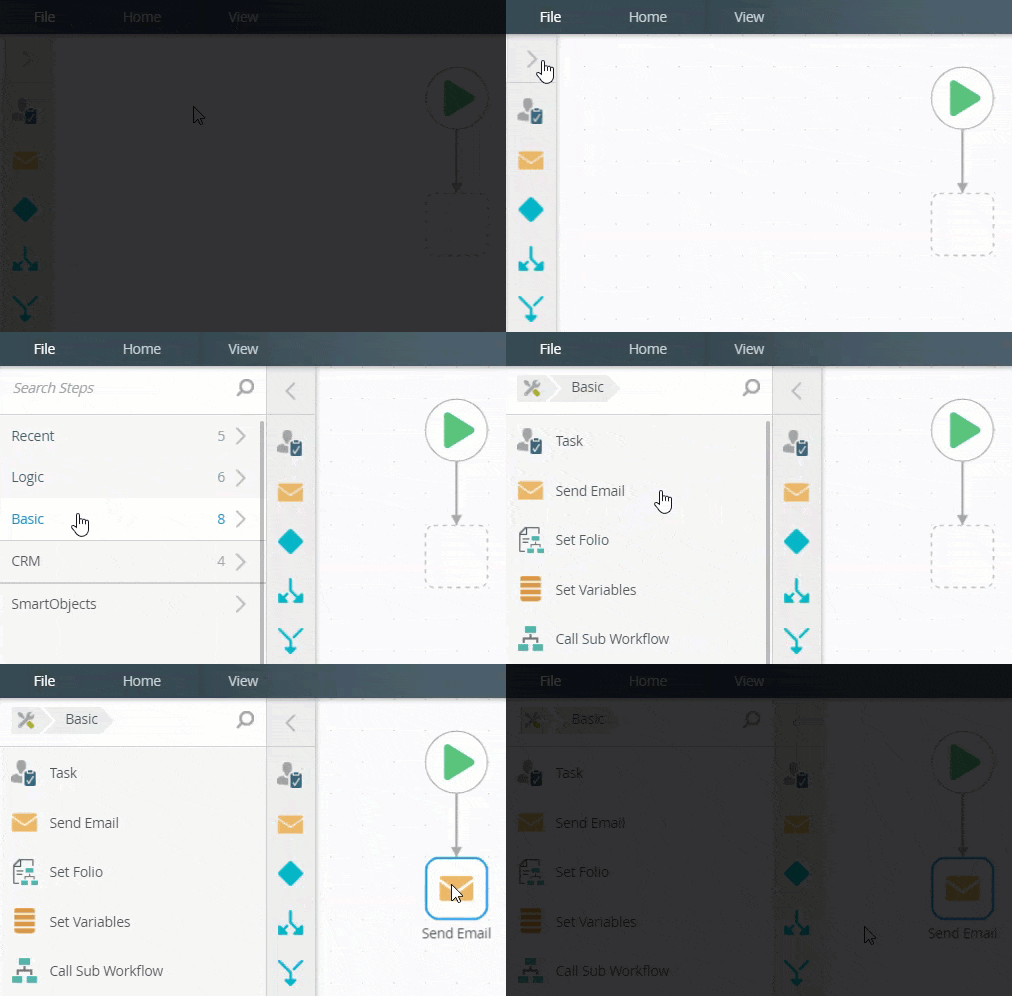
- From the Toolbox > Basic node, drag a Send Email step into the empty placeholder below the Start step.The Toolbox contains steps from which you build your workflow. A workflow is a sequence of steps which automates a business process when followed from start to finish.

- Select the Send Email step, then expand the Configuration Panel.
- For the recipient, use the default Originator. For the Subject line, enter
Employee Details for [First Name Last Name]
where the bracketed text represents references you add from the Context Browser.
- Expand the Context Browser using the slider.The Context Browser contains references, variables, functions, and SmartObject properties. At runtime, K2 replaces references and variables with live data. For example, K2 replaces the First Name reference with the First Name value from the current record.

- Expand the Employee Details references. Notice that these are the same properties you created in the SmartObject. Use references to personalize your content. Drag the First Name and Last Name references into the Subject line. At runtime, K2 replaces them with the actual values from this record.

- Enter content for the message Body. You can use references to personalize the message.

- Use the Photo reference for the Attachment value. Click Add Attachment. Drag the Photo reference into the Attachment box.

- Your email configuration is complete, collapse the Configuration Panel.
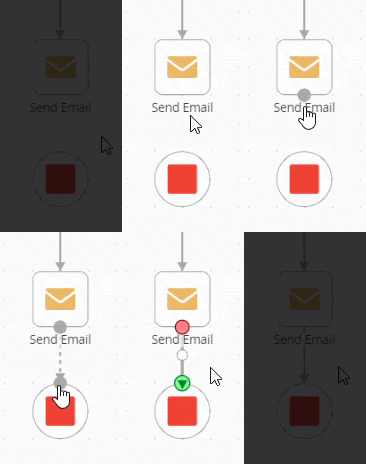
- The next step is optional, but adds a clear end to your workflow. From the Toolbox > Logic node, drag an End step below the Send Email step.To return to the Toolbox main menu, click the Toolbox icon in the breadcrumb bar.


- Connect the Send Email step to the End step. To connect steps, hover over the border of the first step until you see a handle. Click and drag the handle into the second step. Click the canvas to set the line.

At this point, your workflow should look like the image below. You have configured the workflow to start when you click the Create button. The workflow sends an email back to you, the workflow originator.

- From the Toolbox > Basic node, drag a Send Email step into the empty placeholder below the Start step.
- Deploy the workflow. After you deploy the workflow, return to the K2 Designer.
- Before you can use the workflow, you must deploy it. Deploying a workflow publishes it to the K2 server and makes it available for use. If you make any changes to the workflow, you must deploy it again so that the K2 server can register the changes. Click File > Deploy. When you see the success dialog, click File > Close to return to the K2 Designer.

- Before you can use the workflow, you must deploy it. Deploying a workflow publishes it to the K2 server and makes it available for use. If you make any changes to the workflow, you must deploy it again so that the K2 server can register the changes. Click File > Deploy. When you see the success dialog, click File > Close to return to the K2 Designer.
- The last step is to submit a form, then review the email sent by the workflow. Check in the Employee Details Form and Employee Details View. Use the Runtime URL to launch the form. Enter content into the form fields and upload a photo. Click Create. Review the email sent by the workflow. Confirm the photo appears as an email attachment.
- Before testing, you must check in the form and view. Checking in views and forms publishes them to the K2 server, similar to deploying a workflow. Right-click the Employee Details Form and select Check In. When you see the warning about checking in associated views, check the box to Check in associated views. Click OK.

- Now you are ready to launch the form. Select the Employee Details Form, then click the Runtime URL found in the central pane.The Runtime URL is used to launch the form in a web browser. Use this URL as the public link to this form. For example, use this link in emails or web pages to provide access to other users.

- The form launches in your default browser. Complete the form fields with sample content. To upload an image, select Click here to attach an image. Navigate to and your image, then click Open to upload it to your form.

- When you have completed the form fields, click Create. (There won't be any visual indication of the form submitting. In the real world, you might configure a message to let you know the form submitted successfully.)

- Open your email client and review the email. Review the personalization from the references. Notice the photo attachment. The email contains saved content from a SmartObject.

Clicking Create creates your content as a record to the Employee Details SmartObject. Recall that the workflow sends an email using references to this record to personalize the email. The photo reference attaches a copy of the photo to the email.
- Before testing, you must check in the form and view. Checking in views and forms publishes them to the K2 server, similar to deploying a workflow. Right-click the Employee Details Form and select Check In. When you see the warning about checking in associated views, check the box to Check in associated views. Click OK.
Review
You can personalize emails using references from the Context Browser. You can also use references as attachments. At runtime, K2 replaces references with live data from the current record. In this demonstration, you used reference fields in your message body and as an attachment. The resulting email includes personalized content and an attached image.