Job Satisfaction Survey (wizard)
This tutorial describes how to create a job satisfaction survey using the Survey application wizard. You will learn how to select a template of sample questions to begin, then add, edit, and remove questions to customize the survey for your own needs. You will send the survey to specific users, then view reports on the results returned. Last, you will learn about survey administration through editing a question, then testing your edit with a new instance of the survey.
The survey you send in this tutorial includes four questions. By selecting a survey template that closely matches your survey needs, you have a predefined list of questions you can edit or delete. You can add new questions as well. The survey template provides a variety of data types to choose from, such as numerical answers, text answers and drop-down lists. You can require questions or leave them optional. When you start a new instance of a survey, you can select the participants you want and K2 sends an email with a link to the survey. The survey is browser-based, which eliminates the need for specialized software for your users to respond. You will view survey results, then explore the reporting and administering features for this application.
Job Satisfaction Survey 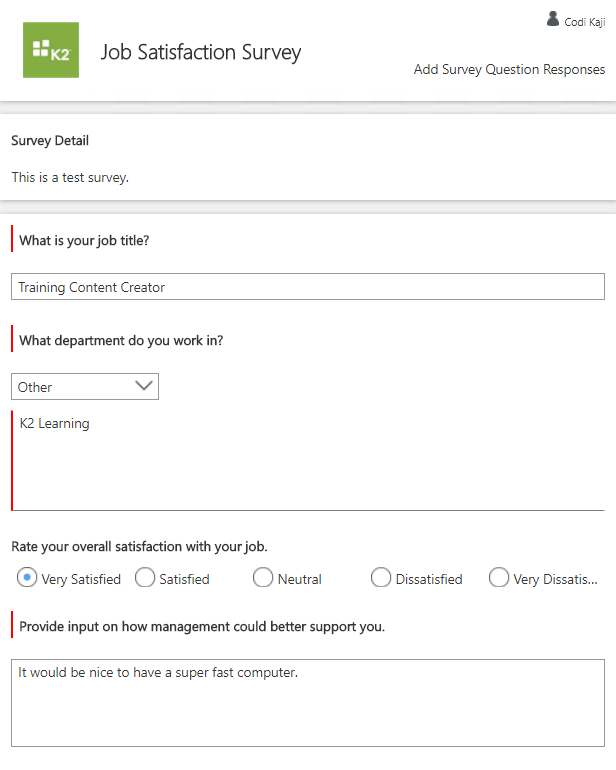
Apps are accessible through Workspace. Workspace is your personal dashboard for managing tasks assigned to you, viewing reports, managing personal settings (such as out-of-office and login credentials), and launching applications.
- Launch WorkspaceIf you are unsure of how to launch the Workspace site, see Accessing Sites.
-
The Workspace launches. You may see a welcome dialog which you can exit. If time allows, explore the Workspace features first, then launch the Apps workspace. To launch the Apps workspace, click the Nintex icon to expose workspace options. Click the Apps link to launch the Apps workspace.
- Workspace launches. In some environments, you will see a welcome dialog box.If you see the welcome dialog and would like to explore its contents, click START. Click NEXT on each screen until you reach the end, then click DONE. Otherwise, exit the dialog.

- You should now see the Workspace dashboard. The left-side column provides access to the workspace features. If time allows, take a few minutes to explore the Workspace. HOME
- The Home button provides quick access to the workspace landing page, or dashboard.
- The Inbox contains a display of tasks currently assigned to you. If the task was not configured to send a task notification email, you will not see it here. Clicking a task opens the associated form where you can complete the task.

- The My Forms page displays the forms (SmartForms) available for you to use.
- The Process Overview report provides a summary of process instances that you are associated with. For example, processes you started, or processes containing a task you actioned.
- The My Overview report displays a summary of your active and completed tasks. From this report, you can action tasks from the Active Tasks list.

- Here you can set your out-of-office controls, set-up auto logins, and set your default workspace.

- Click the Nintex icon to expose other workspace options. Click the Apps option to launch the application wizards menu.
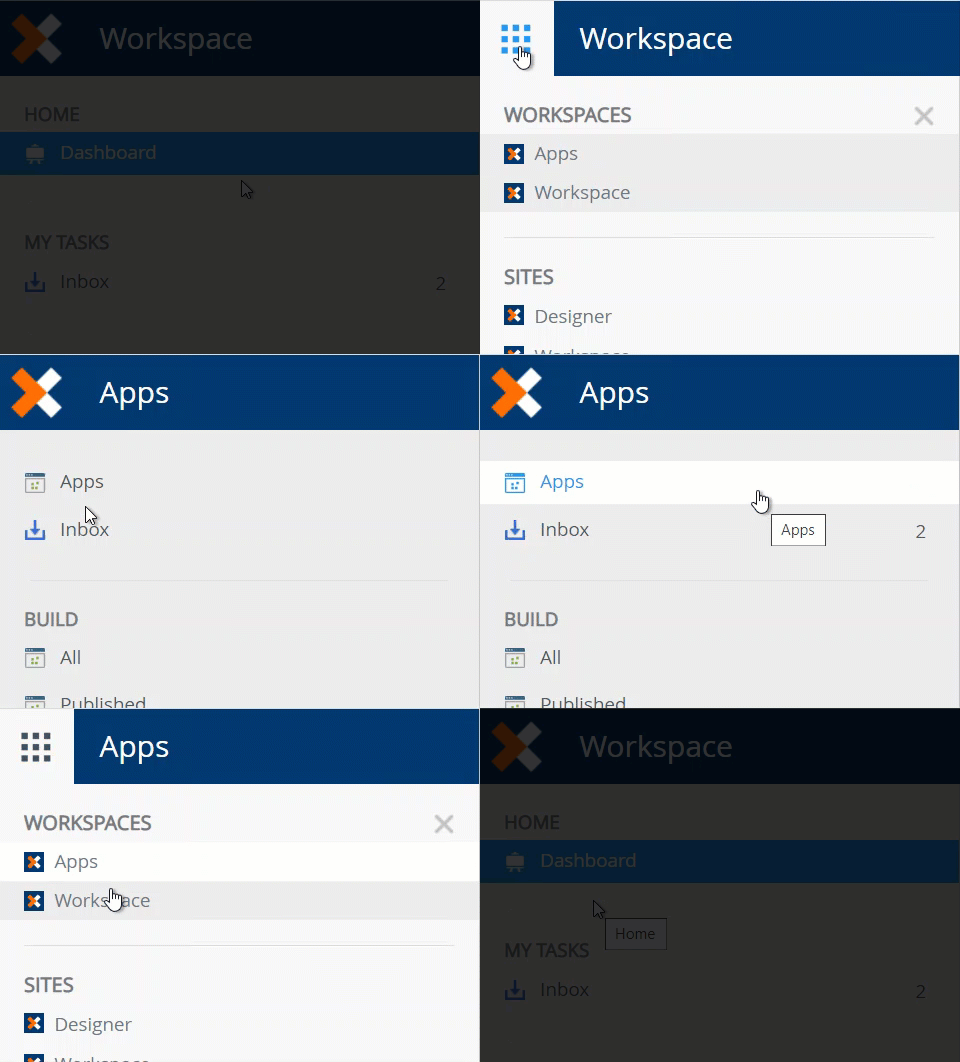
You may not have any apps just yet...
- Workspace launches. In some environments, you will see a welcome dialog box.
- After launching the Apps workspace, navigate to the BUILD > All > ALL APPS landing page. Add a new application. Select the Survey application wizard. Name the application Job Satisfaction Survey. For the description, enter This is a test survey. Select the Employee Job Satisfaction template.Each application title must be unique. You will see an error if you try to duplicate application titles. Consider adding your initials to the title so that you can easily determine which apps are yours. For example, Contact List [YourInitials], like Contact List KL.
Duplicate name error
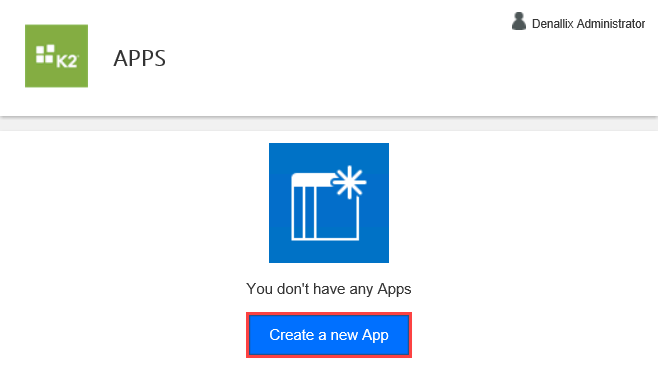
- First, you will add a new application. In the central pane, click Create a new App. (See the Note box below the image if you already have apps displayed in the central pane and don't see the create app link.)
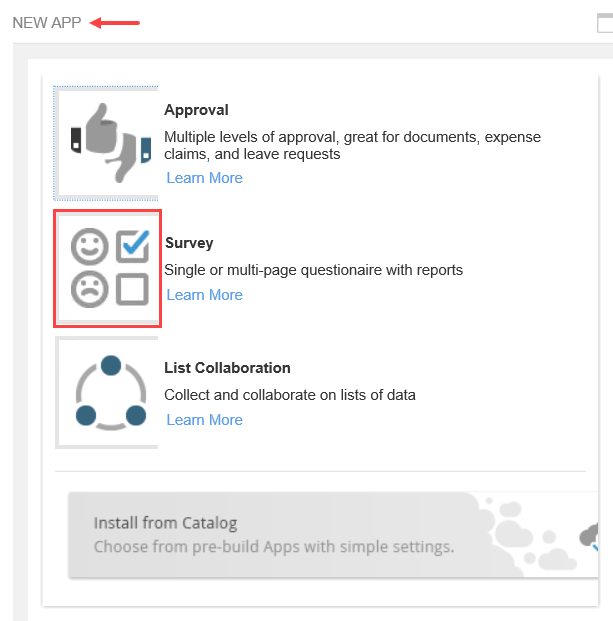
- You are on the NEW APP screen. Here, you can select the app type you want to generate or you can select the option to install an app from the catalog. (See the Install from Catalog tutorial for instructions on how to use this option.) For this tutorial, click the Survey option.
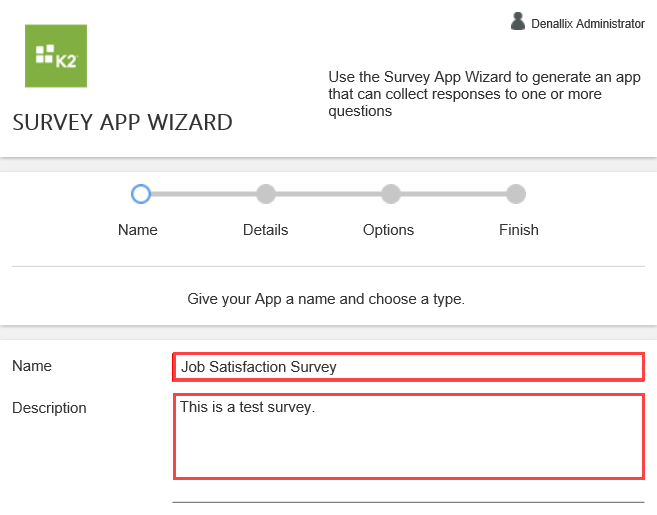
- You see a screen with general settings. At the top of the screen is a time-line that displays your wizard progress. Below that is a section where you can name your new application and give it a description.
Name the new application
Job Satisfaction Survey
and for the Description enter,
This is a test survey.Each application title must be unique. You will see an error if you try to duplicate application titles. Consider adding your initials to the title so that you can easily determine which apps are yours. For example, Contact List [YourInitials], like Contact List KL.
Duplicate name error
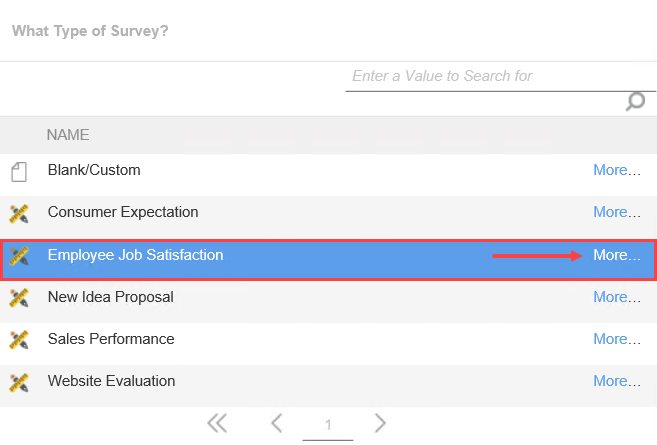
- Scroll down until you see the templates section. Here, you will find a list of survey-type templates you can choose from. Select Employee Job Satisfaction. To learn more about each template, you can open the template details and view the default overview, data object, and workflow structure for the template. Click More.
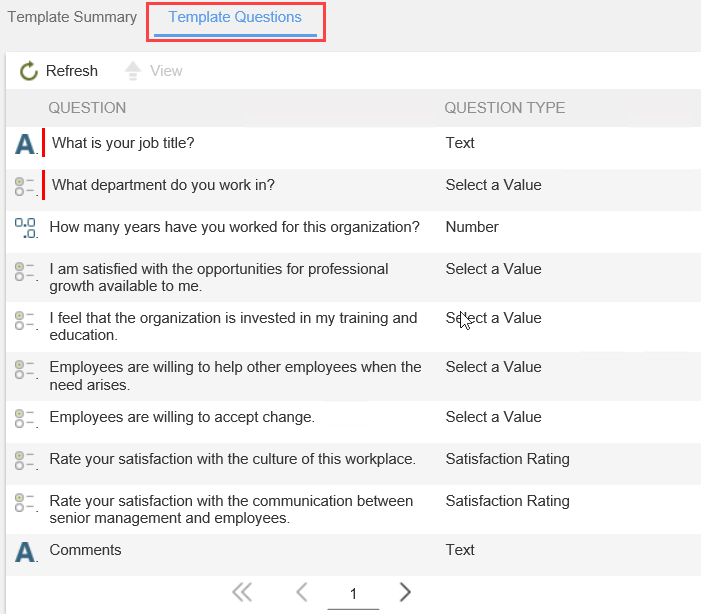
- The details for this template type open in a new browser window. On the Template Details screen, take a minute to explore the details available for the Employee Job Satisfaction template type. The Template Summary screen displays the survey template name and description. The Template Questions screen displays the default survey questions. You can view the default survey questions for each template, then choose the template that most closely matches your needs. Close the Template Details browser window.
- Click Next to continue.
If you already have apps displayed in the central pane, you can start a new app from the BUILD > All > ALL APPS screen. Click All, then click the New button.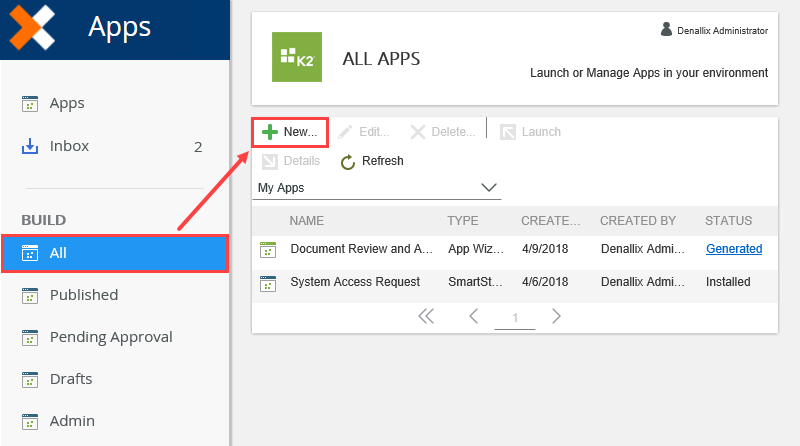
- First, you will add a new application. In the central pane, click Create a new App. (See the Note box below the image if you already have apps displayed in the central pane and don't see the create app link.)
- You are now on the Questions page. On this page, there are a number of predefined questions relating to employee job satisfaction. As with any of the survey templates, you can add, edit, or remove questions to customize the survey to meet your organization's needs. For this application, you have only four questions. To begin, delete all the questions indicated in the image below. You should have three questions remaining.
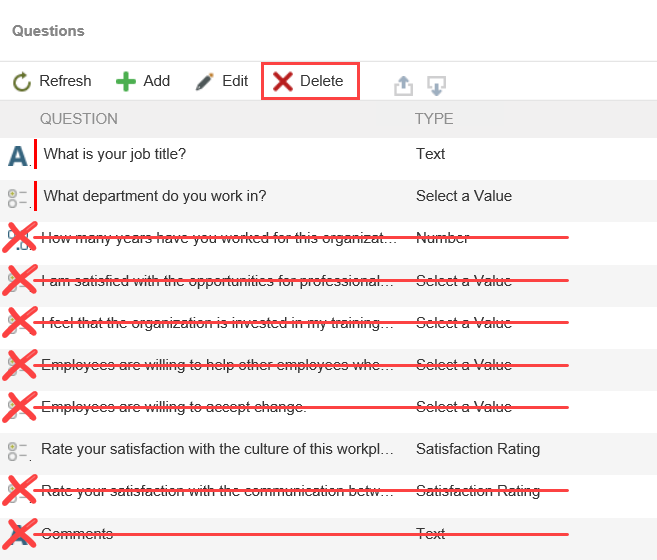
- Each survey template provides sample questions. You can add, edit, and delete questions to customize the survey. For this application, you will have four questions. Begin by deleting the predefined questions marked with a red "x" in the image below. Select the question, then click Delete. Repeat this process until you have deleted all the marked questions. You should have three questions left. You will add the fourth question in the next step.

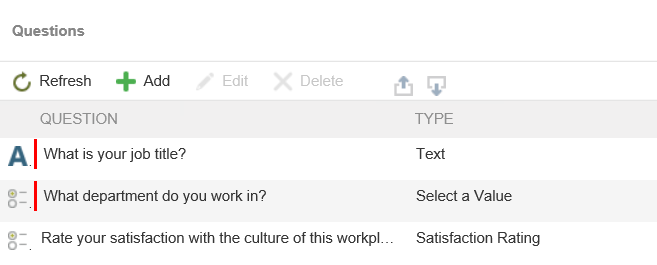
- Each survey template provides sample questions. You can add, edit, and delete questions to customize the survey. For this application, you will have four questions. Begin by deleting the predefined questions marked with a red "x" in the image below. Select the question, then click Delete. Repeat this process until you have deleted all the marked questions. You should have three questions left. You will add the fourth question in the next step.
-
Edit the question that says Rate your satisfaction with the culture of this workplace and change it to Rate your overall satisfaction with your job. Add a new question that says Provide input on how management could better support you., then make it a multiple lines - text data type, and require users to respond to the question.
- Next, you will edit one of the template questions. Select Rate your satisfaction with the culture of this workplace, then click Edit. Change the question to
Rate your overall satisfaction with your job.
Click Done (at the bottom of the page). Do you not need to edit any other settings.
- Now you add a new question. Click the Add icon.
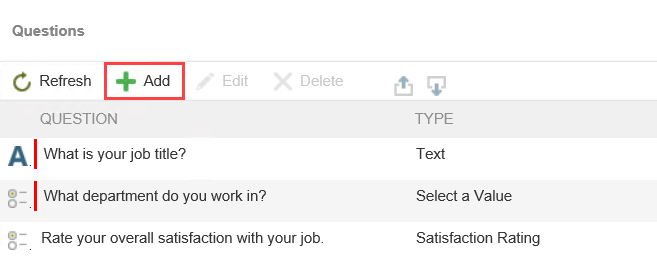
- For the Question name, enter
Provide input on how management could better support you.
Then select the Text option for the Answer Type. Select Multiple lines under the Question Options title. Require the question. You want employees to provide feedback for managers. Click Done (at the bottom of the page).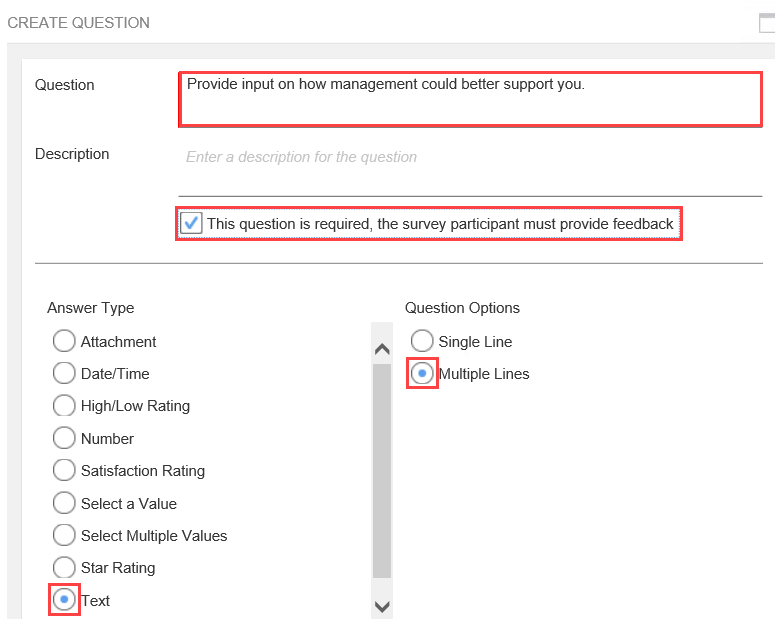
- Your questions are complete, click the Next (Additional Options) button.
- Next, you will edit one of the template questions. Select Rate your satisfaction with the culture of this workplace, then click Edit. Change the question to
- On the Options screen, you can leave the default settings to show all questions on one page. Click Preview and Finalize. On the summary screen, generate your survey application.
- On the Options screen, you have the option of setting how you want your survey questions presented to your users. You can have all questions appear on the same page, or one or more questions per page. For this application, one page is fine. Click Preview and Finalize.
- Click the Preview button. The preview screen allows you to see how participants will view your survey. Click Close Preview.
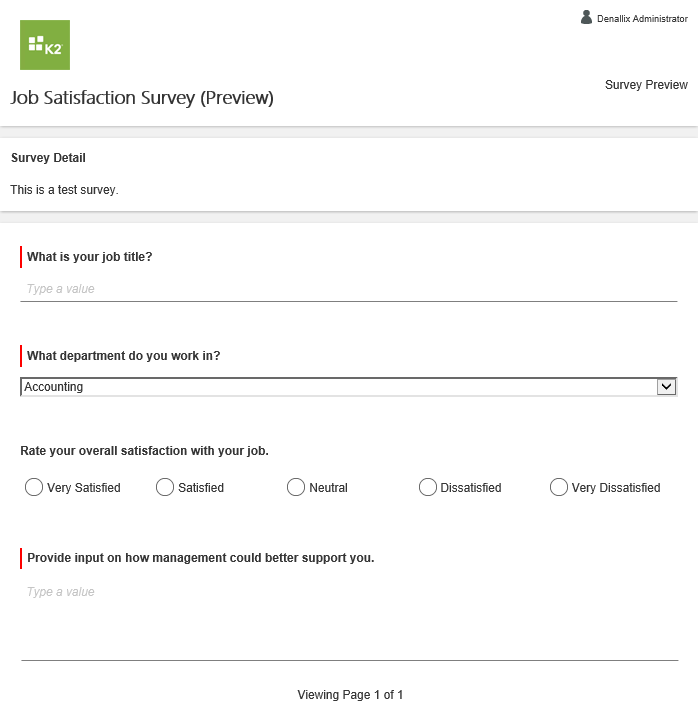
- On the summary screen, click Generate App. Depending on the complexity of your survey, it can take several minutes to create the application.
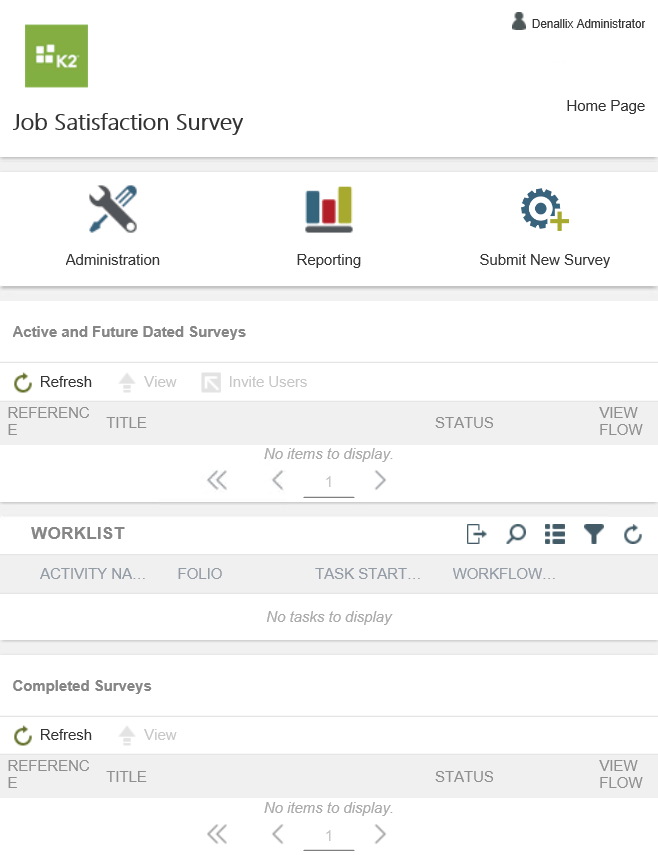
When the application generation process completes, you are on the Job Satisfaction Survey landing page. (This may take a few seconds to redirect. Wait until K2 redirects you to the Job Satisfaction Survey landing page before continuing.)
-
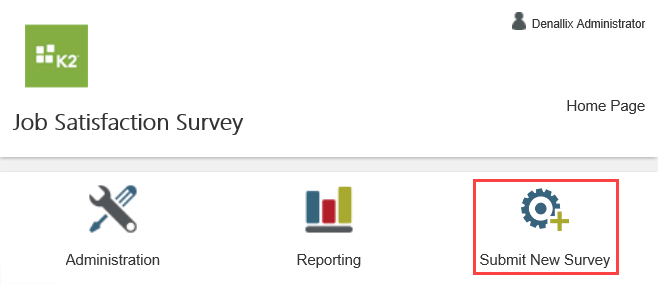
To use the application, you will send the survey to two users. From the Job Satisfaction Survey landing page, click Submit New Survey. Name the survey Employee Survey First Quarter, then enter a Description of your own. Select tomorrow's date for the Close On value. Invite Codi Kaji and Bob Maggio to participate.Assign your own user account or a co-worker’s account, so that you or they can action the task when testing the application.
- You can send out the Job Satisfaction Survey as many times as you need to. For example, you might want to get employee job satisfaction opinions every quarter. You can use the same survey, sent out at different times. On the Job Satisfaction Survey landing page, click Submit New Survey.
- On the Submit New Instance page, enter
Employee Survey First Quarter
for the Title, then enter
This is a test survey.
for the Description. For the Close On date, select tomorrow's date. Be sure to click OK at the bottom of the calendar picker so you set the value.
- Click Invite Users. Selected users receive an email with a link to the survey. You can customize the email message by editing the subject and message boxes. Make sure you leave the link to the survey intact. Users click this link to open the survey.
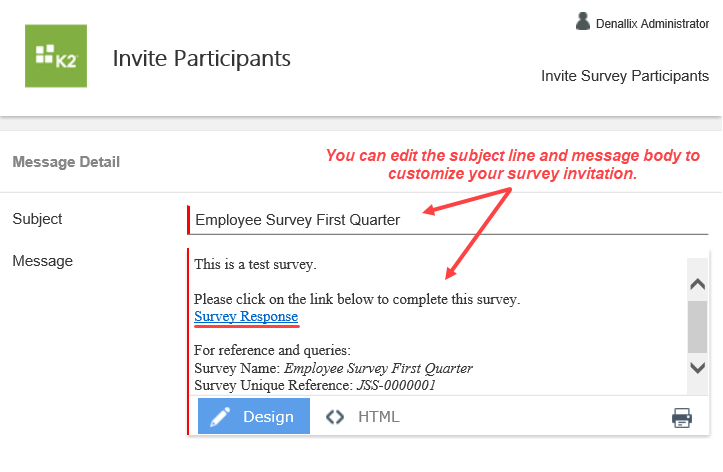
- Next, you will select the survey recipients. In the Message Recipients pane, enter
Codi
into the Select A User From Your Domain box, then click the resolve icon. When you see Codi's name and email, click the Add button to add her to the list of survey recipients.Assign your own user account or a co-worker’s account, so that you or they can action the task when testing the application.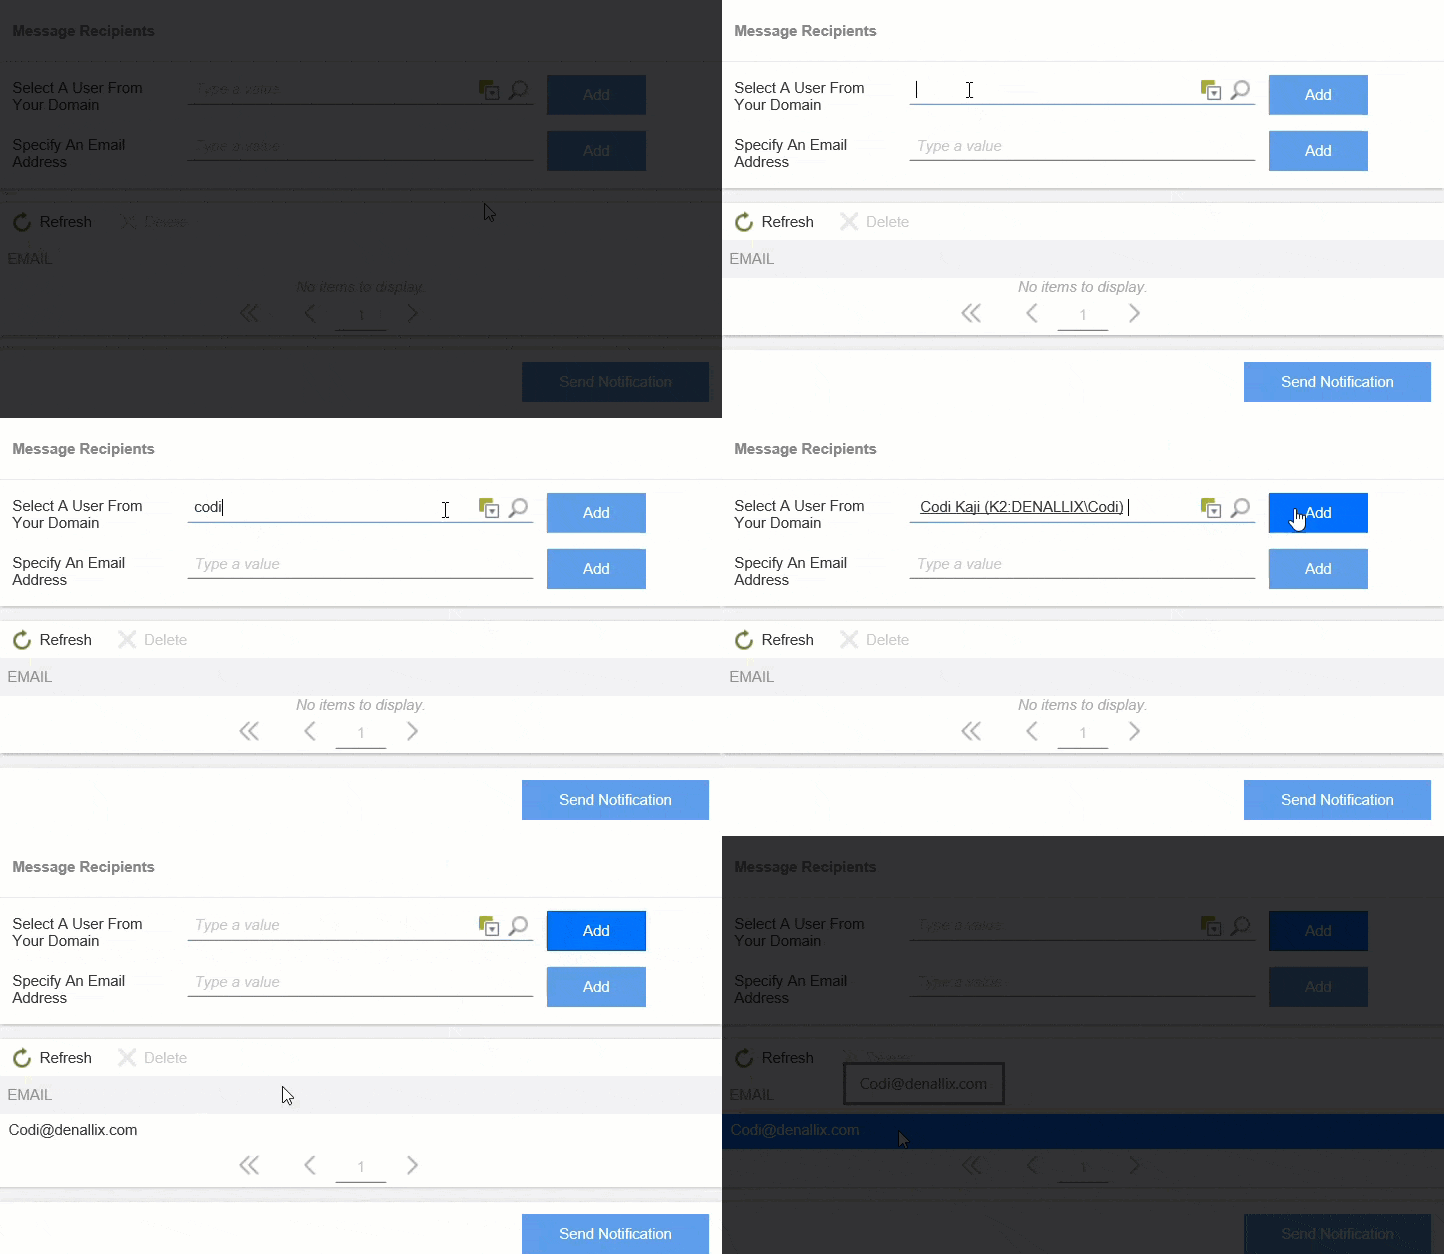
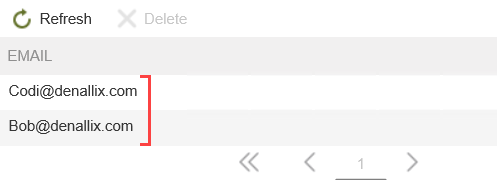
- Repeat this step and add Bob Maggio to the survey recipient's list. Click Send Notification to send the survey.
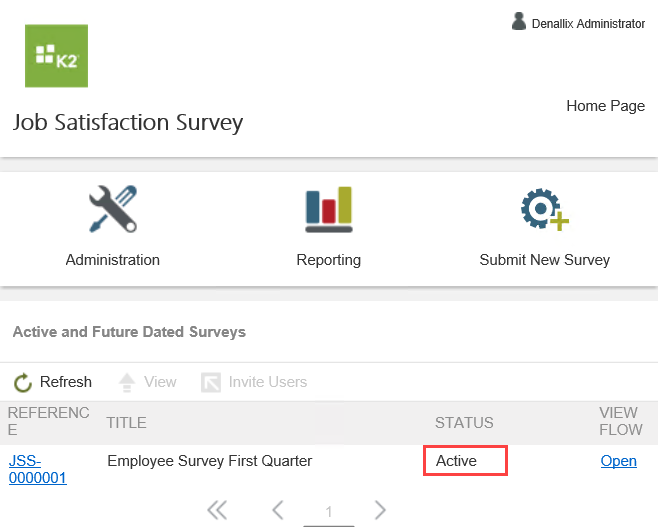
On the Job Satisfaction Survey landing page, you can see the active survey.
- You can send out the Job Satisfaction Survey as many times as you need to. For example, you might want to get employee job satisfaction opinions every quarter. You can use the same survey, sent out at different times. On the Job Satisfaction Survey landing page, click Submit New Survey.
- Next, you will launch OWA (Outlook Web Access) for the two recipients you selected, so that you can respond to their survey email.
Use the User Shortcuts to open instances of IE for Codi and Bob. Then use the Favorites bar bookmark to launch OWA for each of them. (If you are working in your own environment, you can ask the survey participants you entered to help you with this step.) The login credentials for Codi and Bob are as follows:
Domain\user name: Denallix\codi or Denallix\bob
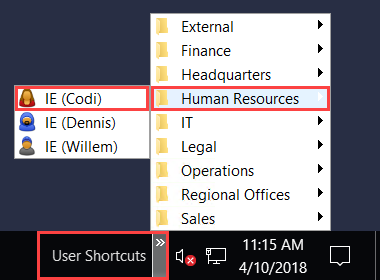
Password: K2pass! (for both)- In this step, you will open an instance of Internet Explorer for both Bob and Codi. On your K2-provided VM, use the User Shortcuts in the lower right corner of your screen to launch the two instances of IE. (If you are working in your own environment, you will need to work with the users you added as recipients to respond to the survey.) Click Human Resources, then IE (Codi) to launch an instance of Internet Explorer in Codi's name.
- Once you have IE opened for Codi, click the OWA link in the toolbar to open Codi's email client. If you don't see the link, you can enter the URL for mail: https://mail.denallix.com/owa/. Enter the credentials below, then click sign in.
Domain\user name: Denallix\codi
Password: K2pass!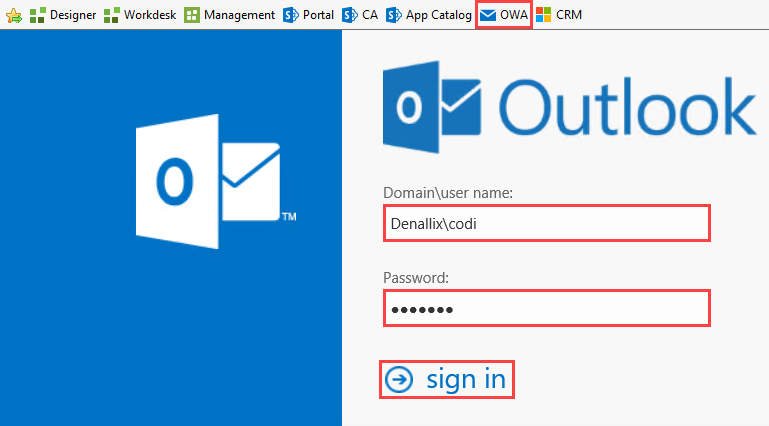
- Repeat the steps above and open OWA for Bob. Bob is in the Finance group. Bob's logon credentials are below.
Domain\user name: Denallix\bob
Password: K2 pass!
- In this step, you will open an instance of Internet Explorer for both Bob and Codi. On your K2-provided VM, use the User Shortcuts in the lower right corner of your screen to launch the two instances of IE. (If you are working in your own environment, you will need to work with the users you added as recipients to respond to the survey.) Click Human Resources, then IE (Codi) to launch an instance of Internet Explorer in Codi's name.
-
With Codi's browser active, respond to the survey. Respond to the questions with any answers you prefer. Notice that the open-ended question is required.
- Next, you will respond to the survey as Codi. In Codi's OWA, select the email notification with Employee Survey First Quarter as the title. Click the Survey Response link to launch the survey.
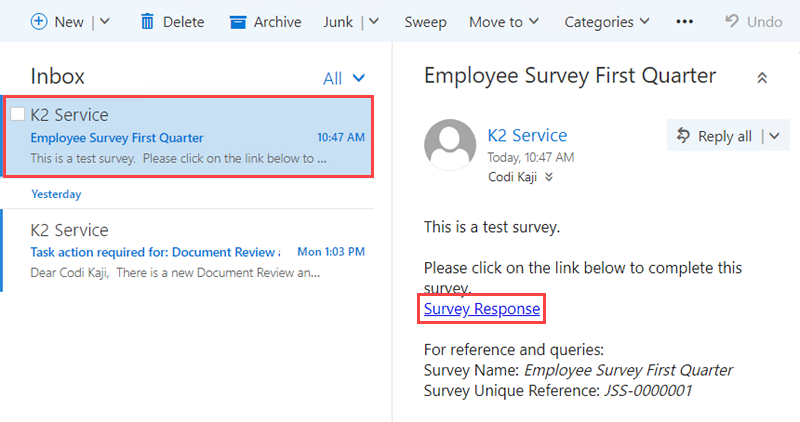
- The survey launches in a new browser tab. Complete the questions with any responses you like. Notice that the final question, Provide input on how management could better support you, is required (note the red band). This is a setting you checked when you added the question. If you need to, you can save the survey and return to it later by clicking Save as Draft. Submit your responses.
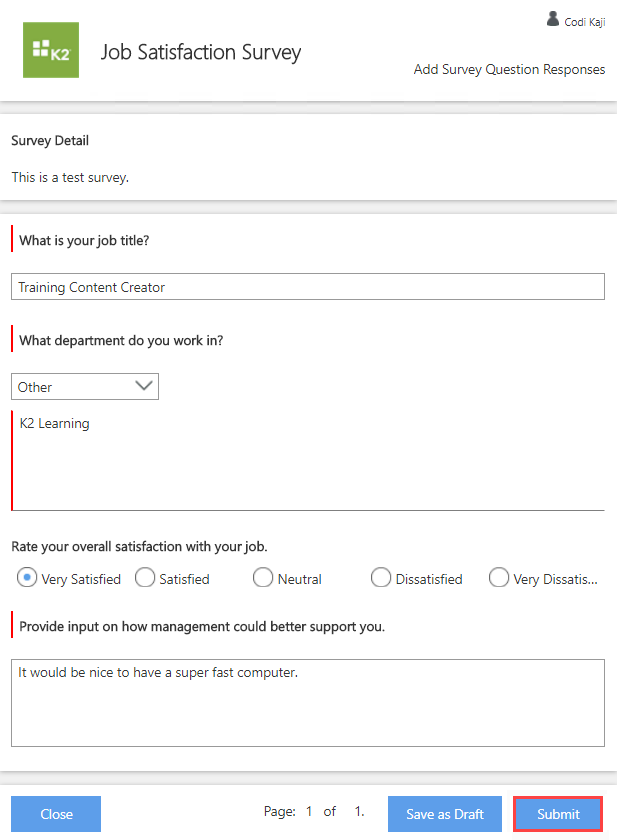
- Repeat the steps above for Bob. Respond to the survey questions, then submit the responses.
- Next, you will respond to the survey as Codi. In Codi's OWA, select the email notification with Employee Survey First Quarter as the title. Click the Survey Response link to launch the survey.
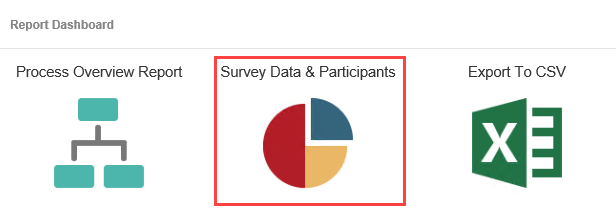
- Survey-type applications have three reporting options: Process Overview Report, Survey Data & Participants and Export to CSV. The Process Overview Report provides instance and activity reporting for surveys, during their creation. This is the workflow instance that runs as you configure and create the survey. The Survey Data & Participants report contains data from survey participants and their responses. The Export to CSV report allows you to export data in a CSV format so that you can work with the data in software such as Excel. This tutorial covers the Survey Data & Participants report.
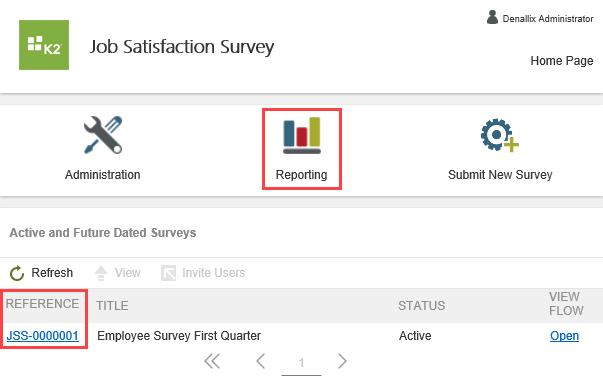
From the Job Satisfaction Survey landing page, make a note of the reference number. You will use the reference number to search for the correct survey results. Remember, you can use the Job Satisfaction Survey many times, creating many instances of the same survey. To find the correct instance results, you'll search for them using reference number. Click Reporting.- Make a note of the survey reference number (JSS-0000001 in the image below), then click Reporting. The reference number refers to the "survey instance" ID. You could have many instances of a single survey, so it's more effective to search by the reference number of the instance, rather than the survey name itself.
- On the Report Dashboard, click Survey Data & Participants.
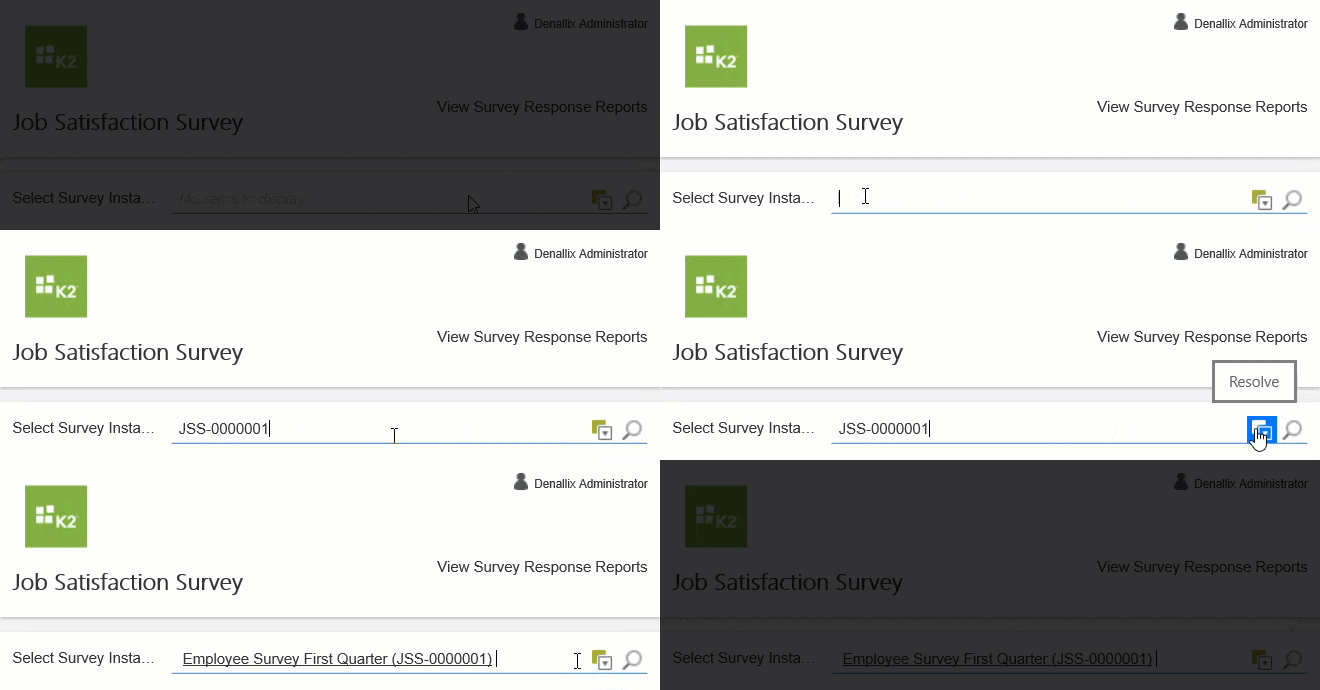
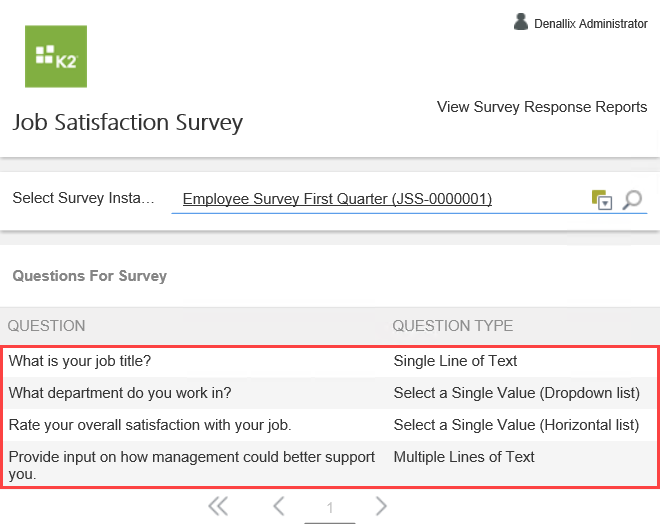
- In the Select Survey Instance text box, enter the reference number, then click the resolve icon. You see a list of your survey questions.
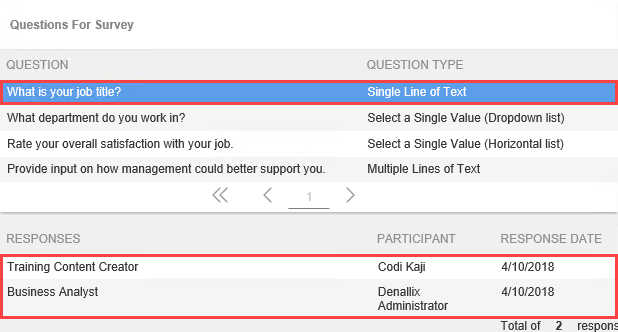
- Select the first question. The responses appear in the RESPONSES pane. You can see each response and the participant who provided the response.
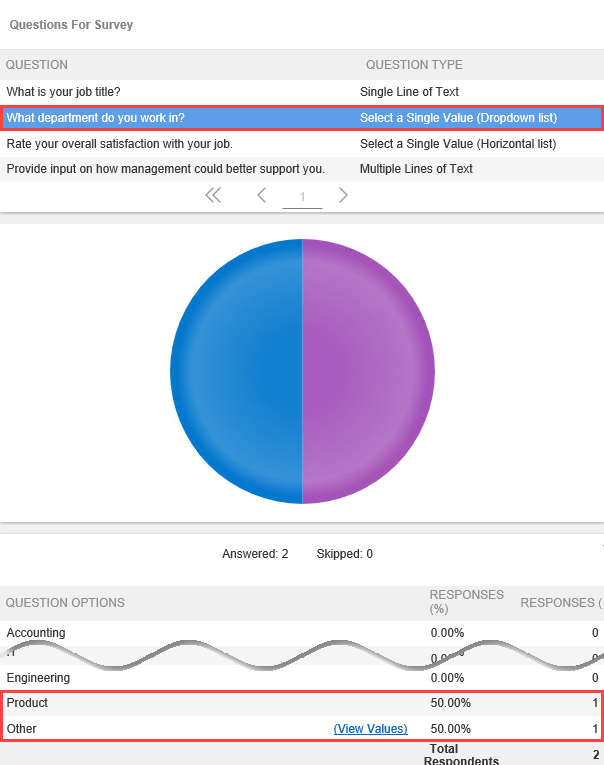
- Select the second question, What department do you work in? Because this question is a drop-down selection, the results display in a pie chart format. Below the chart, is a list of each drop-down value, along with the number of responses each value received.
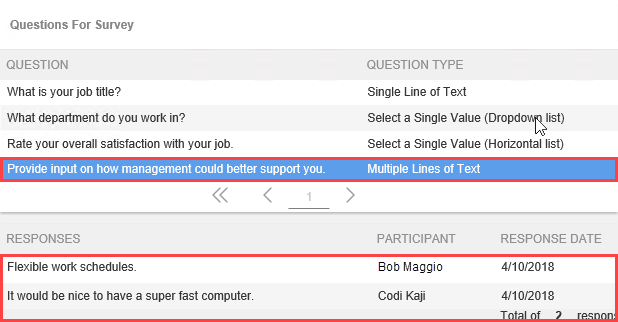
- Select the last question that allows for open-ended answers. (Provide input on how management could better support you.) Once again, the answers that each participant provided appears below the question.
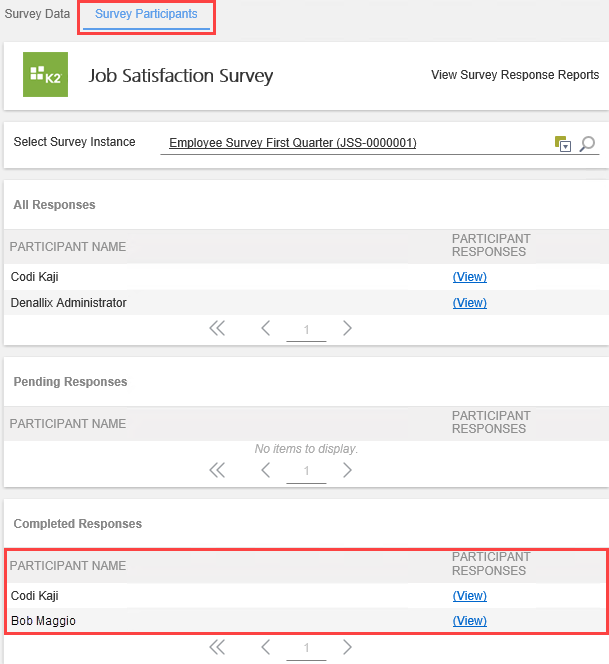
- Select the Survey Participants tab in the toolbar. On this page, you see a list of invited participants, along with sections for pending surveys and completed surveys.
- Make a note of the survey reference number (JSS-0000001 in the image below), then click Reporting. The reference number refers to the "survey instance" ID. You could have many instances of a single survey, so it's more effective to search by the reference number of the instance, rather than the survey name itself.
- You can administer surveys and edit any questions which contain multiple response choices (such as drop-down lists or radio button options). From the Job Satisfaction Survey landing page, click Administration. Edit the What department do you work in? question. Add a new department called Documentation and Learning, then assign it a zero (0) sort by value. This puts the new department near the top of the drop-down list, making it easier for testing.
- Next, you will edit a question on the Job Satisfaction Survey application. On the landing page, click Administration.
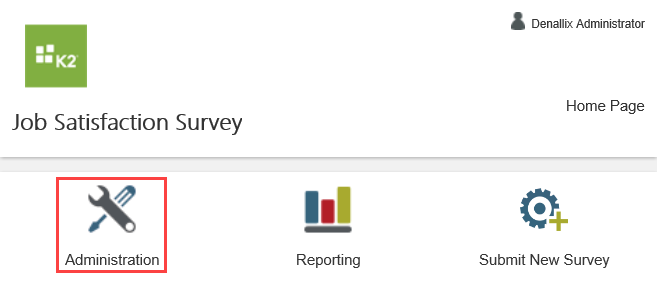
- You see a list of your survey questions. For questions that have multiple choice or lookup data types (such as drop-down lists or lists of radio buttons), you can view the option values in the Question Options pane below the questions. In this step, you will edit the department question and add a new department to the question options.
Select What department do you work in?. In the Question Options pane, click Add. For the Title, enter
Documentation and Learning
then for the Sort By value, enter
0
(zero). The sort by value relates to the order that the entry appears in the list. By entering zero, the new department appears near the top of the list, making it easier for testing. Click Save.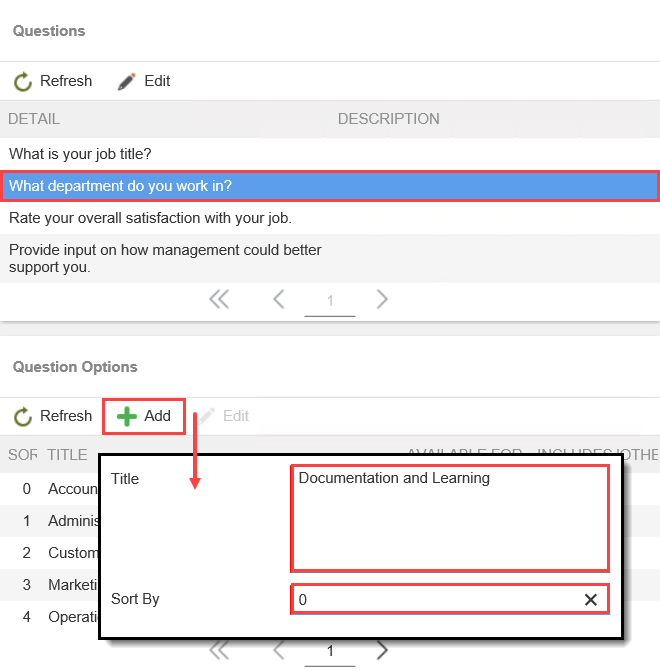
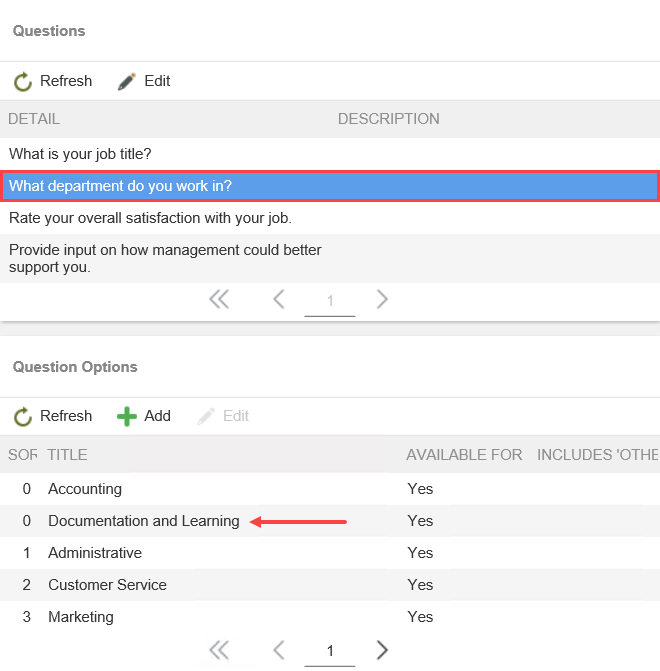
Your survey questions should look like the image below.
- Next, you will edit a question on the Job Satisfaction Survey application. On the landing page, click Administration.
- To test the survey changes, submit a new survey. Use Administrator as the sole survey invitee. Open Administrator's OWA, then launch the survey. Confirm the department value you just added, Documentation and Learning, appears in the drop-down list. Complete the survey questions and submit the survey.
- To test the changes you just made, you will launch another instance of the Job Satisfaction Survey. First, you need to return to the survey landing page. To do this, click the BUILD > All link in the left column. From the ALL APPS screen, select Job Satisfaction Survey, then click Launch.
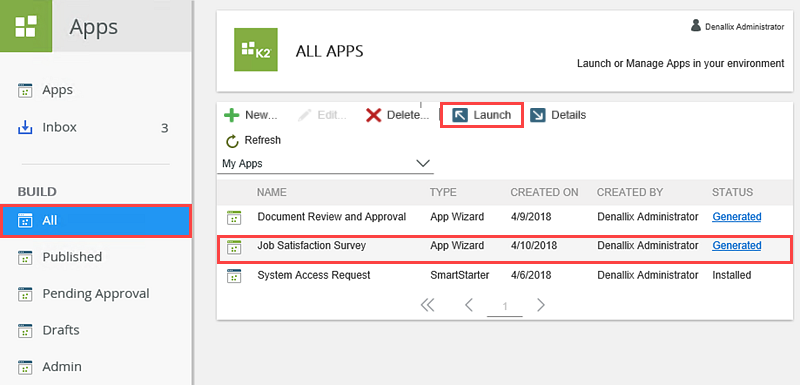
- Click the Submit New Survey button.
- Complete the Title and Description fields with any content you like. Click Invite Users.
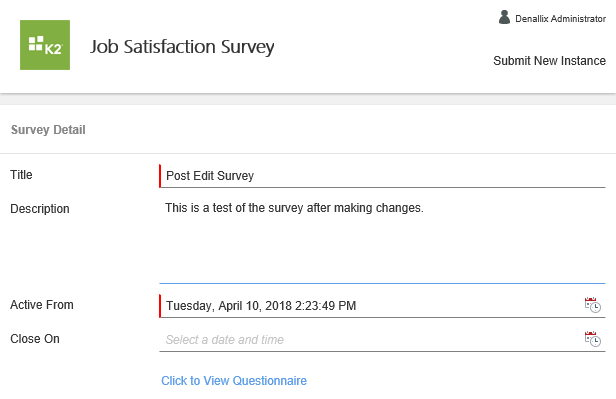
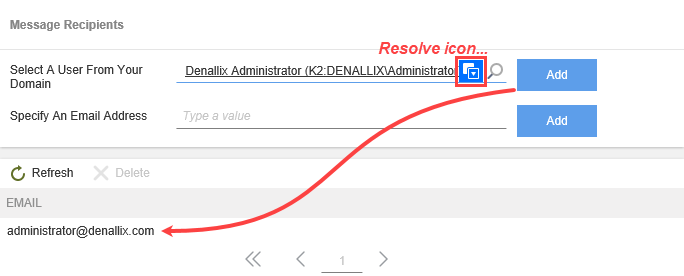
- In the Message Recipients pane, enter your own account for the Select A User From Your Domain value, then click the resolve icon. (Use Administrator for K2-provided VMs.) Click Add. Click Send Notification.
- Open OWA for Administrator. Open a new browser tab, then click the OWA link in the Favorites bar. Enter Administrator's credentials, then click sign in.
Domain\user name: Denallix\Administrator
Password: K2pass!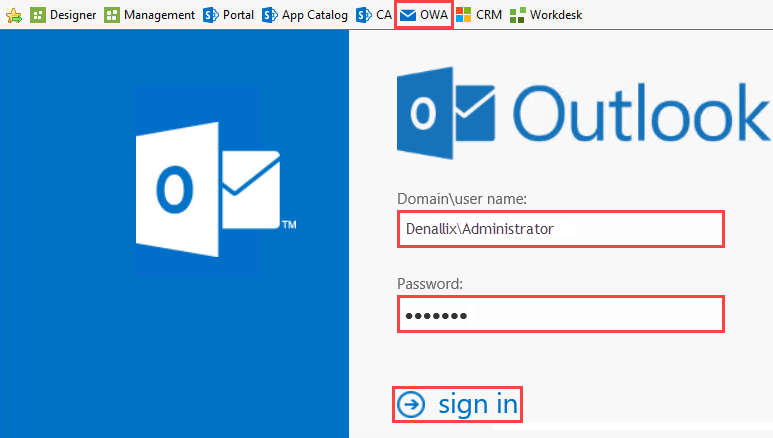
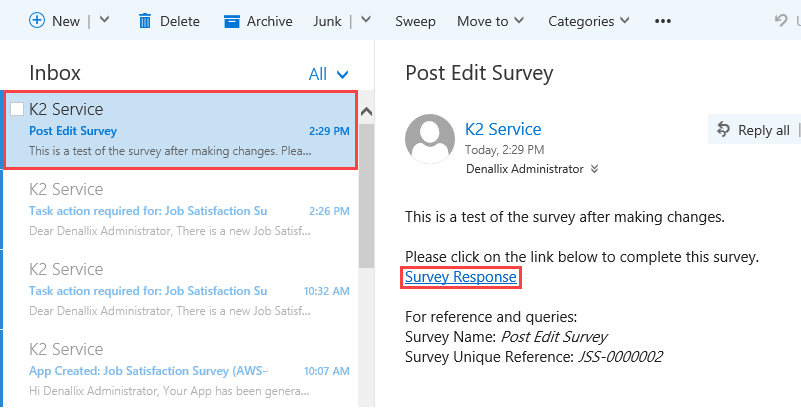
- Find the email with the title you entered. In the sample below, the title is Post Edit Survey. Click the Survey Response link in the email message.
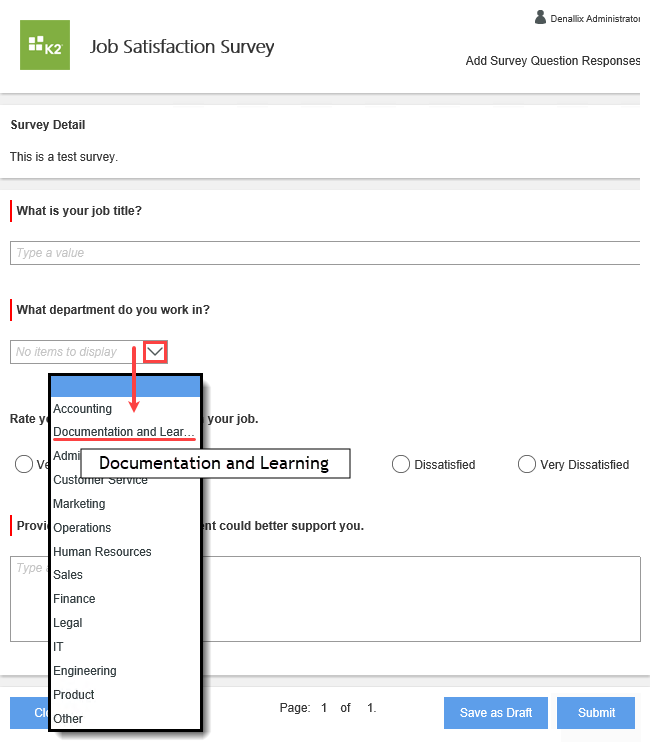
- The survey launches in a new browser window. Expand the drop-down for the question, What department do you work in? and confirm the new department, Documentation and Learning appears on the list.
- Complete the survey with any values you like, then submit the survey to close it out.
- To test the changes you just made, you will launch another instance of the Job Satisfaction Survey. First, you need to return to the survey landing page. To do this, click the BUILD > All link in the left column. From the ALL APPS screen, select Job Satisfaction Survey, then click Launch.
Review
In this tutorial, you created a Job Satisfaction Survey from the Survey application wizard. Each application template type has pre-defined fields and questions that you can further customize through editing. In this case, you customized the survey by removing default questions, editing an existing question, and adding a new question. You explored the Survey Data & Participants report and learned how you can view question and participant results. Finally, you learned how you can administer this application by updating question options.
-
(Optional) In this step, you delete the Job Satisfaction Survey application from your Workspace environment. For example, if you are working in a shared environment where there are multiple builds of the same application, you may want to delete your applications after use to keep the environment neat and tidy.
From the Build > All > All Apps screen, delete the Job Satisfaction Survey application.- In K2 Workspace, click Build > All to open the All Apps screen.
- Select the Job Satisfaction Survey application and click the Delete button. Click OK for the confirmation.
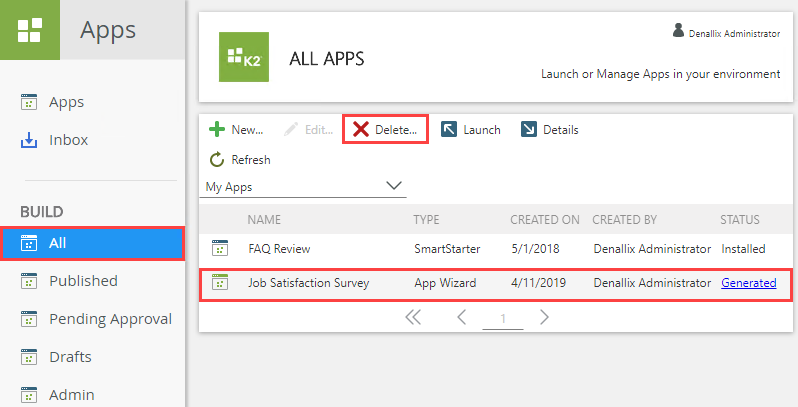
- If the app doesn't immediately disappear, you may see the status change to Pending Delete. Wait a few minutes and click the Refresh button. The application is no longer displayed in the All Apps list.