3. Create Service Instances for External Data Sources; Generate SmartObjects
This application has two external data sources. The first data source (SQL Server database) provides a list of expense claim categories used in a category drop-down list on the expense claim form. The second data source (REST Service) has two functions: the first provides a list of currency codes used for a drop-down list and the second converts the expense claim amount to US dollars. You can enter an expense claim item using another country's currency code and it is automatically converted to US dollars. This is especially helpful when entering travel expenses and eliminates the need to manually convert the amount yourself.
The first step when integrating with external systems such as SQL or REST services, is to create a service instance. The service instance contains the connection configuration such as URL, server name, user name, password, and so forth. In this step, you create a SQL Server service instance and a REST Service, service instance. You also generate a SmartObject from the SQL Service, service instance.
Creating a service instance allows Nintex K2 to discover the objects (such as the properties and methods) that the data source contains. Creating a SmartObject from the service instance allows Nintex K2 to interact with the data source through forms, workflows, and rules.
Service types, service brokers, and service instances are the elements that allow Nintex K2 to interact with other systems, and which form the base layer for SmartObjects. The following is a brief overview of each concept:
- Service Type: A service type is a pointer to a broker file for a specific system or data source. Examples include: SQL Server, SharePoint, CRM, and web services. Each service type has an underlying service broker associated with it.
- Service Broker: A file that contains the logic needed to interact with a specific system. Each service type has its own requirements for interacting with the system. For example, what type of authorization will the system allow? What type of data is contained in the system?
- Service Instance: A service instance is a single connection to a data source, and is based on the service type. The service instance uses the requirements defined by the broker to connect to the target data source. For example, you might have an instance of a SQL Server service type. The instance is specific to a single SQL database. If you have multiple databases, you need multiple instances. From the instances, you can then generate SmartObjects.
SmartObjects: The middle layer that allows interaction between an object (form, view, workflow) and the target data source. For example, you have a form bound to a SQL SmartObject. When you submit the form, the SmartObject creates a new record or it updates an existing record in the SQL table. The SmartObject connects Nintex K2 to the system via the service layer.
- Create a database to connect to.
- For this example, you must create a SQL database called K2Learning. Alternatively, you can use the following SQL script to create the database. Ensure the Service Account has db owner rights to the database.
- The database requires the following:
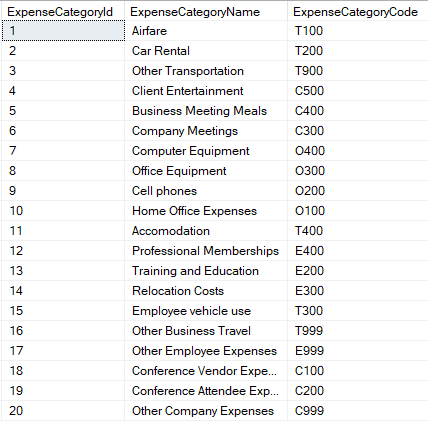
Table Name Table ExpenseCategory Column Name Data Type Column Setting Columns ExpenseCategoryId int (Autonumber) Primary key ExpenseCategoryName nvarchar(50) ExpenseCategoryCode nchar(10) - Create the following entries in the database. If you used the SQL script, these entries already exist but you still have to assign rights to your Service Account.
-
Launch the Management site.
- Launch the Management site.If you are unsure of how to launch the Management site, see Accessing Sites.
- Launch the Management site.
- Configure a new SQL Server Service Instance for the sample database that provides look-up values for expense categories. Use the tables below as a guide to configure the service instance settings. If a setting is not specified, assume the default value.
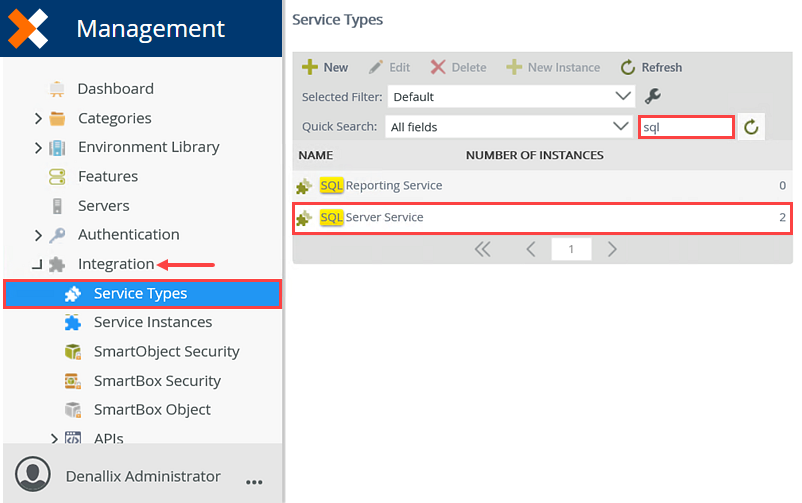
Field Name Setting A Display Name K2 Tutorial Sample SQL Database B Description This is the service instance of the sample database used in the K2 Learning tutorial. Service Type SQL Server Service (default) C Authentication Mode Static D User Name Azure SQL user username (Admin user) E Password Azure SQL user password (Admin user) F On Different SQL Server true G Database K2Learning H Server Your Azure SQL server name I Command Timeout 90 J Use Native SQL Execution false K Generate SmartObjects for this Service Instance UNCHECKED - From the Management menu, expand the Integration node and click Service Types. You see current service types displayed in the central pane. Scroll through the list until you locate SQL Server Service. You can also use the search option instead of scrolling through the pages. (You may see more than one search result returned.)
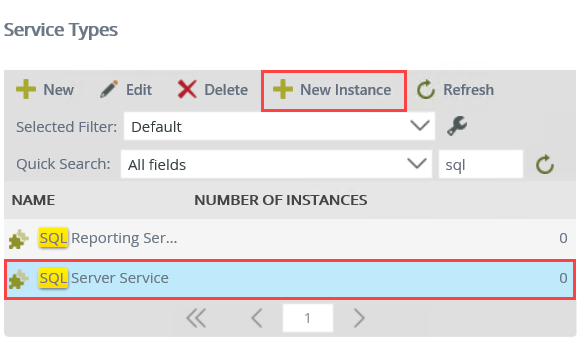
- Select SQL Server Service and click the New Instance button in the toolbar.
- Use the tables below to configure the service instance. There is an image below the table to use as a reference, if needed. If a setting is not indicated in the table, assume the default value. Click OK to create the service instance. Click OK for the confirmation dialog.
Field Name Setting A Display Name K2 Tutorial Sample SQL Database B Description This is the service instance of the sample database used in the K2 Learning tutorial. Service Type SQL Server Service (default) C Authentication Mode Static D User Name Azure SQL user username (Admin user) E Password Azure SQL user password (Admin user) F On Different SQL Server true G Database K2Learning H Server Your Azure SQL server name I Command Timeout 90 J Use Native SQL Execution false K Generate SmartObjects for this Service Instance UNCHECKED 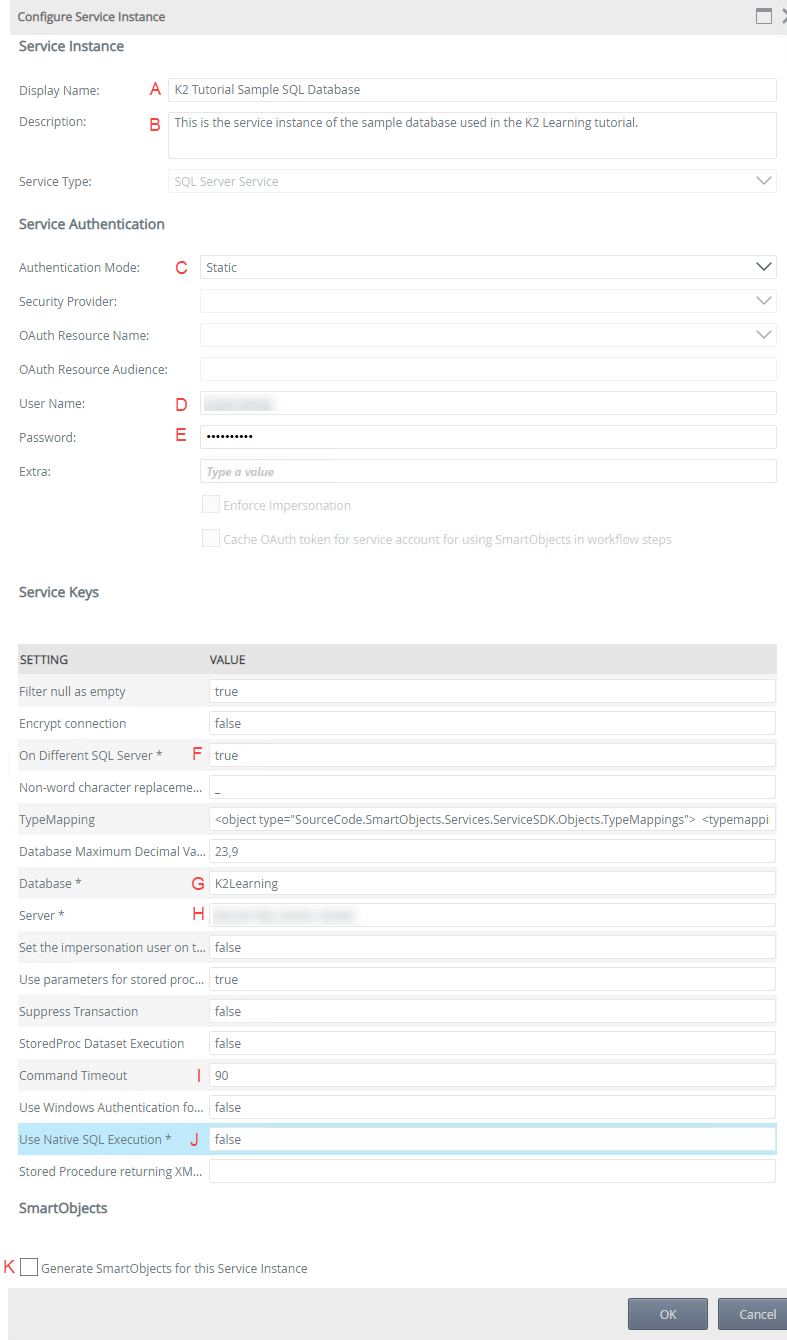
- From the Management menu, expand the Integration node and click Service Types. You see current service types displayed in the central pane. Scroll through the list until you locate SQL Server Service. You can also use the search option instead of scrolling through the pages. (You may see more than one search result returned.)
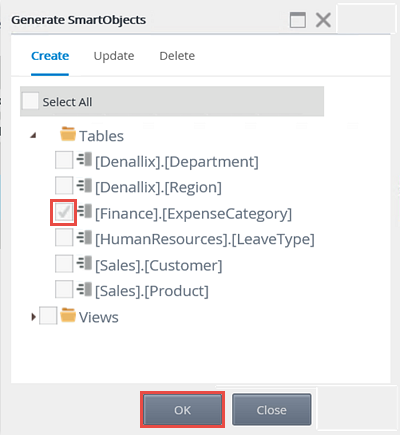
- Generate a SmartObject from the K2 Tutorial Sample SQL Database service instance. Only select the [Finance].[ExpenseCategory] table.
- Next, you create a SmartObject from the K2 Tutorial Sample SQL Database service instance. Creating a SmartObject exposes the properties and methods discovered in the data source and makes them available for use in views, forms, and workflows. This particular SmartObject provides the look-up values for the expense claim categories drop-down list.
In the Management site, expand the Integration node (if it isn't already) and click Service Instances. Navigate to (or search for) the K2 Tutorial Sample SQL Database service instance. Select the service instance and click the Generate SmartObjects button in the toolbar.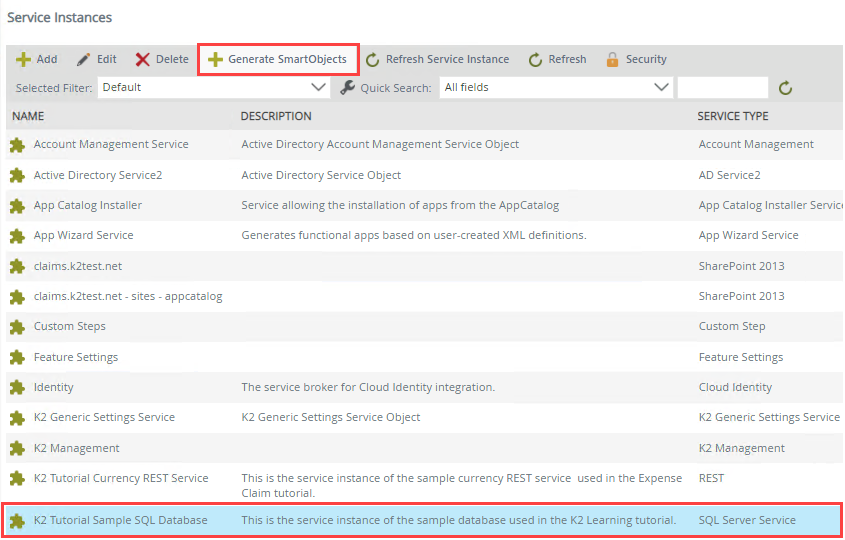
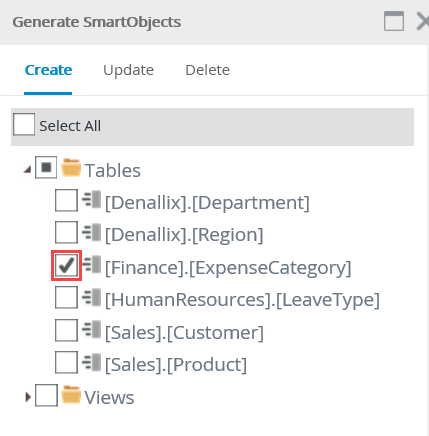
- On the Generate SmartObjects screen, expand the Tables node. (If the Tables and/or Views nodes are already checked, uncheck them first. You don't need to create SmartObjects from all the tables and views; you only select a single table for the SmartObject.) CHECK the [Finance].[ExpenseCategory] table and click OK.
- Next, you create a SmartObject from the K2 Tutorial Sample SQL Database service instance. Creating a SmartObject exposes the properties and methods discovered in the data source and makes them available for use in views, forms, and workflows. This particular SmartObject provides the look-up values for the expense claim categories drop-down list.
-
From the Management site, execute the new SmartObject's list method and confirm expense category results are returned.
- Next, you test the SmartObject to confirm the connection settings from the service instance is valid.
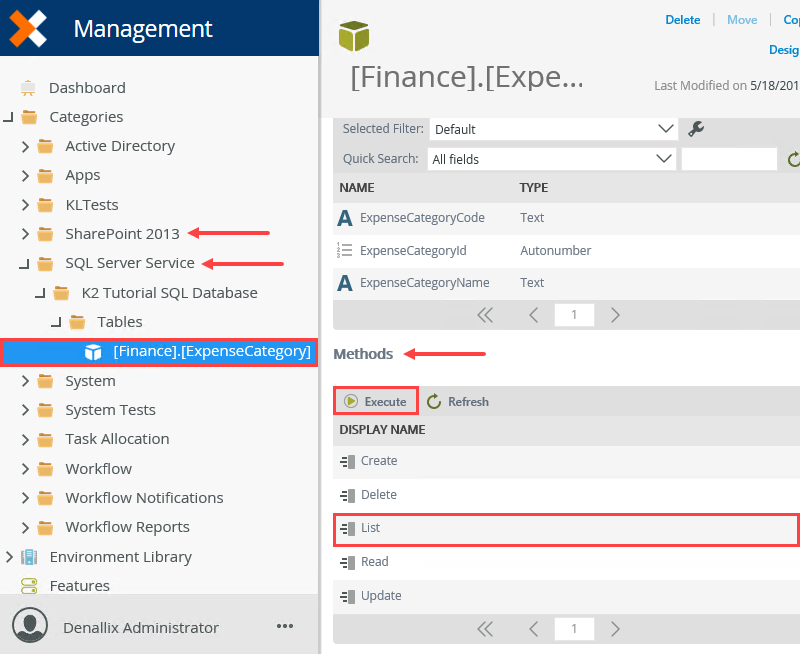
From the Management menu, expand the Categories node. Expand the SQL Server Service > K2 Tutorial SQL Database > Tables nodes. Select the [Finance].[ExpenseCategory] SmartObject. The SmartObject details, properties, and methods open in the central pane. Scroll down to the Methods section. Select the List method and click Execute. - Click the Execute button in the lower right corner of the screen. You see results displayed the same screen, which confirm the connection. This data source provides the drop-down list values for the expense categories. Click Done to close the screen.
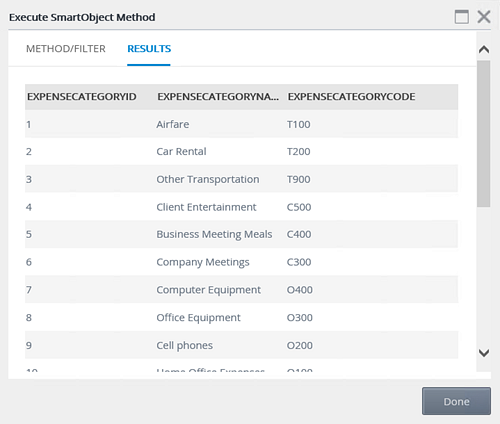
The Execute SmartObject Method screen opens. Here, you can apply filters before executing the method. In some cases, such as read methods, you must provide input parameters before executing the method. For this test, you just want to confirm the connection, so you don't need any filters.
- Next, you test the SmartObject to confirm the connection settings from the service instance is valid.
-
Create a second service instance using the REST service type. Use the table below as a guide for the service instance configuration.
This service provides two methods. The first method returns a list of currency codes (such as GBP, USD) for you to select when entering your expense claim line item. The second method performs a calculation that converts an amount entered to US Dollars. For example, if you enter a line item amount and select GBP as the currency code, the second method converts the amount and outputs it as USD.In a shared environment, you only need to create the service instance once. If the service instance already exists and you want to create your own, use a unique identifier of some kind. One example might be to add your initials to the service instance name.This REST service is for tutorial purposes only. Do not use this REST service for production implementations. Contact a member of your IT support team for help, if necessary.
Field Value Notes Service Instance A. Display Name K2 Tutorial Currency REST Service If you are working in a shared environment, include your initials in the display name to make the name unique and easily identifiable to you. B. Description This is the service instance of the sample currency REST service used in the Expense Claim tutorial. C. Service Type REST Service Authentication D. Authentication Mode Impersonate The Authentication Mode of the service instance should be set according to the authentication required by the endpoint. For example, if the endpoint supports static authentication then select the static authentication mode and provide a username and password. Service Keys
There is only one service key value to set in this step (Descriptor Location).E. Descriptor Location https://k2learning.azurewebsites.net/api/swagger.json This is the location of the descriptor file. This must be a URL. The Authentication Mode used for the service instance is also used to access the Descriptor Location JSON file when that file is a URL. This file must be available at this location when the service instance is refreshed. Paths in the Swagger file must be unencoded. For more information about getting a Swagger file, see Resources for working with the REST Service Broker. - Next, you add another service instance that points to a REST service used for currency conversion.
Open a new browser window and verify you can connect to the following REST service:
https://k2learning.azurewebsites.net/api/swagger/ui#/
You should see a screen similar to the image below. This verifies that your firewall configuration is sufficient for connecting to this REST service.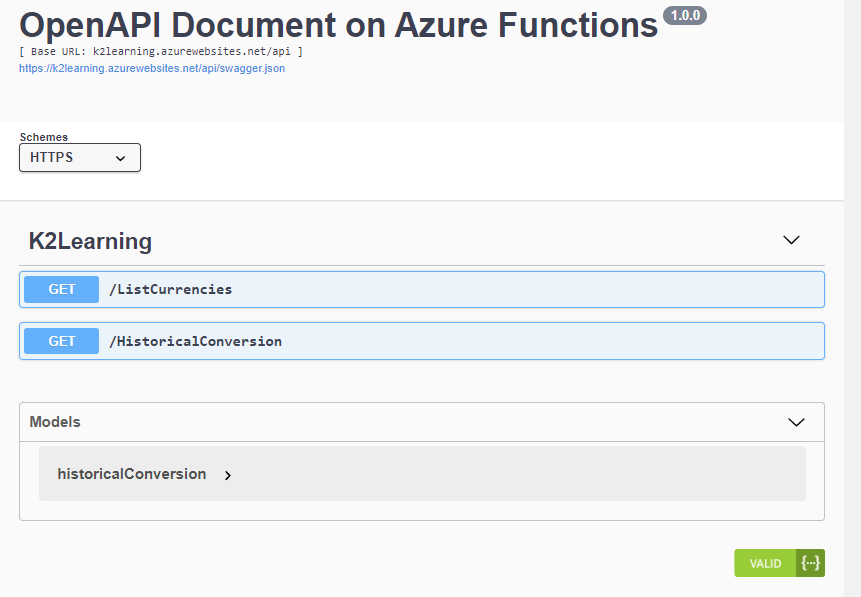
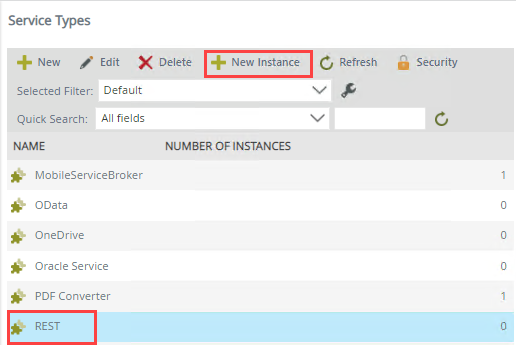
- Returning to the Management site, expand the Integration node and click Service Types. Scroll down to (or search for) the REST service type. Select REST and click the New Instance button in the toolbar.
- Use the table below to configure the service instance. There is an image below the table to use as a reference, if needed. If a setting is not indicated in the table, assume the default value. Click OK to create the service instance. Click OK for the confirmation dialog.
Field Value Notes Service Instance A. Display Name K2 Tutorial Currency REST Service If you are working in a shared environment, include your initials in the display name to make the name unique and easily identifiable to you. B. Description This is the service instance of the sample currency REST service used in the Expense Claim tutorial. C. Service Type REST Service Authentication D. Authentication Mode Impersonate The Authentication Mode of the service instance should be set according to the authentication required by the endpoint. For example, if the endpoint supports static authentication then select the static authentication mode and provide a username and password. Service Keys
There is only one service key value to set in this step (Descriptor Location).E. Descriptor Location https://k2learning.azurewebsites.net/api/swagger.json This is the location of the descriptor file. This must be a URL. The Authentication Mode used for the service instance is also used to access the Descriptor Location JSON file when that file is a URL. This file must be available at this location when the service instance is refreshed. Paths in the Swagger file must be unencoded. For more information about getting a Swagger file, see Resources for working with the REST Service Broker. F. Generate SmartObjects for this Service Instance UNCHECKED You will manually create a SmartObject in a later step. 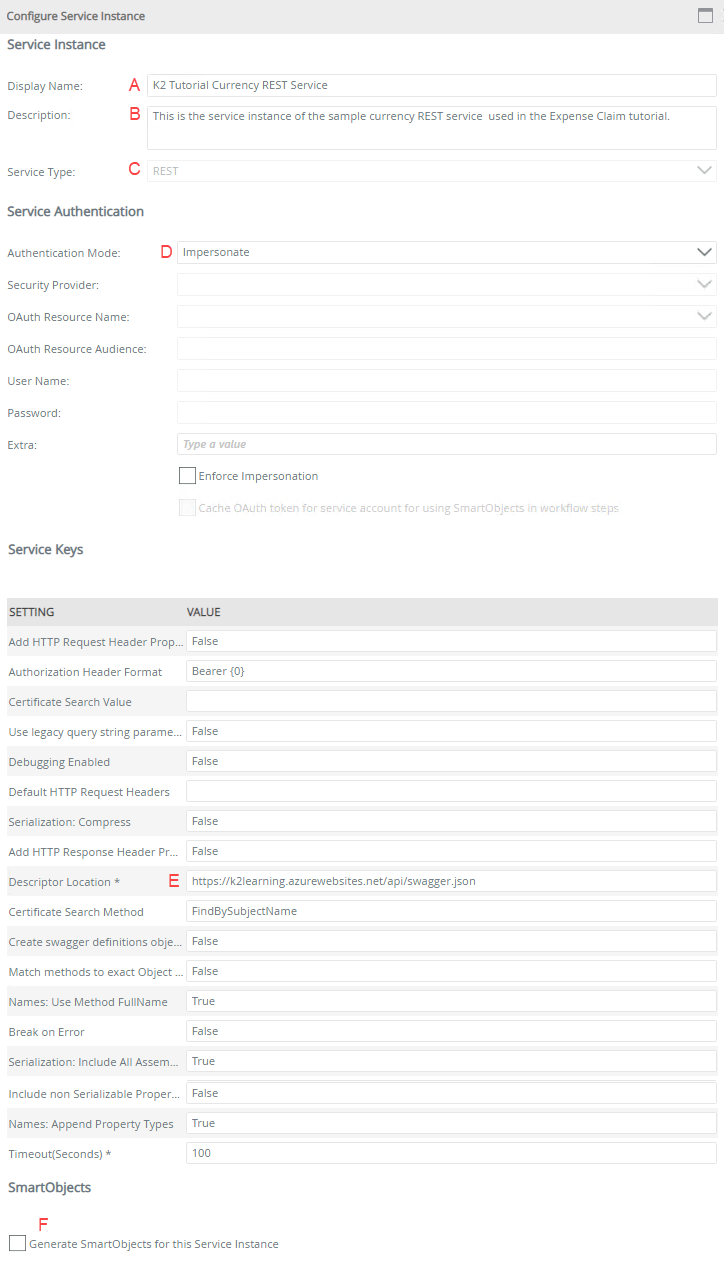
- Still in the Integration node, click Service Instances. Confirm you can see both new service instances: K2 Tutorial Currency REST Service and K2 Tutorial Sample SQL Database. Your external data connections are ready for use!

- Next, you add another service instance that points to a REST service used for currency conversion.
Review
In this step, you created two service instances for external data sources. The first data source is a SQL database and the second data source is a web service. The SQL data source provides the drop-down list values for expense categories. The web service provides values for currency conversion and currency listings. You generated a SmartObject from the SQL Server service instance, selecting the single expense category table. For the currency SmartObject, you will create a new SmartObject from scratch using the Designer. In the next step, you generate application elements from the Expense Claim list.